
Today I’m gonna share a Soft Ripple step-by-step pattern that perfectly fits my soft handle cotton yarn. Ripple is an easy breezy crochet work which creates magic. It’s a delicious DIY pattern that supplies hours of colourful joy. Lets dive in.
THE STORY
Earlier this week I had a reserved workshop for a few nice ladies. They come to my workshops every once in a while but as they are all friends and meet to knit and crochet together on their routine life, they have asked me for a special date to be reserved only for them as a group. It was very exciting as this group of ladies are all very creative. They do few kinds of crafts, they write, some do lectures etc.. Usually I text or call the workshop participants few days before the workshop in order to discuss what would they like to crochet in our meeting. I usually prepare each of the participants a printed pattern according to what was discussed in this conversation. The first lady I called told me that she is only waiting to be sat around the table and she would be very happy to continue with her own Granny squares project. She feels she just need the spirit of my colourful workshop space. ‘OK’ I said (very excited but I tried not to show).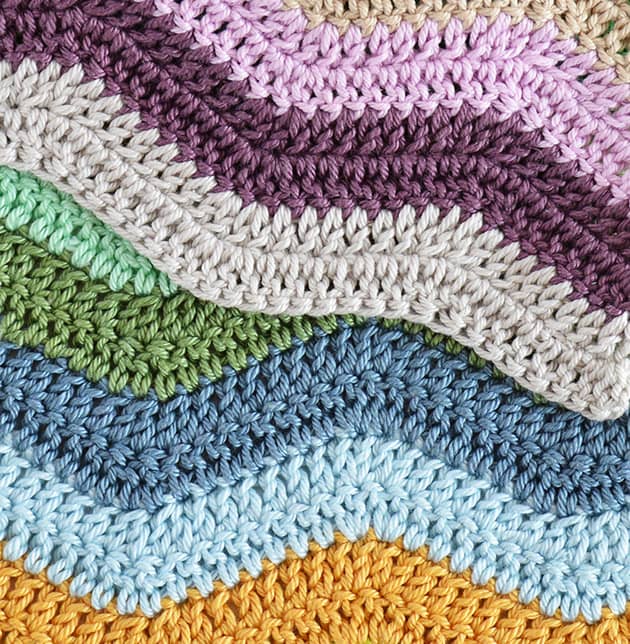 When I talked to the others, most of them said sort of the same. Thanks god it was a phone conversation, so they didn’t see me blushing.. I felt like all they need is actually a ‘crochet spa day’ like. A colour therapy session. In any case, two of them told me: “I would like to start making a baby blanket and I want it to be a very simple and easy going but colourful crochet project and I prefer that you choose the patterns for me”. OK (I said in my heart again). So I thought and I thought and…. I thought a little more and finally came out with a decision that a Ripple might be a bingo here.
  If you search the web for ripple patterns, you will find out that there are TONES of Ripple free patters out there. But no matter which one I tried I felt changes are needed, so it fits well with the cotton yarns that I love, and the quality I want to have. So eventually, I wrote a Soft Ripple pattern to be made on this reserved workshop. The Soft Ripple pattern became a success in the reserved workshop as few other ladies were also making it during the workshop. I thought you might also like to try it.
 The Soft Ripple pattern I share here today is very similar to many other Ripple patterns out there and there is nothing new that I invented here. However, I made it to fit my Granny Kit cotton soft handle yarn and I made it to fit my own OCD yarn-y/ texture/ layout/ stitch-y. I wrote it here as honestly, I just enjoy writing and taking photos of a step by step patterns. I hope you’ll feel it while scrolling through.
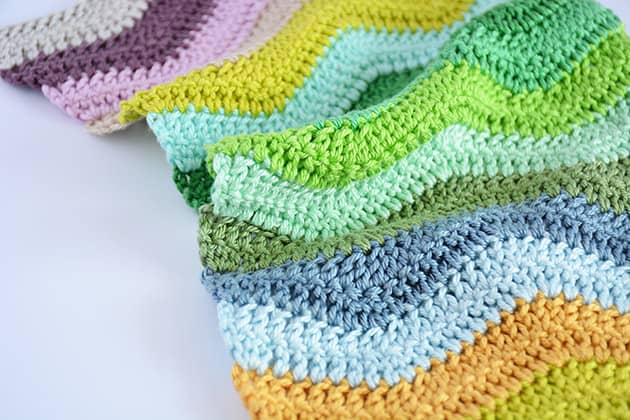 So, are you ready to dive into this wavy pattern now? Let me give you some important information about it first.
LEVEL
Ripple is one of the basics projects to crochet. I wrote here a step-by-step pattern, followed by close up pictures to show each step along the way. It will be very easy for you if you are familiar with crochet sts. If this is your first crochet project, you might need to go to YouTube and look for some “how-to” for the relevant sts.
WHAT DO YOU NEED
Yarn: GrannyKit cotton in any colour combination you like OR the Soft Ripple colour combo.
Crochet hook: 2.75 mm
A pair of crafty scissors
Tapestry needle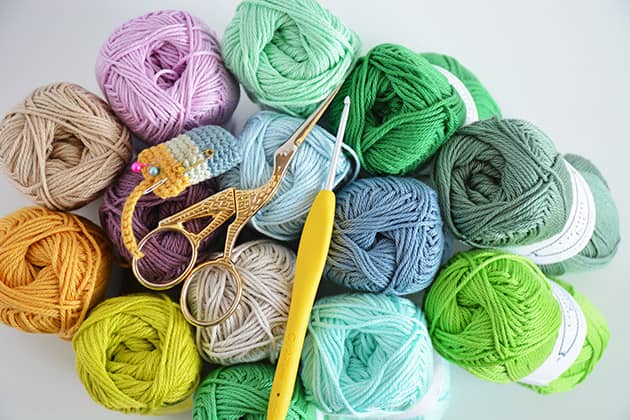 ABREVIATIONS AND STITCHES (US crochet terms)
ch = chain stitch
st(s) = stitch(s)
yo = yarn over
dc = double crochet = yo, insert hook, yo, pull the lp back through the st (3 lps on hook), yo and pull through 2 lps on hook (2 lps left on hook), yo and pull through remaining 2 lps.
dc2tog = double crochet 2 stitches together = yo, insert hook through the st, yo, hook back through st (3 lps on hook), yo and pull through 2 lps (2 lps on hook). yo and insert hook through next st. yo, hook back through st (4 ps on hook), yo and pull through 2 lps (3 lps left on hook). yo and pull through all 3 lps together.
REPEAT INFORMATION
You should start your work with a foundation ch in multiples of 18 + 3. I strongly recommend that you start by crocheting a sample. It’ll give you an idea of how the pattern works. I will share my pattern here by creating a sample of 2 times the repeat plus 3 for the turning. The sample I share here today is made out of 2 repeats. the Width of 2 repeats is approx: 15.5 cm’ = 6″.
If you do 10 times the repeat you have to ch 183 on your foundation ch – It’ll make a 75 cm’ width blanket. Each colour stripe will take acout 12.5 gr’ of cotton. 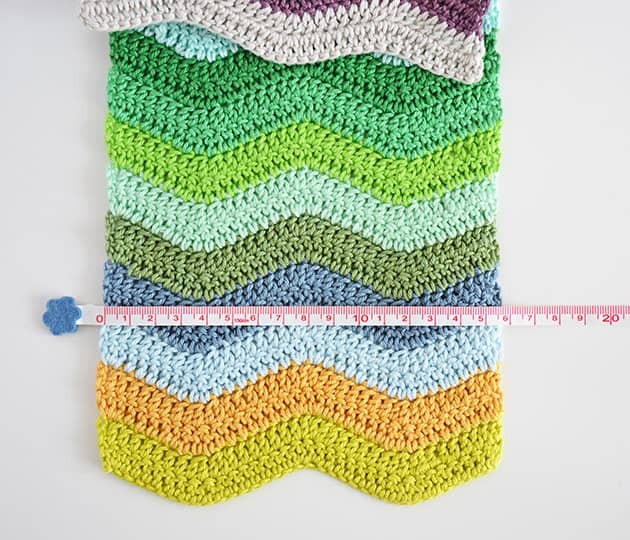 To Start a sample, ch 39 (which is 18×2+3). I start my sample with colour Citron.
Row 1:
dc into the 4th ch from hook, where I show on below pic, with my sewing pin.  It’ll look like below picture after you made your first dc.
 Make 1 dc into each of the next 6 ch sts. Now make a dc2tog using the next 2 sts, those I’m showing on below picture.
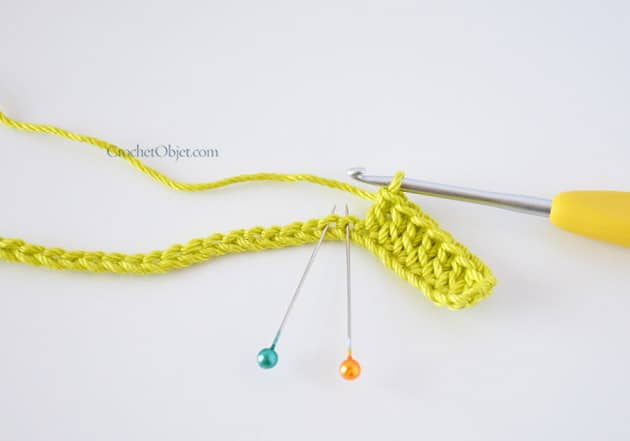 Now make one more dc2tog from the next 2 sts – we created the lower point of the ripple pattern.
 Now make 1 dc in each of the next 6 ch sts.
  *Make 2 dc’s into each of the next 2 sts – we created the higher point of the ripple.
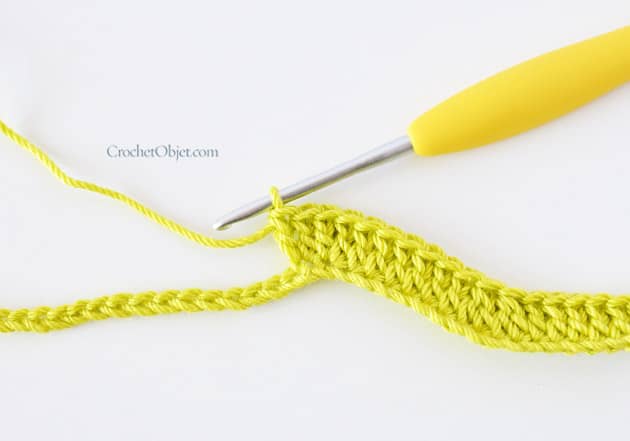 Make 1 dc in each of the next 6 sts.
  Now make dc2tog – twice.
Make 1 dc in each of the next 6 sts*
repeat between ** till you reach the last st in the row. For this sample we have now reached our last st.
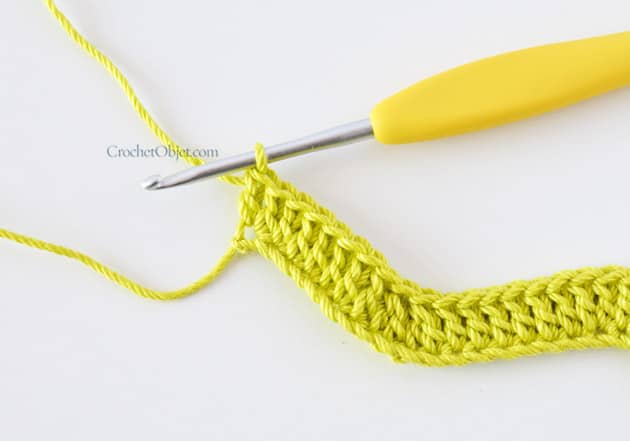
Make 2dc into the last st, where I show with my sewing pin on below picture. 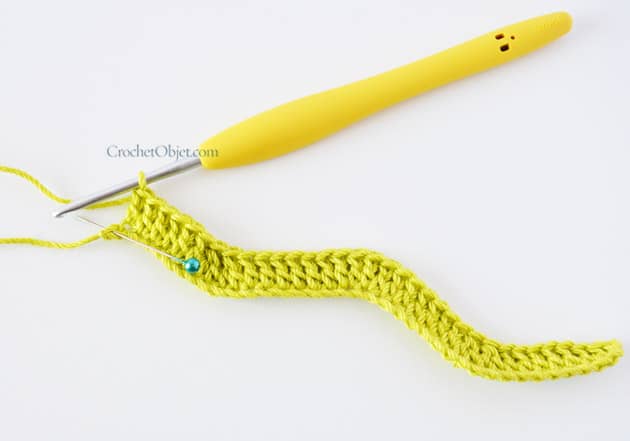 Our first row is done and we can easily see now the Ripple shape starting to show. It will be much clearer after we finish the next row.
 Row 2:
ch 2 and turn your work. Now make 1 dc into the st at the bottom of your ch 2 – where I show with my sewing pin on below picture.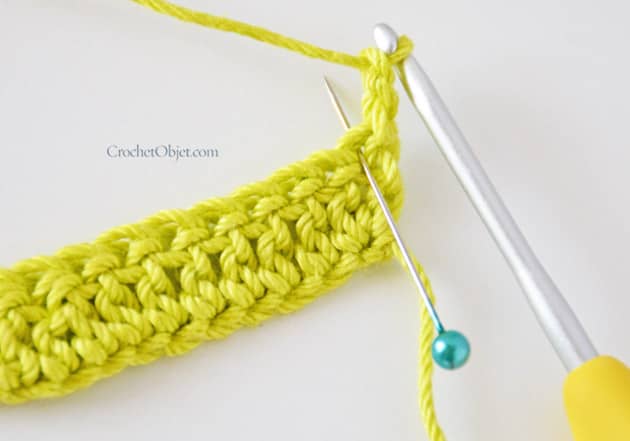 dc into each of the next 6 ch sts.
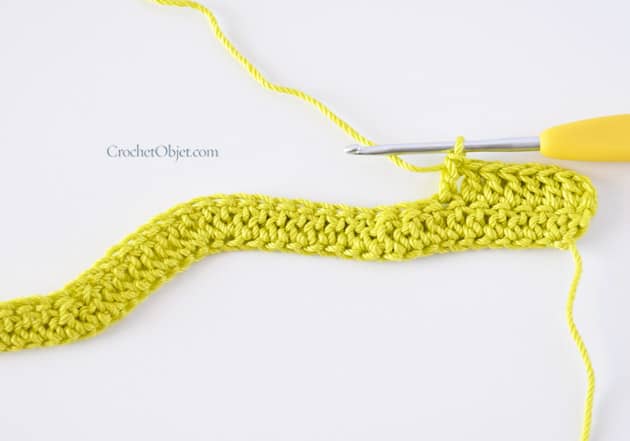 dc2tog – use those sts I show on below picture to create the dc2tog.
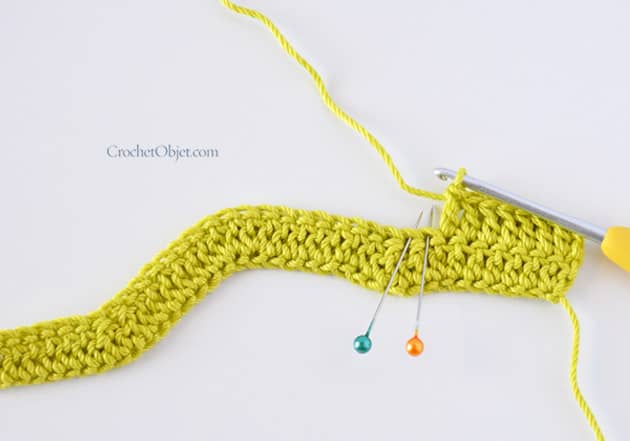 Now make 1 more dc2tog, from the next 2 sts – these dc2tog x2 that we just made are creating the lowest point of our ripple.
 make 1 dc in each of the next 6 ch sts.
*Make 2 dc’s into each of the next 2 sts – those I show on below picture. Make 1 dc in each of the next 6 sts.
make dc2tog – twice, you can see these dc2tog x2 on below picture – our lower point again. dc in each of the next 6 sts*
repeat between ** till you reach the last st in the row. For this sample you’ll reach the last st now. Make 2dc’s into the 3rd ch of the ch3 below you, from previous row – insert your hook where I show with my sewing pin on below picture. You’ll have to turn the ch in order to see where to insert your hook.  When you make the second dc, please finish it with the next colour on your hook – make the last part of the second dc with the next colour. In this way you are ready for the next row with the next colour already on your hook., You can see my new colour is Spicy. You can cut the first yarn now leaving about 15-2- cm yarn tail.
  Row 3:
ch 3 and turn your work. Now make 1 dc into the st at the bottom of your ch 3 – where I show with my sewing pin on bellow picture. Make sure you insert your hook through both loops of the st – see 2nd below picture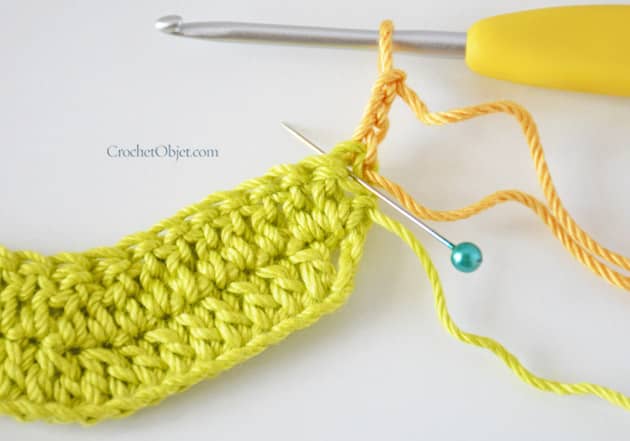
 dc into each of the next 6 ch sts. Now make 2 dc2tog one after the other. Try to work on your yarn tails so you don’t have to weave them in later.
 make 1 dc in each of the next 6 ch sts.
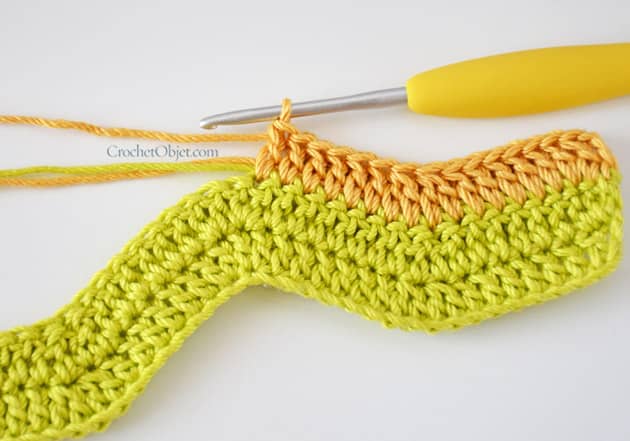 Continue working this row as follow: *Make 2 dc’s into each of the next 2 sts, dc in each of the next 6 sts, dc2tog, dc2tog, dc in each of the next 6 sts* repeat between ** till you reach the last st in the row. In this sample you have already reached the last st after 1 repeat. To finish the row make 2dc’s into the 2nd ch of the ch2 below you – where I show with my sewing pin. You’ll have to turn the ch in order to see it clearly.
 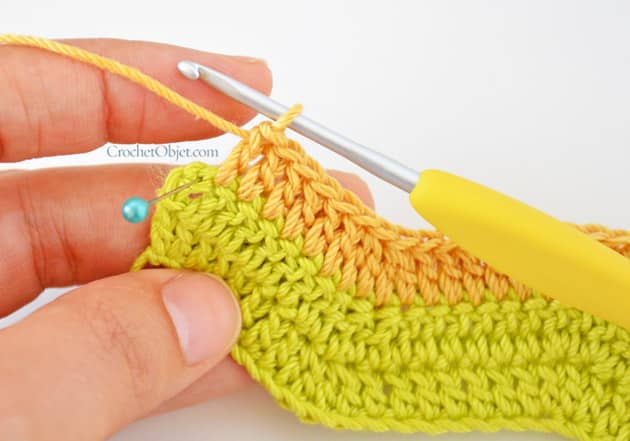 Now ch2 and repeat row 2 till the end of the row. Start with a dc into the same st as your ch2.
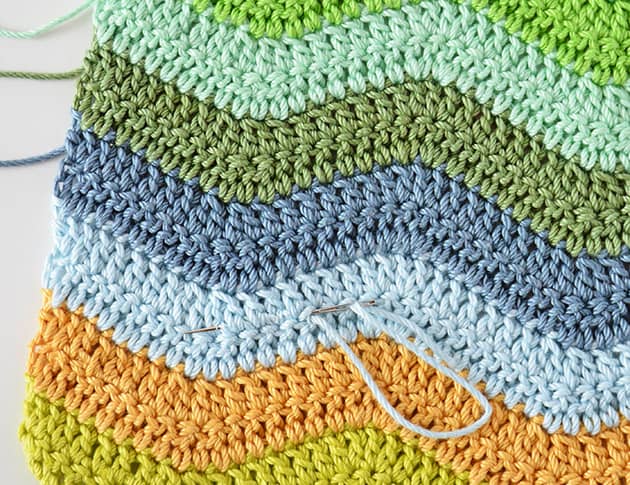
 When you reach the end of the row remember to change colour on the last part of your last dc, like I show with colour Alice on the below picture.
  Repeat rows 2, 3 , until you reach the desired length and your ripple will rock… as ripple is magic true magic.
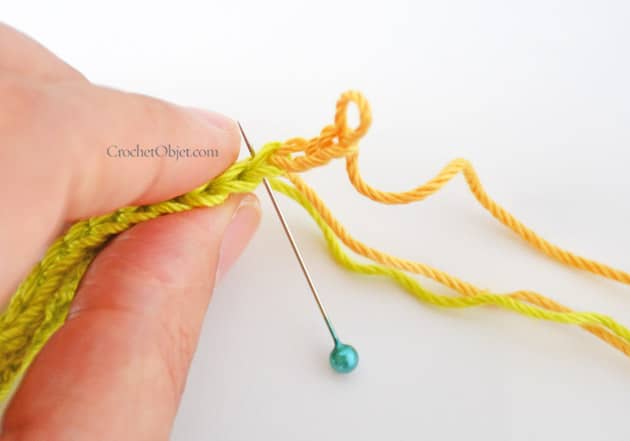
 I strongly recommend that you leave about 15-20 cm yarn tail of each colour and stop every 3-5 stripes to weave it in the yarn tails. Use a tapestry needle and hide each yarn tail into the stripe from the same colour. I usually hide it through the stitches in one direction and then make a U turn and hide it through the stitches into the other direction. It is not a fun work to do but that is why I recommend to stop and do it every 3-5 stripes.
 These are the colours I used to make a sample for my workshop girls, which I also shared on my IG the other day. My workshop girls liked it and wanted to use this colour combination so I made a kit of 14 colours for you if you like to use it for your Soft Ripple project as well. 14 Granny Kit cotton balls can make a nice 100 x 100 cm blanket or 2 stripy cushions. So if you liked this colour combination you can now find it here.
 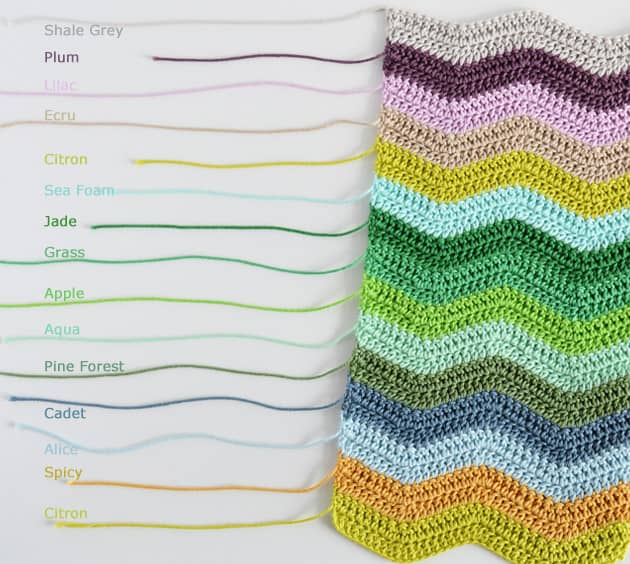 Well this is it, a very simple and easy going soft ripple pattern. Are you going to give it a go? Hope you will cause this Soft Ripple will provide you with hours of colourful happiness. If this pattern is on your hook and you have an IG account please share your work with #crochetobjet or #softripple
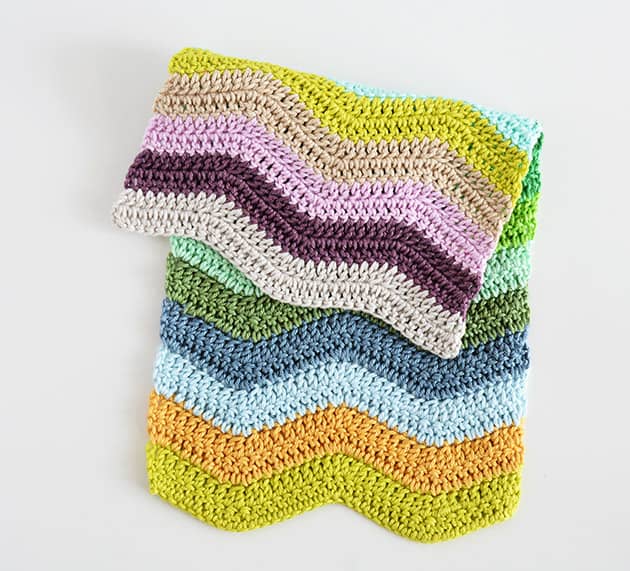 Here is a short instruction with ‘just words’ and no pictures, so you can copy and print to yourself if you like:
To Start make a foundation ch in multiples of 18 plus 3 for the turning.
Row 1:
dc into the 4th ch from hook.
dc into each of the next 6 ch sts.
dc2tog
dc2tog
make 1 dc in each of the next 6 ch sts.
*Make 2 dc’s into each of the next 2 sts.
Make 1 dc in each of the next 6 sts.
dc2tog
dc2tog
dc in each of the next 6 sts*
repeat between ** till you reach the last st in the row.
Make 2dc into the last st.
Row 2:
ch 2 and turn.
dc in same st as your ch 2
dc into each of the next 6 sts.
dc2tog
dc2tog
make 1 dc in each of the next 6 sts.
*Make 2 dc’s into each of the next 2 sts.
dc in each of the next 6 sts.
dc2tog
dc2tog
dc in each of the next 6 sts*
repeat between ** till you reach the last st in the row.
Make 2dc into the 3rd ch of the ch 3 below you.
Finish the second dc with the next colour on your hook
Row 3:
ch 3 and turn.
dc in same st.
dc in each of the next 6 sts.
dc2tog
dc2tog
make 1 dc in each of the next 6 sts.
*Make 2 dc’s into each of the next 2 sts.
dc in each of the next 6 sts.
dc2tog
dc2tog
dc in each of the next 6 sts*
repeat between ** till you reach the last st in the row.
Make 2dc into the 2nd ch of the ch2 below you.Repeat rows 2, 3 , until you reach the desired length and your ripple will rock on.
Happy colourful crochetime, xoxMo
35 comments on Soft Ripple Pattern
Sandra Favre-Byles
I adore the soft ripple pattern and you’ve explained it so beautifully here. Thank you! I especially love it in the aqua and blue tones in your fourth photo!
Mo Malron (author)
Thank you Sandra, so happy to read your comment
Paula Evans
Mo, I am currently working on a baby ripple blanket but .I like yours so much more! I may have to make two! Thank you for sharing. I loved reading your post.
Mo Malron (author)
Thank you so much Paula.
Making 2 sounds perfect to me 🙂
Andrea
Me encanto el diseño …muchas gracias por tu explicacion y generosidad…besos
Mo Malron (author)
Thank you Andrea
Winifred
That is a lovely pattern such soft colours.
Wish I lived near enough to join a workshop.
Mo Malron (author)
Thank you Winifred, I wish you join us here.
Jo
Love how you have “softened” the traditional Ripple afghan, Mo. Your pattern (and yarn) is so lovely! I enjoyed reading about your workshop “Crochet Spa Day” for the ladies. How fun it must be to visit with you in your colorful shop!
Mo Malron (author)
Thank you so much Jo, how nice to read your lovely comment. I’m so happy you liked the ‘soften’ ripple version.
Dana
Mo you have outdone yourself as always! This is so simple and so wonderful! Love this.
Mo Malron (author)
Thank you Dana, this is such a great feeling to know people like you appreciate my work, it gives a great feeling
Michelle
Those are some very smart ladies you have there . . . . a ‘crochet spa day’ sounds wonderful! And a spa day with you and all of your beautiful Granny Kit cotton colors would be the perfect way to spend it. This ripple is beautiful!
I have a question for you: I would love to crochet a valence with your Granny Kit white for my kitchen window which is 46 inches wide (which if I converted correctly would be a little less than 117 cm). Would you be able to point me to a nice pattern that would work well with your Granny Kit cotton?
Thank you so very much with this lovely visit with you through your blog. I always enjoy each and every one. Hugs to you, Mo. XO
Mo Malron (author)
Thank you Michelle for you comment and for your warm words. There are tones of options on Pinterest and I’m sure you’ll be able to find one that fits your needs. XO
Ash
Love your soft ripple! Its always nice to put your own spin on classic patterns like this… I love your colours too! Can’t wait till I have an opportunity to use this lovely yarn 😊
Mo Malron (author)
Loved the way you said ‘put your own spin on classic patterns’ Thank you Ash
Meryl Brockway
Hi Mo, Thanks for sharing your lovely pattern. I am going to save this to make a baby blanket in soft colours for my daughter when she is having a baby . Hope it won’t be long as I can’t wait to try this out. Have a lovely summer,there’s nothing nicer than crocheting in the garden!
Meryl x
gloria g. Walls
Yes, this is just too precious…..I love it………great directions. I too wish I lived there or you lived here…..I think a class would be in order for us……….looks like you are a great teacher…..
happy in quilting and crocheting, gloria g. Wellborn, FL
Mo Malron (author)
Thank you Gloria, wish you could join us here and have a crochet morning with us. Maybe one day if you come to visit…
Charlene Brown
I am always excited when you put some new creation out! I must make this.
Sharon
Mo,
In the 4th picture from the top, someone is making the ” Soft Ripple ” in several blue colors. Can you give me the names of the colors?
THANKS SO MUCH,
SHARON
Mo Malron (author)
Hi Sharon it’s here:
https://www.etsy.com/listing/523166904/14-balls-100-mercerised-cotton-yarn?ref=shop_home_active_4
Sharon
Hi Mo,
Thank you for responding! While I absolutely love the colors you combined, I am thinking of trying it in the three blue colors in the 4th picture from the top ( on the right side of the picture) What are the names of those 3 blue colors? Thanks again. I admire all of your work and look forward to seeing more afghans!
Sharon
Mo Malron (author)
The 3 blue coliurs are: SeaFoam, Royal and PaleBlue. The Seafoam is a little lighter than what it looks on this picture.
Sharon
Thank so much, Mo!
Kathy
Hi Mo,
Thanks for sharing your wonderful pattern and pictures, I can’t wait to start a baby Afghan. Do you know how many stitches I would need in my starting chain, to make my baby Afghan 30×30?
Thanks,
Kathy 😊
Mo Malron (author)
Hi Kathy, Thank you so much for enjoying it. I really recommend that you make a sample before you start the real blanket. As written in the post:
To Start a sample, ch 39 (which is 18×2+3). Keep your foundation ch in multiples of 18 and at the end add 3 more ch sts. Happy Hooking
Kathy
Thank you ☺️
Sandra Smith
Wow, thank you so much for giving the best illustrations I have ever seen. I feel I could easily follow your instructions and start my baby blanket after searching so many others for an easy to follow pattern. I especially liked how you demonstrated through pictures and words the beginning and ending of the rows, I never seem to get mine straight. Again, best I have seen, you must be a great teacher.
Gloria
Thank you so much for taking the time to make these instructions so explicit, especially with the pins and all the photos. I am a beginner and with your instructions to follow I have the confidence to make this baby blanket for a gift.
MRS LYNETTE A ANEAR
Thank you so much for sharing this pattern, I have been able to make a lovely blanket for my bed
Elizabeth McLeod
What other hook could u use other than 2.75 which is a b. I don’t go that small.
Mo Malron (author)
Hi, you can work with 3 or 3.25 mm hook, it’ll work perfectly fine. `or if you use a different type of yarn make sure to use the hook size it calls for. Happy making!
Ronda DiCicco
This is an excellent blog tutorial! I totally agree with the other comments. Your pictures and explanations are fabulous. Thank you!
Martha Hutson
I’m looking for a ripple afghan that has 14 stitches point to point in crochet. I basically need the staring chain count and first row to do it again. I made one a long time ago and lost the pattern. Hope you can help. Thanks.