 What is the magic that crochet squares carry? Is it all about the combination of shapes and colours? Is it in the meditative rhythm of the crochet stitches? Is it the cheerful pile that grows in our project bags that makes our hearts sing? It might be all of them together plus a few more to add, don’t you think so? Today ‘s free crochet pattern pattern is a very special Granny Square I created for my Love Garden Blanket. This blanket is made of 63 Love Garden squares. There is so much to say about this crochet blanket’s journey. I made with my mom, in her last weeks. It is all about the daughter-mother love and you’ll feel it in every stitch you’ll make. Read the story of this special journey here. These squares are so cheerful and will provide you with so many happy moments. I am so excited to be here today, sharing this special square pattern, giving you the opportunity to start your own Love Garden project. Learning how to crochet Love Garden Square is the first step in such a blissful journey. It might look a little complicated but it’s very simple to make. I do believe there are so many beautiful Flower squares patterns that you might know but here is my Love Garden Square pattern as made for my Love Garden Blanket.
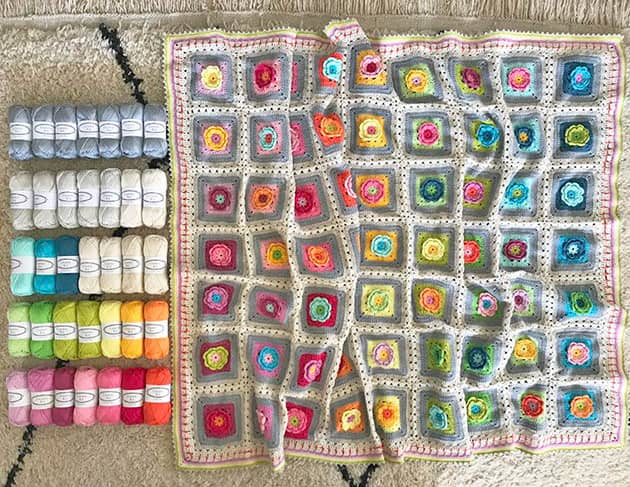 WHAT DO YOU NEED
The Love Garden Yarn Pack (or any other yarn you wish to work with).
Flower Sq. pattern.
The PDF file with Squares colour list. Download here – LoveGardenCoList
Crochet hook – 3 mm
Crafty scissors & A tapestry needle to weave in ends.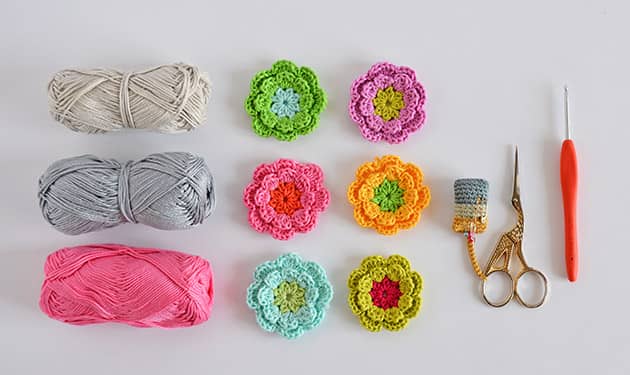 ABREVIATIONS AND STITCHES (US crochet terms)
ch = chain stitch
st(s) = stitch(s)
rnd(s) = round(s)
lp(s) = loop(s)
ch sp = chain space
sl st = slip stitch = insert hook, yo, pull the lp back through the st and through the lp on your hook.
dc = double crochet = yo, insert hook, yo, pull the lp back through the st (3 lps on hook), yo and pull through 2 lps on hook (2 lps left on hook), yo and pull through remaining 2 lps.
HOOK SIZE AND TENSION
The Granny Kit Cotton is a pleasure to work with. It has a soft handle and it’s a perfect yarn for home textiles and especially blankets. I usually recommend using 2.75 – 3.5 mm when crocheting blankets with this soft handle cotton. In my Love Garden Blanket I used a 3 mm crochet hook. My crochet tension is very balanced, not to tight and not too lose. My advice for you is that you start with making a sample, it’ll help you decide what size hook suits you the best (for this project). Your final sq. should measure somewhere around 12.5 – 13 c”m. If you crochet loosely, you will probably need to use a smaller hook size and if your stitches are tight, use a bigger hook.
LOVE GARDEN SQUARE SIZE
Each square made out of 9 rounds. With Granny Kit cotton and the recommended hook, it will come out just a little less then 13 c”m. THE LOVE GARDEN SQUARE PATTERN
I created the Flower Square pattern at the very beginning of CrochetObjet. It was a lot before I had FB or IG. I made it because I really loved flower squares and never knew how to make them. I couldn’t find any pattern to follow (no Pinterest back then), so I had to make one up. I made so many trials and finally came out with my Flower Sq. pattern. At the beginning I wrote it in Hebrew and we only used it here in my workshops, but after a while I translated it into English as well and put it in my Etsy shop. It was and it is still a very successful pattern, One of my best sellers. The Love Garden Square pattern is based on the Flower Sq. pattern. I designed it on the go for one of my workshop girls that wanted to crochet a flower sq. blanket. I redesigned it to fit her wishes and her floral blanket dreams. So, in order to learn how to Love Garden Sq. you have to be familiar with the Flower Sq. pattern.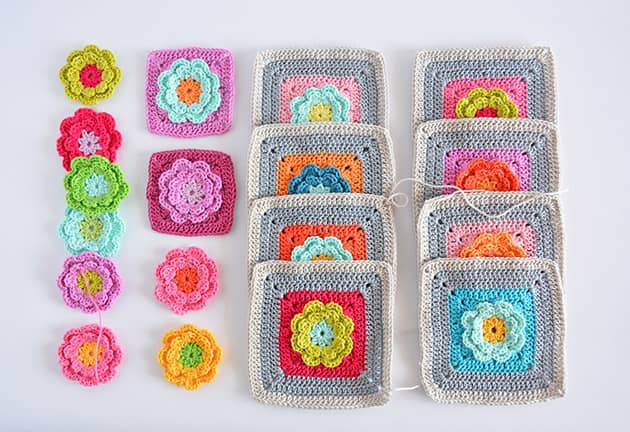 At the end of this post you will find a quick ‘ just words’ pattern that you can copy, paste & print.
TO START
Follow my Flower Square pattern, work as instructed on rounds 1, 2, 3, & 4. I will now explain how I worked from rnd 5 to create the Love Garden Square, so you can follow the exact same steps I did. You can always choose to make things differently if you wish, of course.
Here is what I did next.
Rnd 5: I use Rose colour here. Follow the instructions given in rnd 5 in the Flower Sq. pattern but instead of ch 1 in the corners make ch 2 in the corners. When I say corner made in the pattern? this is where you have to ch2 (dc3 + ch2 + dc3), as seen in next picture. To close this rnd, sl st into the 3rd ch of your initial ch3. DO NOT cut the yarn, we will continue working with the same colour.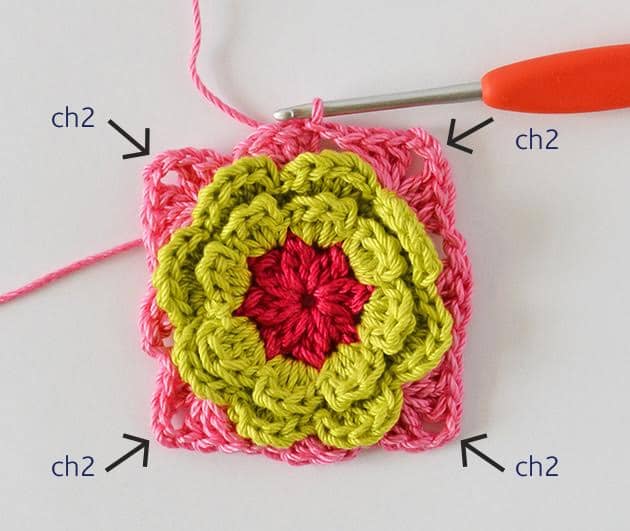 Rnd 6: Continue working with the same colour. In this rnd we will be making dc’s around as follow:
ch3 (counts as first dc), dc in each st around and in each of the ch sps. In corner sp make: 2dc + ch2 + 2dc. Don’t forget to dc in the last ch sp , before closing the rnd. To close this rnd, fasten off, leaving about 12 cm yarn tail and make an invisible join as follow:
1.Thread a tapestry needle onto the yarn tail.
2. Insert your tapestry needle into the first real dc made in this rnd, the one made after the ch3, see next picture.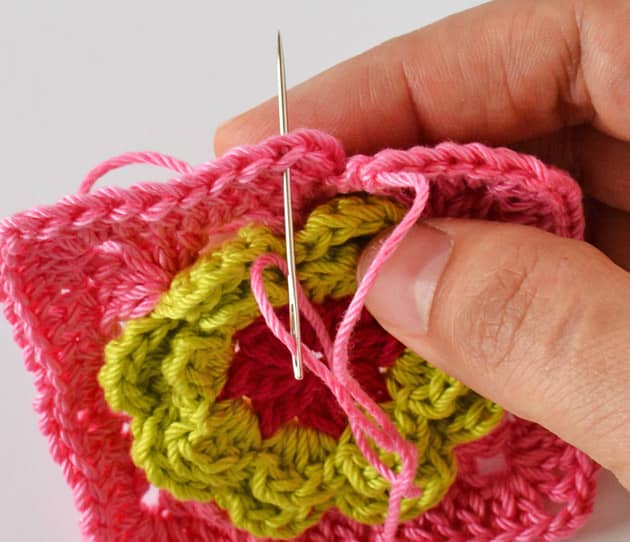 3. Pull all the way through the st.
4. Now insert your needle into the middle of the last dc made on this rnd and to the bar lp behind it – See next two pictures.
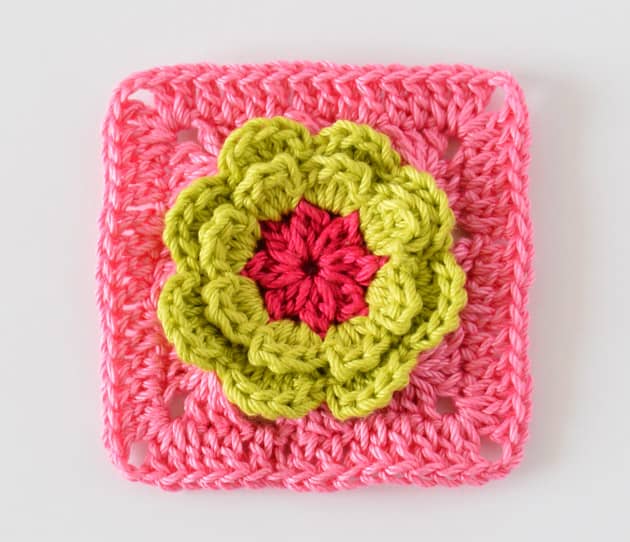
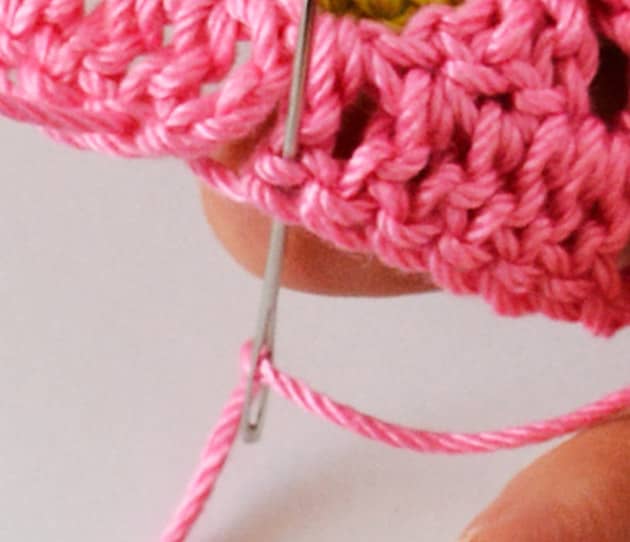 5. Pull the yarn all the way through the st. You have just created a new st that looks like all the other sts you have, and you can’t see the join point. It makes a clean edge. I just LoVe it, now you don’t even know where the join was. Weave in the yarn tails now, to get it all clean for the next rnds. Your square should look like the next picture now, it is about 7.5 – 8 cm. There are 15 dc’s in each side (including the corners) + a ch2 space in each corner.
 So, up to this point the squares in the Love Garden Blanket are worked the same way but with different colours combinations. If you wish to make the exact same Love Garden blanket, like I made, you supposed to follow the colours worked in all squares as given in the Squares Colour list PDF file (LoveGardenCoList).
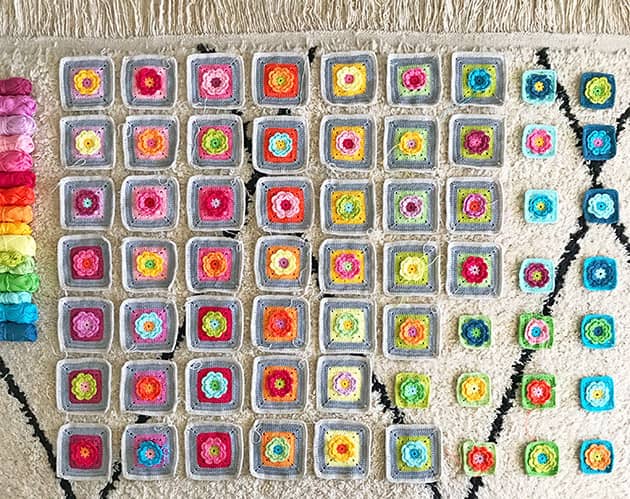
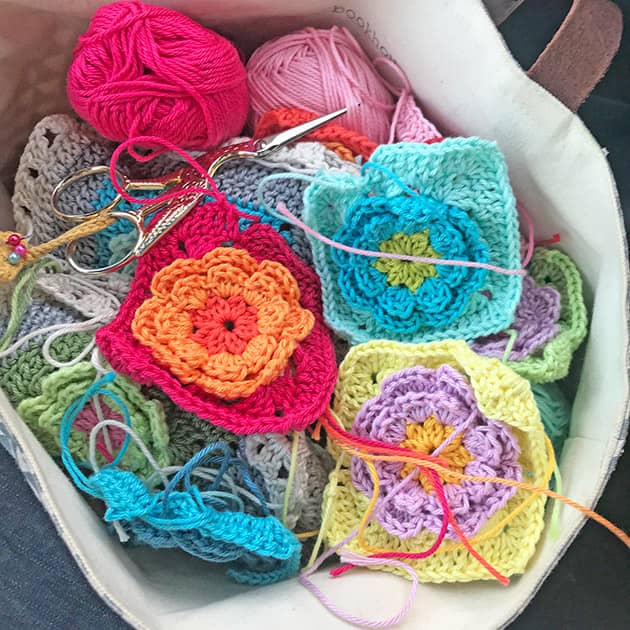 On my blanket journey I crocheted all 63 squares up to this point (6 rnds). I put all the Flower Sq. colours in a bag to go with me, everyday, to my parent’s house. I made them all at my mom’s bedside and we both enjoyed each and every moment.
If you have the Love Garden yarn pack, and you wish to work your blanket same way as me, these are the colours you need to take out of your pack. From top left: Teal, Turquoise, SeaFoam, LimeGreen, Apple, Citron, Yellow, Daisy, Tangerine, Festive, Framboise, Rose, BabyPink, Mouve, Violet, Lilac. 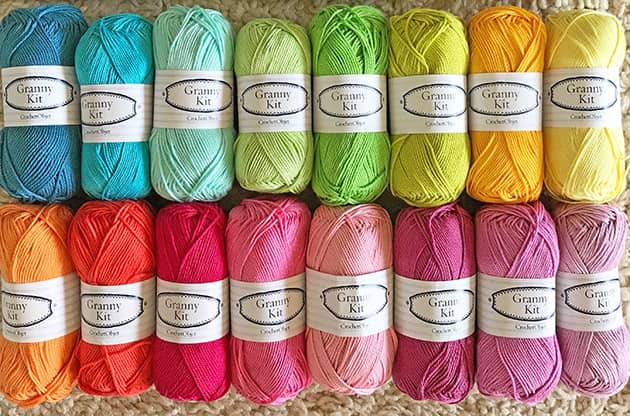
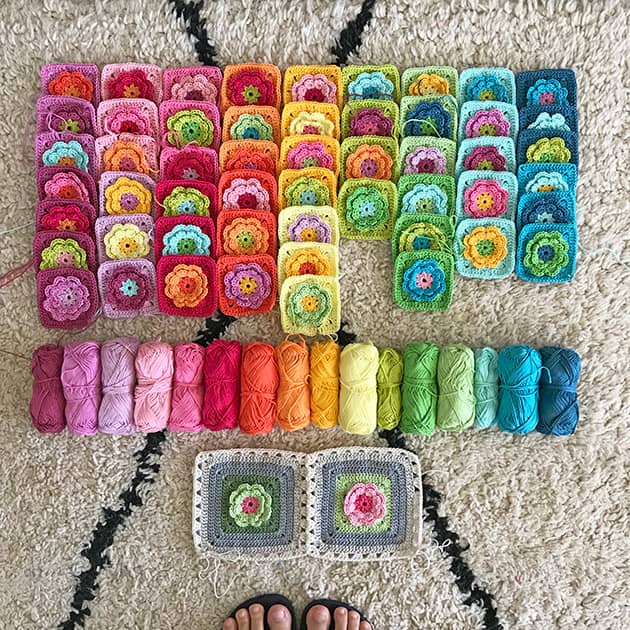
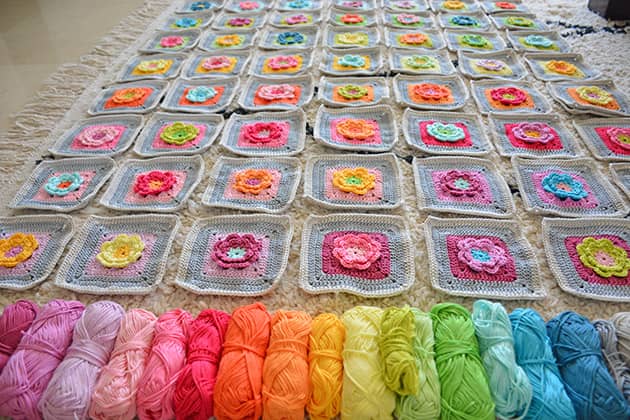
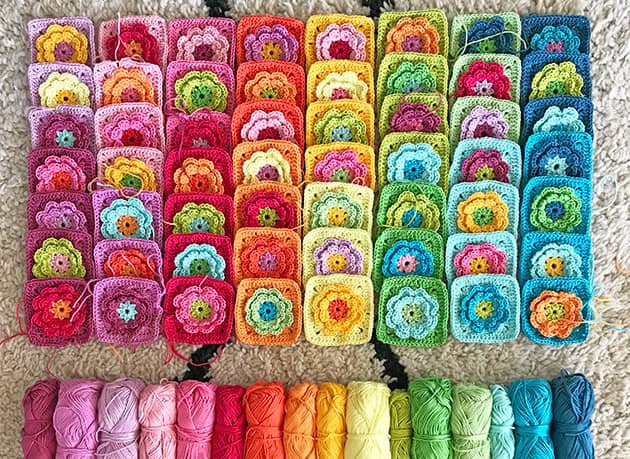 Every day when I came back home, I spread all the Flower squares I made with my mom on my carpet, to get the feeling of the colour story. When I had all 63 Flower squares done, I continued working the next 3 rounds.
 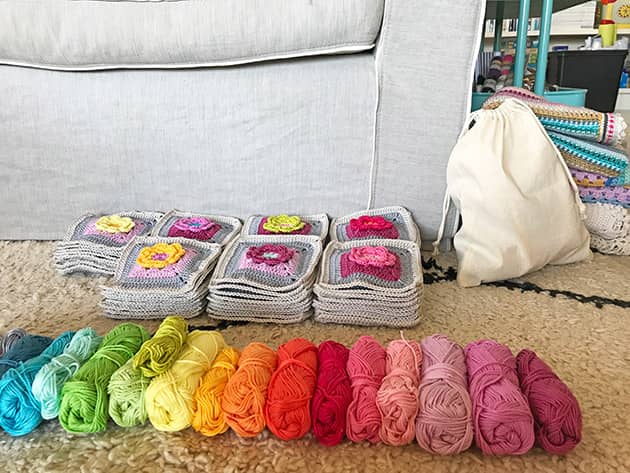 Back to the pattern now: we will be working all next rnds with Platinum and Shale Grey colours, as follow:
Rnd 7: If you’re using the Love Garden yarn pack, this is the time to take a PLATINUM ball out of your pack. Join Platinum colour under one of the ch2 sps. Ch5 (counts as 1 dc + ch2). Now make 2 dc’s into same ch sp. Make a dc in each st around, work over the yarn tail so you don’t have to weave it in later. Make sure you don’t miss the first st, pull back the corner dc’s so you can easily see the first st. When you reach a corner make: 2dc + ch2 + 2dc, in ch2 corner sp. When you reach the starting point of this rnd, make another dc into the first corner sp and sl st into the 3rd ch of your initial ch5, to close the rnd – see next picture. Do Not cut the yarn, we will continue working with it. You have 19 dc’s in each side + a ch2 space in each corner.
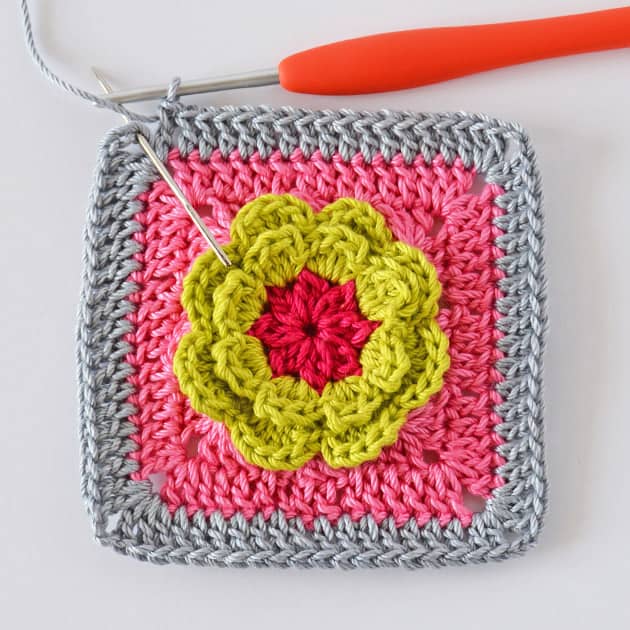 Rnd 8: Continue working with Platinum colour, sl st in same ch sp just to locate your hook in the middle of the ch sp. Ch5 (counts as 1 dc + ch2). Now make 2 more dc’s into same ch sp and dc in each st around. In corner sp make: 2dc + ch2 + 2dc. When you meet the point where you started this rnd make another dc into the first corner sp and sl st into the 3rd ch of your initial ch5 to close the rnd. Cut the yarn and fasten off. You don’t have to weave in the yarn tail, work over it while crocheting the next rnd. You have 23 dc’s in each side + a ch2 space in each corner. My square measures now about 11.5 cm.
I made a huge amount of calculations for this yarn pack, weighed each and every single rnd to make sure this pack can create the full blanket. Just to give you an idea of yarn calculation: These 2 rnds are taking about 5.4 grams of yarn. Each ball of Platinum colour frames about 10 squares. 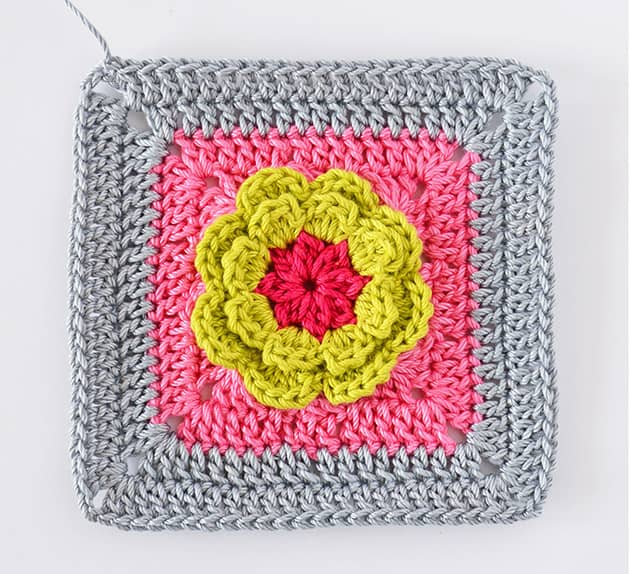 Rnd 9: If you’re using the Love Garden yarn pack, this is the time to take a SHALE GREY ball out of your pack. Join the Shale Grey colour under one of the ch2 sps. Ch5 (counts as 1 dc + ch2). Now make 2 dc’s into same ch sp. I usually start this rnd from the corner before the last sl st made – as seen in next picture. This way I don’t have 2 yarns to work over. I work over the previous yarn tail as I reach it.
 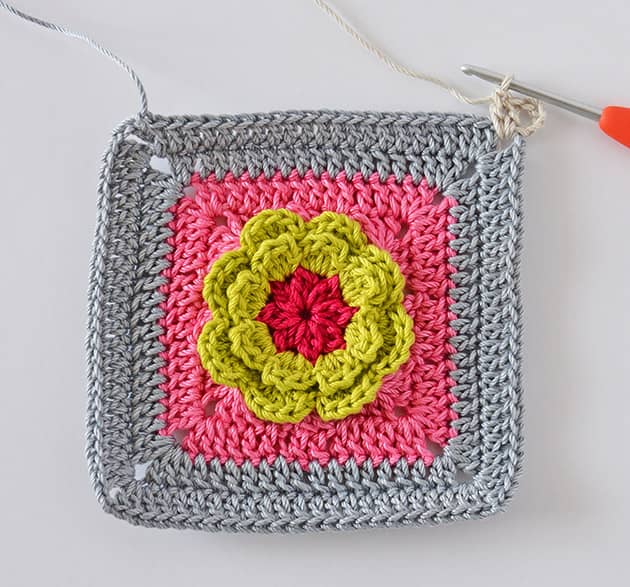 Make a dc in each st around, work over the yarn tail so you don’t have to weave it in later. When you reach the next yarn tail work over it as well. In corner sps make: 2dc + ch2 + 2dc. When you meet the point where you started this rnd make another dc into the first corner sp and sl st into the 3rd ch of your initial ch5 to close the rnd. Cut the yarn leaving about 12 cm yarn tail., fasten off and weave in the tail. This rnd takes about 3.5 gr’. Each ball of Shale Grey colour frames 14 -15 squares.
  And That’s it!!! Your Love Garden Sq. is done. BRAVO. You have 27 dc’s in each side + a ch2 space in each corner.
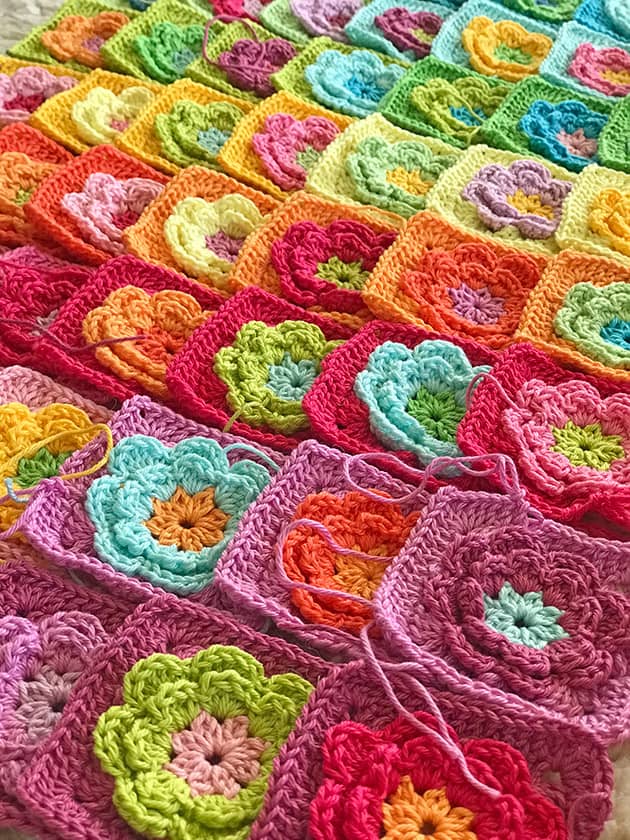
 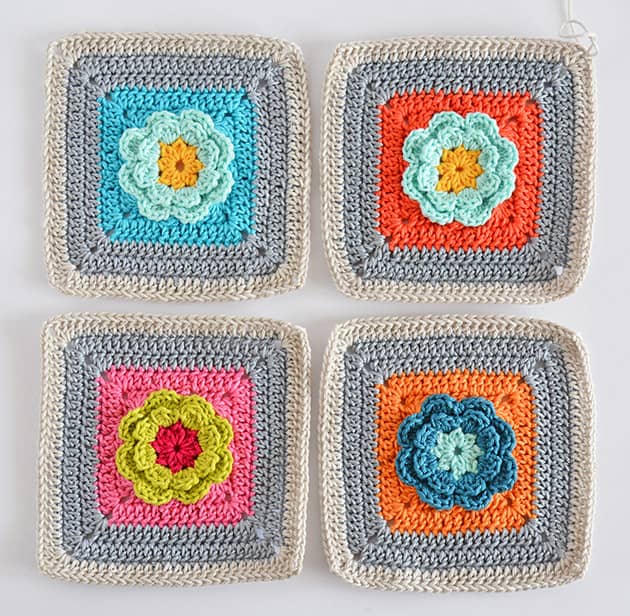 The final size of my Love Garden Square is a little less then 13 cm x 13 cm. After I had them all framed, I made a few little lay-out fine tunings (it’s me after all). My aim was to create a lay-out so that there’s no one same flower colour in any row or column. It was a bit of a job to reach this goal and it took quite a while to achieve it.
 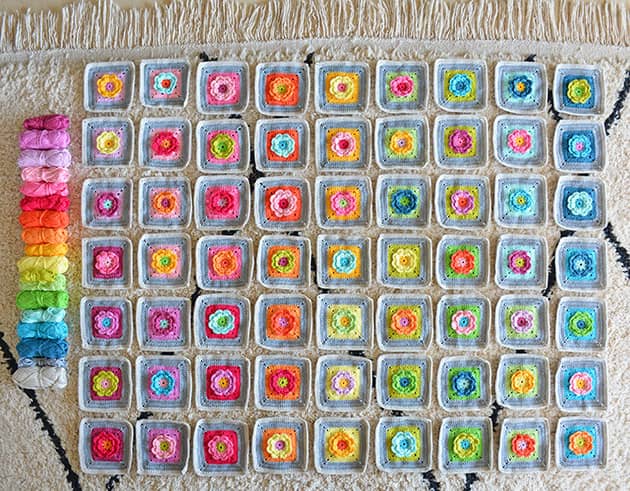 When I finally had it right I could feel my heart sing and this singing went all around my blood system because I knew this blanket was going to contain years of the pure love I got from my very special mom and it made me happy. It also gave me the necessary strength I needed for the future. I was all ready for the Love Garden Join-as-you-go now. Both joining pattern and squares lay-out will be shared here on my next blog post.
  As many of you know, my beloved mom passed away two weeks ago and the Love Garden Blanket is the last project I made completely with her. Making the Love Garden squares provided us both with many happy hours to be remembered forever. She touched each and every one of these colourful squares with her soft hands that I miss so much. This blanket means so much to me but most of all it reflects the happy and vital personality of my special mom, who was a true love – life person.
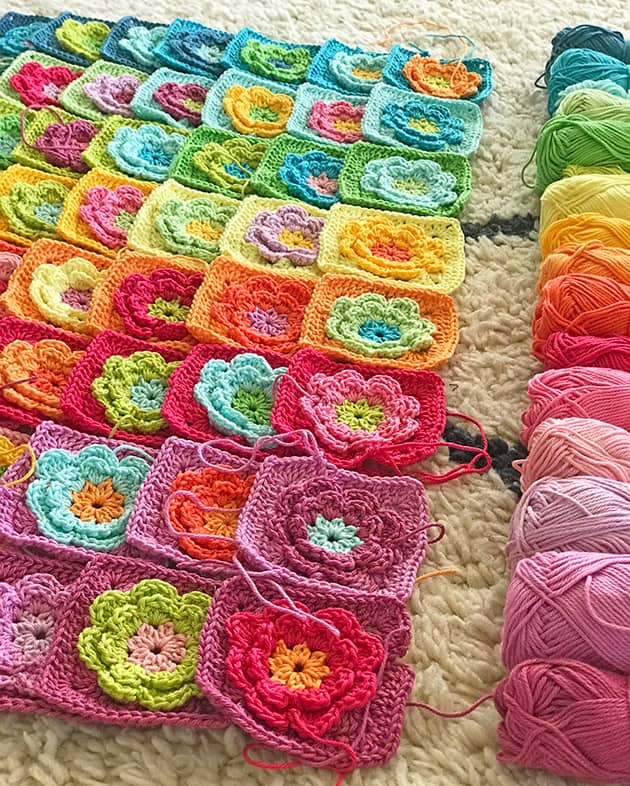 If by any chance these cheerful squares inspired you to start your own Love Garden project go get yourself a Love Garden yarn pack because I only have a very limited quantities from these beautiful cotton colours. Yes CrochetObjet is still a very small business and I don’t have a huge stock of Granny Kit cotton balls.
If you wish to create the same Love Garden Blanket like mine you will need:
The Love Garden yarn pack.
The Flower Square Pattern.
The colour list for the Love Garden Squares: LoveGardenCoList
Here is a ‘Just Words’ pattern for those of you don’t need the step-by-step with pictures one:
TO START
Follow my Flower Square pattern, work as instructed on rounds 1, 2, 3, & 4.
Rnd 5: Follow the instructions given in rnd 5 in the Flower Sq. pattern but instead of ch 1 in the corners make ch 2 in the corners. When I say corner made in the pattern? this is where you have to ch2 (dc3 + ch2 + dc3).
To close this rnd, sl st into the 3rd ch of your initial ch3. DO NOT cut the yarn.
Rnd 6: Continue working with same colour. ch3 (counts as first dc), dc in each st around and in each of the ch sps. In corner sp make: 2dc + ch2 + 2dc. To close this rnd, fasten off, leaving about 12 cm yarn tail and make an invisible join.
Rnd 7: Join the next colour under one of the ch2 sps. Ch5 (counts as 1 dc + ch2). Now make 2 dc’s into same ch sp. Make a dc in each st around. When you reach a corner make: 2dc + ch2 + 2dc, in ch2 corner sp. When you reach the starting point of this rnd, make another dc into the first corner sp and sl st into the 3rd ch of your initial ch5 to close the rnd. Do Not cut the yarn, we will continue working with it. You have 19 dc’s in each side + a ch2 space in each corner.
Rnd 8: Continue working with same colour, sl st in same ch sp. Ch5 (counts as 1 dc + ch2). Now make 2 more dc’s into same ch sp and dc in each st around. In corner sp make: 2dc + ch2 + 2dc. When you meet the point where you started this rnd make another dc into the first corner sp and sl st into the 3rd ch of your initial ch5 to close the rnd. You have 23 dc’s in each side + a ch2 space in each corner. My square measures now about 11.5 cm.
Rnd 9: Join the next colour under one of the ch2 sps. Ch5 (counts as 1 dc + ch2). Now make 2 dc’s into same ch sp. Make a dc in each st around. When you reach the next yarn tail work over it as well. In corner sps make: 2dc + ch2 + 2dc. When you meet the point where you started this rnd make another dc into the first corner sp and sl st into the 3rd ch of your initial ch5 to close the rnd. Cut the yarn leaving about 12 cm yarn tail., fasten off and weave in tails.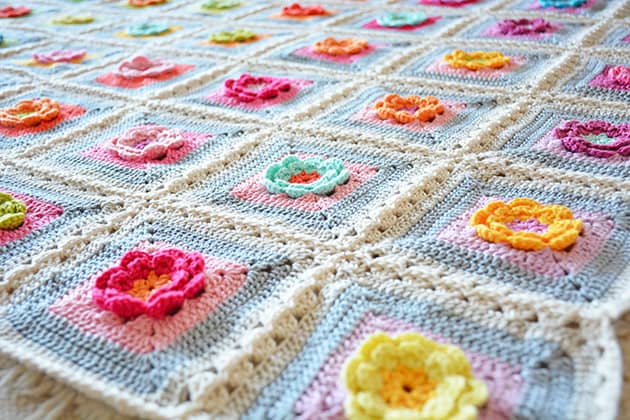 The squares lay-out and the Joining method will be shared here on my next blog post, go get ready with your Love Garden Squares my lovelies. What do you think? Will you give it a go? Thank you so much for visiting my little blog corner. Thank you for your support during this difficult time, and thank you for all your nice comments, and OUH yes thank you form the bottom of my heart for all your nice birthday wishes, all of them are kept inside my heart. Wishing you all the very best moments with your loved ones. xxxMo
31 comments on Love Garden Square Free Crochet Pattern
Sandra
What a gorgeous pattern of flowery squares in the most wonderful colours! Thank you so much for sharing this stunning pattern with us! Colour is the greatest happy inducing therapy!
Mo Malron (author)
Thank you Sandra, these flowery squares are so cheerful, both the making and the results. xxxMo
Melanie
What an amazing blanket you have created here Moran! Well done! I love everything about this blanket and can’t wait to create my own with your lovely yarn! So much love put into this special piece💕
Mo Malron (author)
Thank you for your worm words and for ordering my yarn, you make me happy,xx
Ann
Dear Mo, I am so looking forward to making this blanket. I have followed your journey of making it whilst with your mum and the love flows out of it and creates wonderful memories and a very beautiful blanket. My sincere condolences at your mother’s passing.
My yarn kit is ordered, my pattern purchased and I can’t wait to start xx
Mo Malron (author)
I am so looking forward to seeing your Love Garden and I know you will enjoy every single moment of it. Thank you so much for your warm words xx
Maxine
Hello Mo, I am so sorry for the loss of your Mum. This blanket is so special, and a reminder of special times you shared with her. Please be gentle with yourself. Warm wishes, Maxine X
Mo Malron (author)
Thank you Maxine, that’s so kind of you, I know this is my real task for now, not to go too down, xx
אורלי לוריא
שמיכתרפיה ❤️💜💛💚
Mo Malron (author)
צודקת
Ana Maria
Dear Mo.
My sincere condolonces for your loss. Treasure with happy memories to help you through this difficult time.
Your craftsmanship and ability to combine colours is truly remarkable.
Thanks for your blog.
Warm wishes.
Mo Malron (author)
Thank you Ana
Michelle
Dearest Friend, reading all of this still makes my heart weep with you, and gives me pause to think about you & your precious momma. She was such a blessing to you and her love for you unlike any other. What a special thing for you to have this blanket where she touched every square. Sitting under it will always remind you of her special touch and love. I will think of you with every stitch I make in this blanket. And maybe I will make each of my daughters a Love Garden because I want them to always remember how much I love them. Sending you the biggest of hugs and much love ❤️
Mo Malron (author)
Dear Michelle, I send you all the love back and I send some of it in your package this morning, xx<3 Mo
Sandra R
Dear Mo,
You really spread so much joy and light. I can only guess your mom gave you so much love growing up. I am sorry for your loss. My mom has been sick for a while and is well now. She, as well as my aunt, both want me to teach them to crochet. I know we will create beautiful memories together!
I purchased this kit of yarn today and I am so excited to get going I am practicing with some of your yarn I had from another project. Thank you for all the amazing things you make and share.
Best wishes,
Sandra
Vivian Vera
THANK YOU so much, I got my yarn kit today. Making the Love Garden Blanket for my daughter and the one word she used for it LOVE LOVE actually two words. I hope she will feel this is a special blanket also. Will be made with lots of Love, she LOVES the colors.
Mo Malron (author)
Thank you Vivian <3
Cheryl
I’ve just ordered this beautiful blanket, cant wait for it to be delivered, one problem, I’ve just started another big blanket thats all over Instagram, how ever im going to keep my hands of this one for awhile i do not know, thank you for this guwjus blanket that comes with a very personal story that im sure will just make it all the more special… xxx cheryl… xxx
Angela
This is a beautiful blanket, made all the more special because of why you made it. I love the colours. I have a yarn pack I received with a magazine subscription that I could definitely use to make this pattern. Just need to finish my current project 😊
Thank you for sharing xx
Fabiana
Es realmente MARAVILLOSO todo lo qué haces!!!!!!!!! Ojalá estuvieras más cerca de mi casa, para poder aprender de vos y compartir horas en tu clases… sé que esto le haría muy bien a mi vida, a mi mente y a mi corazón… me ENCANTAN tus trabajos, sueño con hacerlos TODOS ellos y sería un gran honor recibir el regalo hecho por tus manos!
Donna
Would love to have a go at this , I bought the download fro Etsy and unable to get it contacted seller through Etsy no comment seems like I have wasted money with no return of download
Mo Malron (author)
Hi Donna,
See my answer on Etsy convo, Thank you
Luisa Buogo
Hello, where can I get the full yarn package to make your Love Garden blanket ? It is unavailable on Etsy… Thank you, Luisa from Italy.
Mo Malron (author)
Hi Luise I hope to have it back in my shop during September 21.
Thank you
Kim
Mo is lovely to work with. She responded very quickly to my questions and requests. I’m excited to move forward on my love garden blanket. I will be checking in regularly to see new patterns.
MANDY
I have started marking the love Blanket and just “love” making each square, i love the pattern, flowers and the colors its just a pleasure to sit down and crotchet with your beautiful yarn and wonderful colors, I cant explain the feeling each time I finish a square and my pile gets bigger – the colors bring a smile to my face and I am truly addicted. THANK YOU!
MANDY
I have started making the love Blanket and just “love” finishing each square, i love the pattern, flowers and the colors! its just a pleasure to sit down and crotchet with your beautiful yarn and wonderful colors, I cant explain the feeling each time I finish a square and my pile gets bigger – the colors bring a smile to my face and I am truly addicted. THANK YOU!
Linda Frost
I would love to be able to purchase this beautiful crochet kit. Do you still have it in stock as I have only just come across this.
You have an amazing talent and to share this is so generous of you
Best Wishes
Linda
Mo Malron (author)
Hi Linda,
Thank you SO much. Here’s a link to a video where I explain all about my cotton kits:
https://youtu.be/0Iuho4pqnro?si=df_SjzzMM_xMSaB-
Gigi Stump
Hello Mo,
I hope you and your family are weathering the storms in your life right now. Can you tell me what weight the yarn is that you use in this pattern since your yarn is not available. Thank you and I will be praying for you
Mo Malron (author)
It’s a 4ply Sport weight cotton but PLEASE use any yarn you like or that is easy for you to get! happy makiong