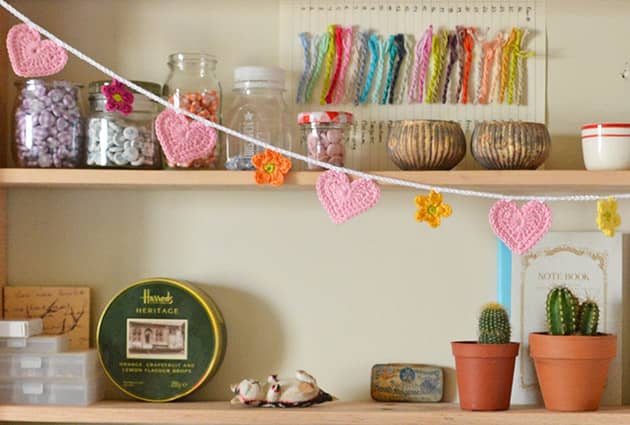
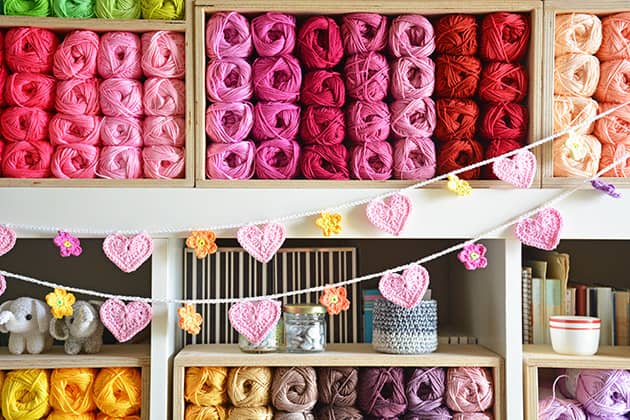
Garlands are always a happy addition to any room or shelf. Crochet garlands always look so warm and cosy to me and they add this little warming touch wherever I see them. I made so many crochet garlands during the years but this heart and flowers garland is my favorite one. I made quite a few of these for many girls rooms and thought you might want to make one as well. So, are you ready for a garland pattern here today?
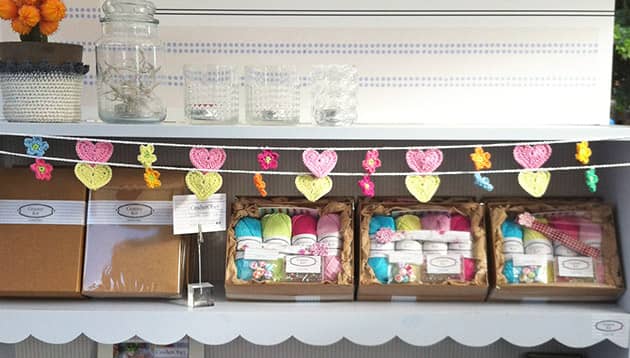 My hearts and flowers garland is an easy breezy crochet project and the most cheerful present you can give to someone you love. It’s made of 5 hearts and 6 flowers. I’ll teach you how to crochet this perfectly shaped, 3 rnds heart – you’ll see that you’ll immediately fall in love with the tiny heart you get after finishing the first rnd. But for this garland we will need the 3 rnd heart. The 2 colours flowers I’ll teach here today are a 5 petals tiny Japanese flowers, which you can easily make bigger, after learning the principles. The pattern I’ll give here today is for a multi colour garland, using few different colours of Granny Kit cotton. The hearts are all made of the same colour but the flowers between them are made of few different colours. I think the multi colour version is much better than the mono chrome version, in this case. Colour makes this garland pop up. But, it can also work beautifully with only 2-3 colours. Please feel free to go with whatever colour combo you like and play with your own colour ideas. If you’re on IG please share your garland using #heartandflowers so we can all enjoy.
WHAT DO YOU NEED
Yarn: GrannyKit cotton colours:
For the hearts: BabyPink
For the flowers: Citron, Lily, Corn, Yellow, Tangerine, Fuchsia & Yellow
For the garland making: White Lace
Crochet hook: 2.75 – 3.25 mm
A pair of crafty scissors
Tapestry needle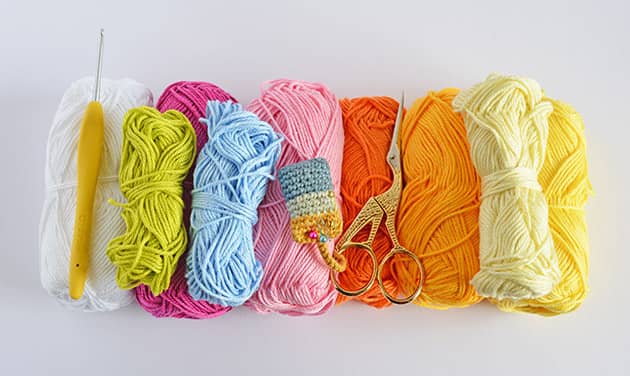 ABBREVIATIONS AND STITCHES (US crochet terms)
ch = chain stitch
st(s) = stitch(s)
rnd(s) = round(s)
yo = yarn over
lp(s) = loop(s)
*…* = repeat instructions between ** x times
sl st = slip stitch = insert hook, yo, pull the lp back through the st and through the lp on your hook.
sc = single crochet = insert hook, yo, pull the lp back through the st (2 lps on hook), yo and pull through both lps on hook.
hdc = half double crochet = yo, insert hook, yo, pull the lp back through the st (3 lps on hook), yo and pull through all 3 lps on hook.
dc = double crochet = yo, insert hook, yo, pull the lp back through the st (3 lps on hook), yo and pull through 2 lps on hook (2 lps left on hook), yo and pull through remaining 2 lps.
tr = treble crochet = yo twice, insert hook, yo, pull the lp back trough the st (4 lp on hook), yo, pull through 2 lps on hook (3 lps on hook), yo, pull through 2 lps on hook (2 lps on hook), yo, pull through remaining 2 lps.
3dctog = 3 double crochet connected in the same stitch = yo, insert hook the st, yo, pull the lp back trough the st (3 lps on hook), yo, pull through 2 lps (2 lps on hook), yo, insert hook to the same st, yo, pull the lp back trough the st (4 lps on hook), yo, pull through 2 lps (3 lps on hook), yo, insert hook to the same st, yo, pull the lp back trough the st (5 lps on hook), yo, pull through 2 lps (4 lps on hook), yo and pull trough 4 remaining lps.
So now you are ready to start crocheting your heart & flowers garland and if you like to work while listening to some nice freshening up music, go to the end of the post for a nice song I’ve left you there, turn it on and come over here to start crocheting your garland.
Heart
To start make a magic loop.
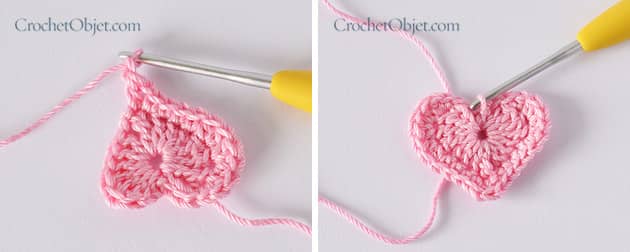
rnd 1: ch3 and make 3tr into the ring centre (right picture).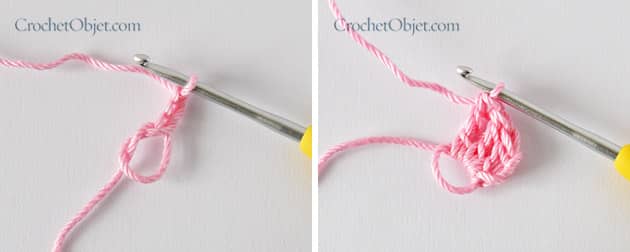 Continue working into the ring centre as follow: 3dc, ch1, 1tr (it should look like left below picture now), ch1, 3dc, 3tr, ch2. Tighten the lp and leave just a small and aesthetic hole to set the centre of your work. Sl st into the centre lp to close. It should look like the right bellow picture now.
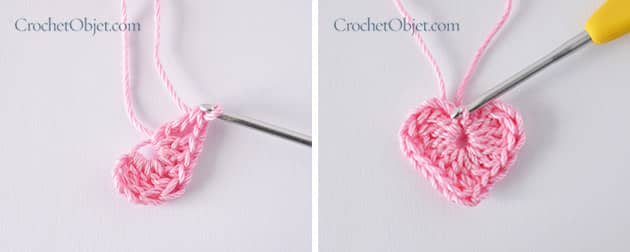 You have this tiny 1 rnd heart made now, which is soooo pretty. Just pretty. I love to make piles of these with many different colours and just put them together inside a glass gar, isn’t that the most wonderful present to give to someone you love? This tiny 1 rnd heart is a perfect little addition for gift Wrap as well, or just sitting on your desk to make you happy. For this garland we will continue with 2 more rnds though, come with me I’ll show you how.
rnd 2: Ch3 and make sc+hdc into the first tr made on previous rnd, where I show, with the sewing pin, on left below picture. Make 3hdc into the next st, 2hdc into the next, sc in next 4 sts, the 4th sc will be made on the ch1 from previous rnd.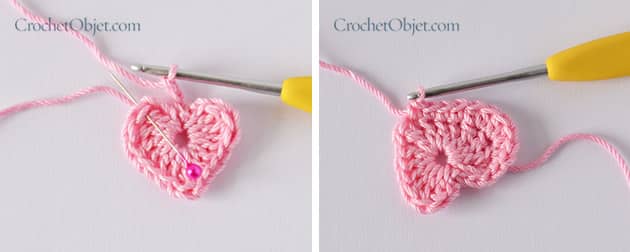 Now, you have reached the corner right? Continue as follow: ch1, dc in next (corner st), ch1. It should look like left below pic now. Sc in next 4 sts (the first one will be made on the ch1 from previous rnd), make 2hdc in next st, 3hdc in next, in next st make: hdc+sc, ch2 and sl st into the centre ring (see right picture).
 We will make the last rnd now.
rnd 3: ch3, sc on top of the first sc made in previous rnd, sc2 in next, sc in next, sc2 in next, sc in next 8 sts, now sc in corner st, where I show on left below pic. Ch1 and sc in next 8 sts, cs2 in next st, sc in next, sc2 in next st, sc in next, ch3 and sl st into the centre ring. Fasten off and I’ll show you how to weave in the tails.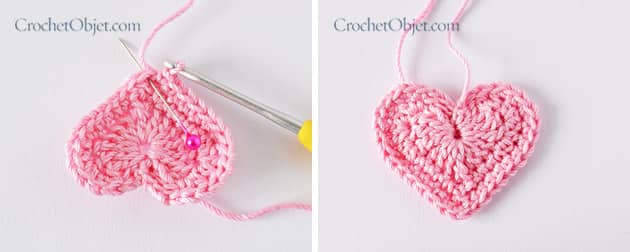 Now pull the centre yarn tail a little, to create an aesthetic hole at the middle. Thread a needle onto the yarn tail and weave it in. Hide it around the centre hole, at the back side, as I show on left below picture. Now thread a needle onto the other yarn tail and weave it in-beneath the sts to hide it, make sure it doesn’t show up on front.
 Make 4 more of these 3 rnds hearts, same like this one, you need 5 BabyPink hearts for this garland.
 Blocking: Spray a little water on each of the hearts, with your hands, make them flat and help them to get their sharpen heart shape. Lay them flat to dry.
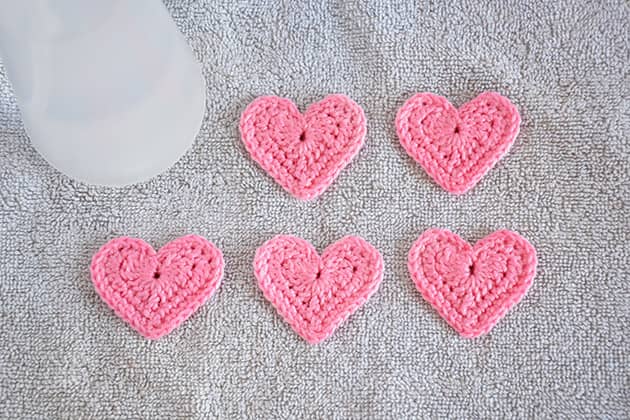 While your pretty pink hearts laid flat to dry, lets start making the tiny 2 rnds flowers now.
Tiny Japanese flower this super cute 2 rnds flower has 5 petals around, but you can make them with 6 or more petals if you like. It’ll be very easy to change their size once you learn the principle. I’ll teach you the 5 petals flower pattern here. We will need 6 flowers from 6 different Granny Kit cotton colours, using the colours shown on the picture below.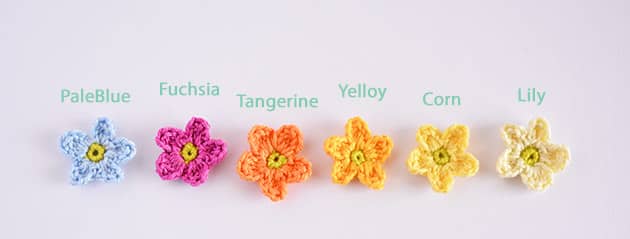 To start make a magic lp with colour Citron
Rnd 1: sc 5 into the yarn lp and tighten the lp. Sl st into the first sc made. Fasten off and break the yarn – 5 sts
Now make 5 more of these 5 sc’s circles – these are the centers of our 5 petals flowers. 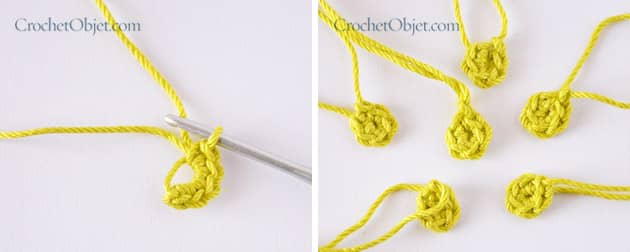 Rnd 2: Attach the petal colour into one of the sts around. I’ll use colour Fuchsia here, for this flower tutorial. We will make one petal in each st around = 5 petals.
Ch3 and make a 3dctog into the same st, where you just attached the new yarn (see abbreviations for *3dctog)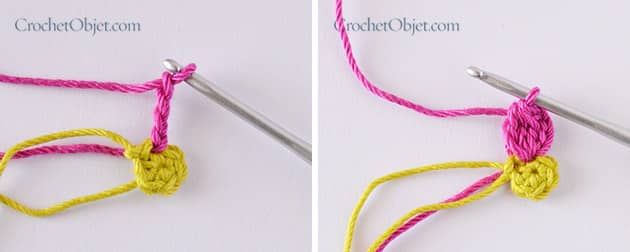 ch3 and sl st into the same st. (see right below picture)
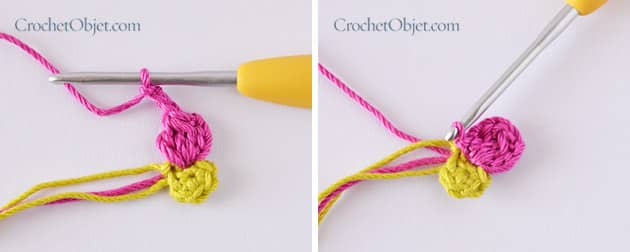 *into the next st make: sl st, ch3, 3dctog, ch3, sl st – all into the same st* repeat between ** make one petal in each st around, till you have 5 petals around. Work on the yarn tails so you don’t have to weave them in later.
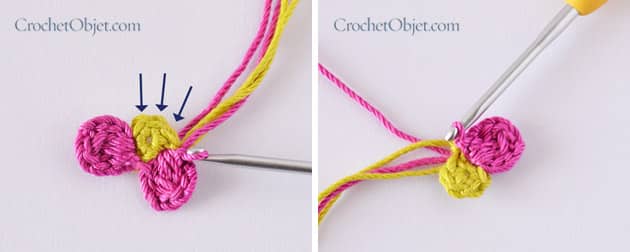 When you have 5 petals around, fasten off and break the yarn, leaving about 15 cm yarn tail. DO NOT sl st to close, I’ll show you my way here to close the flower. You can cut the yarn tails now, if you worked on them (see left below picture).
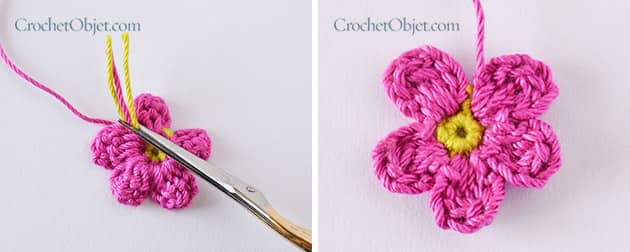 Thread a needle onto the yarn tail and weave in the tail to the back side of the next petal, the closest – to close the petals rnd (see left below picture), now continue weaving in the yarn tail, under the back side to hide it and cut it when done.
 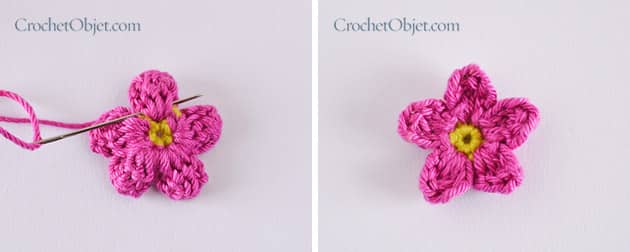 Make 5 more flowers, like the one we just made, with the 5 different flower colours, one flower from each colour. You’ll need 6 flowers for this garland.
 We have 5 hearts and 6 flowers now, let’s make them a ‘hearts & flowers’ garland.
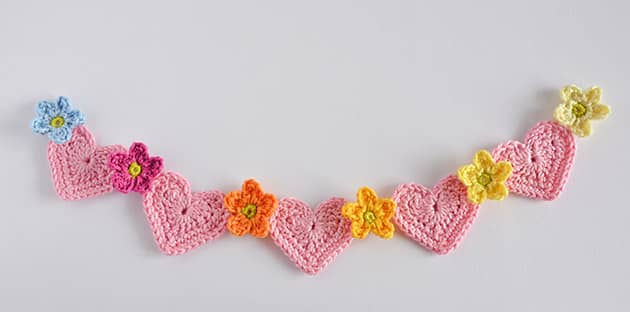 Joining first just arrange the hearts and flowers in their right position. As seen at the picture above, I’ve located all the Yellows together, from light to dark, as I really like the gradation in colour. The Tangerine comes next after the Yellow, Fuchsia and Pale blue afterwords.
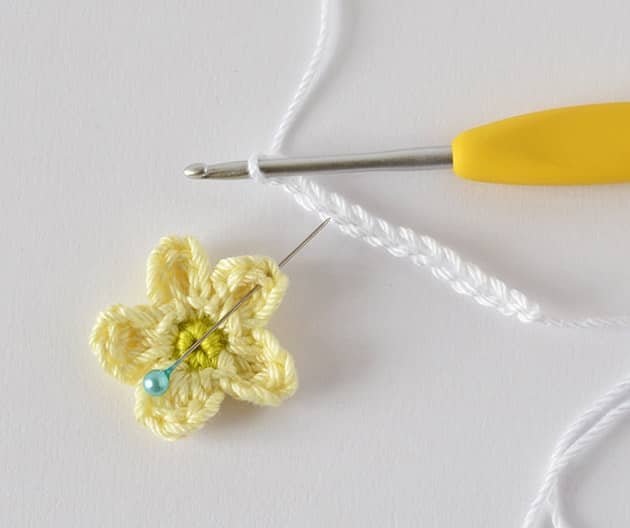
Take your White Lace yarn, leave about 30 cm yarn tail, to hang the garland with, later. Now ch 12 and sc into one of the petals in the Lily flower. Make your sc into the top of the 3dctog, into the point where I show in the pictures below.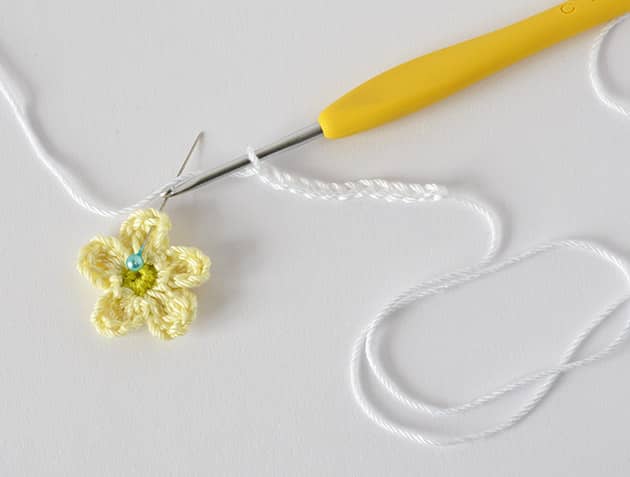
 Our first flower is joined. We will join the first heart now. Ch12 again and cs into one of the highest points of the heart, where I show in the picture below.
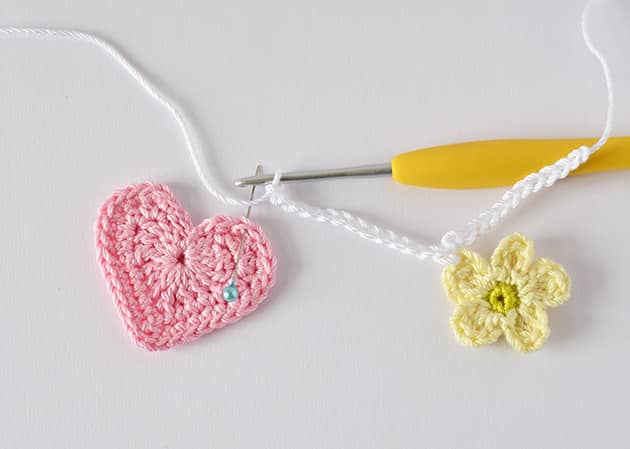 Ch 5 and sc into the other highest point of the heart.
  Ch 12 and join the Corn flower, sc in one of the 3dctog to join.
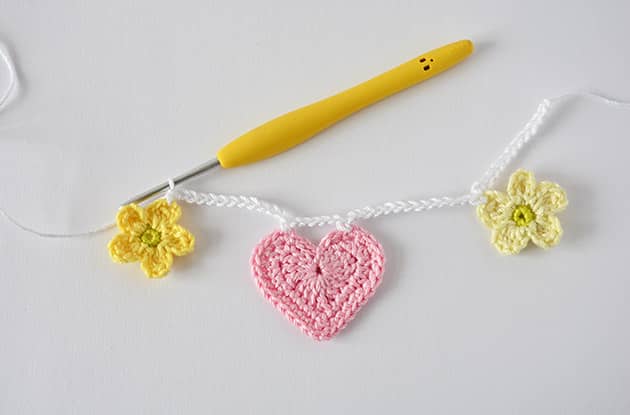 Ch12 and sc into the highest point to join the second heart, ch5 and sc to the other highest point of the heart, ch 12 and join the Yellow flower, now ch 12 again.
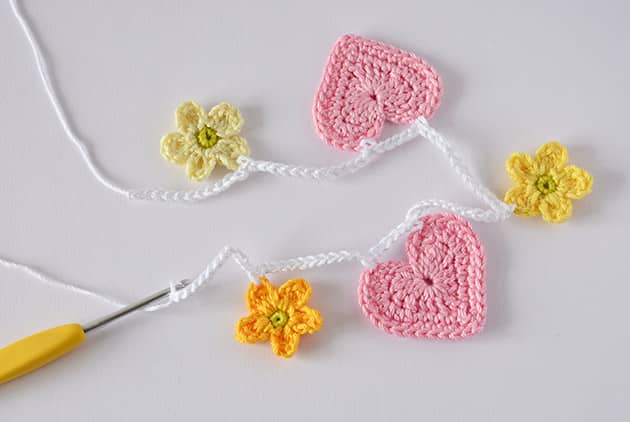 Continue joining your hearts and flowers, till you have this pretty, colourful, cheerful garland. At the end, after joining the Pale blue flower, ch 12 again. Remember to leave about 30 cm yarn tail, before you cut the yarn.
 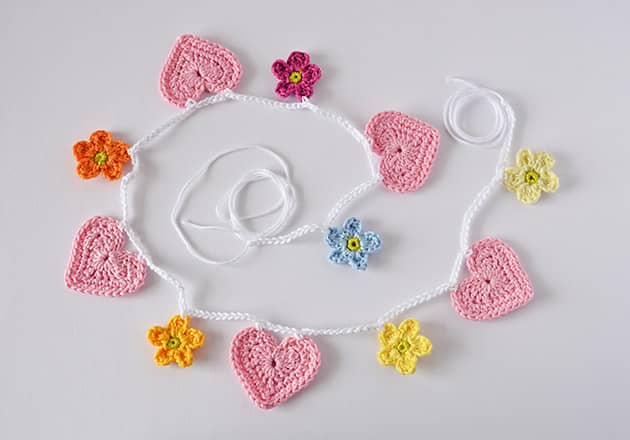 Your heart and flower garland is ready now. Now the question is: where to hang it, because there are tones of pretty options.

 Well, isn’t it an easy breezy crochet garland?
Here is a “just words” pattern for you, if you don’t need the step-by-step instructions:
Heart
To start make a magic loop. make the following rnd into the centre of the lp. DO NOT work on the yarn tail – we’ll form the centre hole with it later.
rnd 1: ch3, 3tr, 3dc, ch1, 1tr, ch1, 3dc, 3tr, ch2, tighten the lp and leaving a small and aesthetic hole to set the centre of your work. sl st into the centre lp to close.
rnd 2: Ch1 and make a sc + hdc into the first tr made on previous rnd. Make 3hdc into the next st, 2hdc into the next, sc in next 4 sts, ch1, dc in next, ch1, sc in next 4 sts, 2hdc in next, 3hdc in next, ch2 and sl st to the middle.
rnd 3: ch3, sc on top of the first sc made in pre rnd, sc2 in next, sc in next, sc2 in next, sc in next 9 sts (down to the corner). Ch1, sc in next 8 sts, cs2 in next st, sc in next, sc2 in next st, sc in next, ch2 and sl st into the ring centre. Fasten off and weave in the tails.
Tiny Japanese flower
To start make a magic lp.
Rnd 1: sc 5 into the yarn lp and tighten the lp to close the hole, sl st into the first sc made. Fasten off and break the yarn – 5 sts
Rnd 2: Attach the petal colour into one of the sts around. Ch3, make a 3dctog into the same st, ch3 and sl st into the same st. *Into the next st make: sl st, 3dctog, ch3 and sl st into the same st* repeat between ** till you have 5 petals around. Fasten off and weave in the tail.
Joining first just arrange the hearts and flowers in their right position.
Take your White Lace yarn, leave about 30 cm yarn tail, to hang the garland with, later. Now ch 12 and sc into one of the petals in the Lily flower. Make your sc into the top of the 3dctog. Ch12 again and cs into one of the highest points of the heart. Ch 5 and sc into the other highest point of the heart. Ch 12 and join the next flower. Ch12 and sc into the highest point to join the second heart, ch5 and sc to the other highest point of the heart, ch 12 and join the next flower, now ch 12 again. Continue joining your hearts and flowers, till you have this cheerful garland. At the end, after joining the last flower, ch 12 again. Leave about 30 cm yarn tail, before you cut the yarn. Thank you for joining me here, following the heart and flowers garland tutorial. Hope you’ll give it a try sometime. It is a very easy crochet project and one of the sweetest gifts ever. If you’re on IG please share your garlands with #heartandflowers, see you soon xoxMo.
https://www.youtube.com/watch?v=akT7dAeRg5I
11 comments on Hearts & Flowers garland
Sue Sanderson
Mo
Thank you for that gorgeous pattern. The hearts are perfect. Will make one for my Great niece for her summer playhouse.
Regards
Sue
Mo Malron (author)
You’ll love making them Sue, this heart pattern is super addictive.
Shirit Rosen
This is just a great post. Thank you so much Mo
Susan
Hi Mo……..on your Instagram page forth row down, last picture, you have a small blues and a green crochet…….is that a Braverian stitch or is it called something else? I love that stitch and the closest I can find is a Braverian stitch but it is done in a big square…. 😕 I would prefer to do it in rows……not sure if that’s the name of the stitch……I love your yarn and patterns….. I bought the Chevron pattern….. I need the yarn now….😃
Mo Malron (author)
Susan, it’s a “box stitch” I’ll write down the pattern soon.
Susan
Thank you……I love that stitch…….I look forward to getting your pattern! Thanks again!
cris lee
hi Mo, enjoyed your blogs tremendously with the beautiful photos and stories, not forgetting the simplified tutorials which are so helpful. A real joy to read , please keep blogging
Mo Malron (author)
Thank you so much Cris, this is a “makes me happy” note you left me here. thank you.
Karen A Emrich
Mo –
Your blog site is pined on my internet bar. I *always* find something and interesting outside crocheting.
I had to chase the movie clip to find it. Thank you for “A Life At Stake”. It is now on my to watch list.
Mo Malron (author)
This is quite exciting I have to say Karen, THANK YOU so much you made me so happy here.
Laine Harris
I just wanted to thank you Mo for being so generous with your talent. Sharing your skills and lovely patterns.
I live in Australia and wanted to crochet a present for my newborn great niece in England. Your heart and flower garland is perfect.
Thank you for making the world a nicer (& brighter) place.