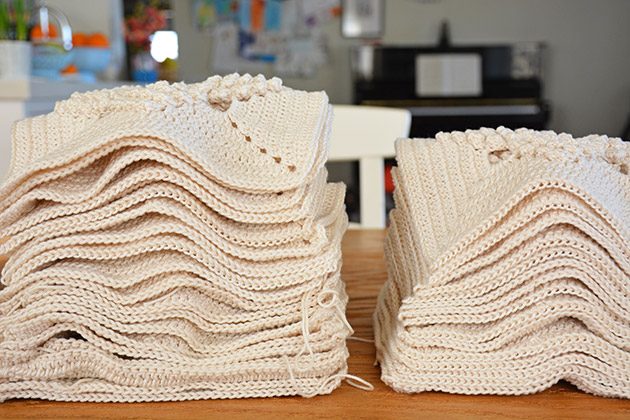
The Smitten Border is in work. I’m so excited to finally offer this PDF pattern on both my Etsy shop and Ravelry soon !!!Finally!!! As a blog subscriber you will receive an email with a coupon code to get a special introduction price, once it published. Thank you so much for waiting patiently for sooo long.
Here is some information you’ll need to have before starting your own Smitten blanket.
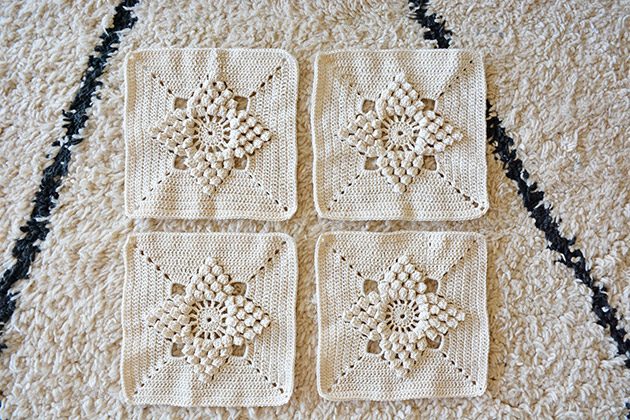
Smitten Square
This is a free crochet pattern – a very beautiful and easy to follow chart, share by ByHaafner. If you are not familiar with the Smitten Square, check out ByHaafner blog for this beautiful free crochet pattern.
Yarn, and sizes
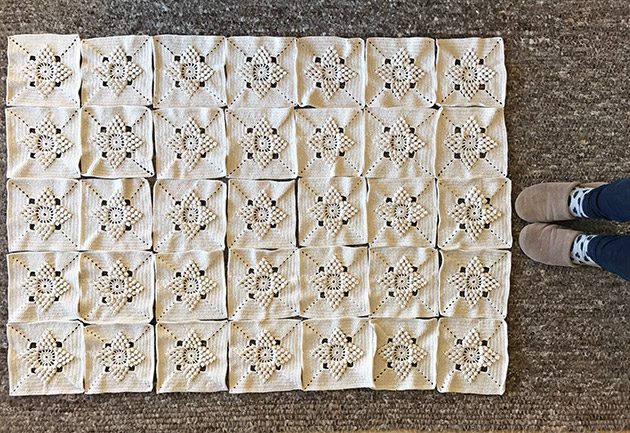
My Smitten blanket made out of Granny Kit cotton in colour Sand.
Square size: 7.6″ / 19.5 x 19.5 cm’
Smitten Blanket size: 50 x 67 inch / 128 cm x 170 cm’ My blanket is made of 5×7 squares framed by the Smitten border.
Smitten Border width: 4.3 inch / 11cm’
You will need 36 Granny Kit cotton balls in colour Sand if you plan on making the same blanket. Choose any colour you like, leave me a note while checkout with the colour you wish to get.
Gauge and Hook Size
With Granny Kit cotton you’ll need to crochet your squares in a 2.75 – 3 mm crochet hook.
Gouge: 24 sts x 12 rows = 4×4 inch (10×10 cm’) Measured on dc st after blocking.
Use any hook size needed to achieve gouge.
Before you start the Smitten border fun, you need to join your squares right? So, I have written a free crochet pattern for the joining part where I show you how I joined my Smitten squares. To do that, let’s take one step back, to the point where you close the last round of your squares.
Invisible Join
 I used the Invisible join to close the last round on my Smitten squares, just as I did in my Love Garden Square tutorial. Using the invisible join to close each of your squares, will make the joining easier since it creates a clean edge without any slip stitch bumps.
Weaving in squares yarn tail
The last step before joining will be weaving in the yarn tails. Darn a needle onto the yarn tail and hide it through the stitches in the wrong side. Weave in one direction and then make a U turn and go back a little on the opposite direction. I usually weave in tails right after I finish crocheting a square because I don’t like this part of the work and I want to finish with it. More about weaving in tails at the end of this post.
Joining the Smitten Squares
 I will show you how I did it, using (mainly) my original photos taken through September 2016, when I joined my Smitten squares, it was a long time ago. For the joining I use the same crochet hook I used to crochet my squares. If you use Granny Kit cotton or any similar yarn, you’ll probably use a 2.75 – 3 mm crochet hook. We will work the joining with the same yarn we crocheted the squares (colour Sand in this case). We will be joining them using a sc into BLO (back loops only). The join will be worked from right to left and than from bottom up (if you are a lefty start from left to right).
Note: (because I know you want to know) I haven’t blocked my squares before joining. I only blocked my Smitten Blanket after it was done.
Step 1
Put two square one on top of the other, facing towards each other. Try to put them so the stitches are matching. If you followed the original Smitten square pattern you would have 44 dc’s on each side of your square + 3 ch stitches on each corner. We will start joining from the centre corner stitch, the second ch stitch in the corner.
Step 2
Insert your hook into the BLO of the centre stitch – on the top square. Now insert your hook to the BLO of the parallel stitch on the second square. Attach a new yarn and sc into the same point where attached – corner stitches joined.
*Insert your hook into BLO of next stitch on the top square and into BLO of the parallel stitch on the bottom square, sc to join them* rep between ** till you reach the next centre corner stitches. Now sc in both BLO of corner stitches. Remember you have 3 stitches on each corner, you join the first one and than the middle one in both squares.
One side is joined.
You joined 44 dc’s + 2 corner stitches in each side – comes to a total of 48 joining sc’s. Turn to look at the right side of your work. Can you see the front loops left to make a pretty stitch-y line between the squares? I love it. Do not cut the yarn,we will continue joining the next couple with the same yarn. We will use the same yarn till the end of the row. I strongly recommend that you look at the right side every few stitches to check that you don’t skip stitches and that the line between two squares looks fine and clean.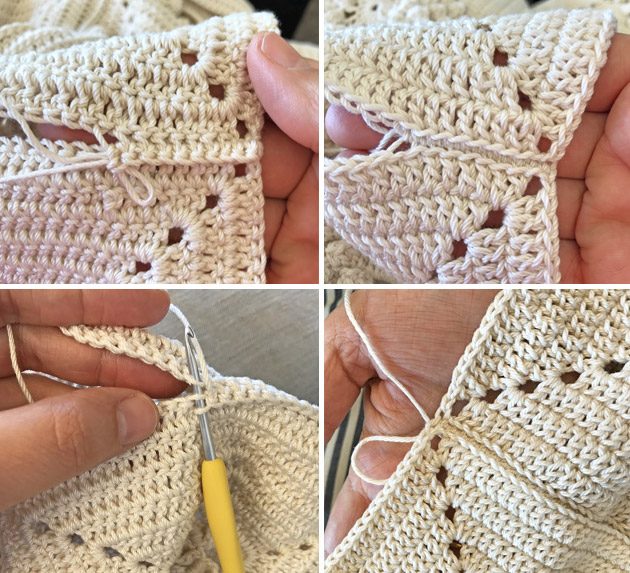
Step 3
Take the next couple of squares. Put them one on top of the other, facing each other with wrong side out. Insert your hook into the BLO of centre stitches on the top square and then in the bottom square, sc to join the corners and than sc all the way to the next corner stitches.
Continue in this manner, repeating step 3 to join all the squares you have in this row. Sc through BLO of parallel stitches in each square, till the end of the row. Break the yarn at the end of the row, leaving about 25 cm’ yarn tail. See weaving-in tails instructions at the end of this post. 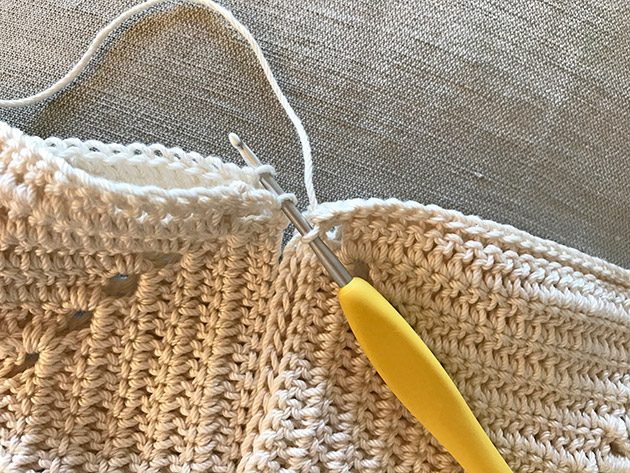
Step 4
Join the next line of squares and than the next one, just the same way, till all your squares are joined only in one direction (horizontally or vertically). Cut the yarn at the end of each row you join (leaving about 25 cm” tail) and join a new yarn at the beginning of each row.  Time to join from bottom up. We will do it just the same way. The only point I want to show you is what we do when we meet a corner.
Step 5 Joining a corner
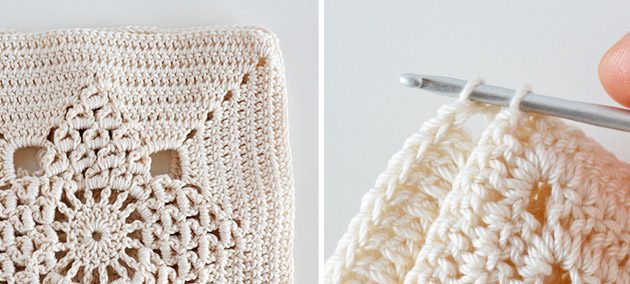
Start at the bottom corner of the right column (if you are left handed start on the left bottom corner). Join a new yarn into BLO of centre stitch on both squares and start joining with sc’s all the way up. When you reach the point where the corner stitches are already joined (used), sc in last available stitches – as I show in below left picture. These two stitches are part of the three corner stitches on your Smitten squares.
Now skip the connected corner and sc straight into the first two available stitches in the next couple of squares – where I show in the right picture. These two stitches are also part of the three corner stitches on your squares. 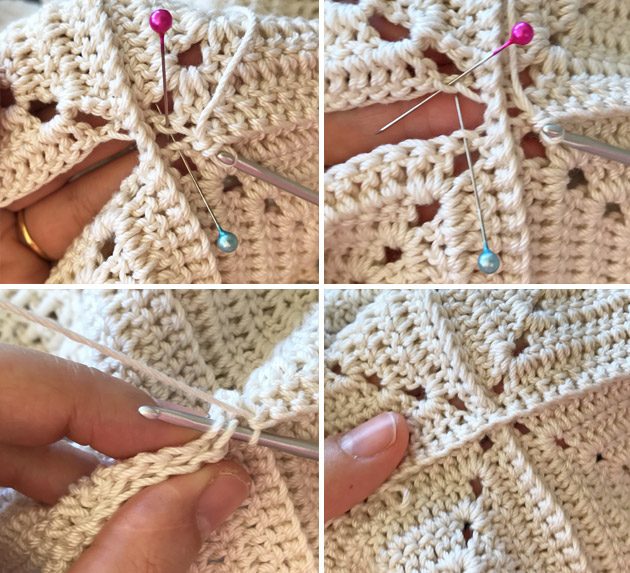 Your corner stitches are joined! Now all you have to do is keep on joining all the way up, in this manner till your squares turned into a full blanket.
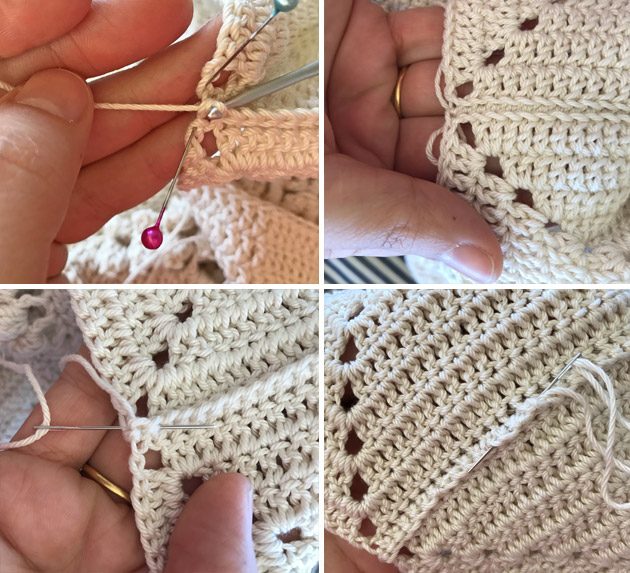
Weaving in tails.
let me show how to weave in the yarn tails, like I did. I think you might find it useful, not just for this project. When you reach the last stitches on the row, insert your hook into the two last corner stitches to join, as seen below. After your last corner is joined, leave 25 – 30 cm” tail and cut the yarn. Darn a tapestry needle onto the yarn tail and sew the tail into the stitches. Make sure your stitches are not seen on the right side. Sew it in one direction and then make a U turn, to make sure it’s all locked and safe (like we always do especially with cotton).
Tip for tail ends.
This tip will work not just for the Smitten blanket but for any other project, especially 4ply yarn projects. After I finish sewing the yarn tail, I split my 4ply into two strands, seen below. With these two ends I make 2 -3 knots, than I cut the yarn. This will help keeping the ends in place and avoid tails movements while using. As you know all crochet blankets are in massive use here in our family so with these knots we are on the safe side. 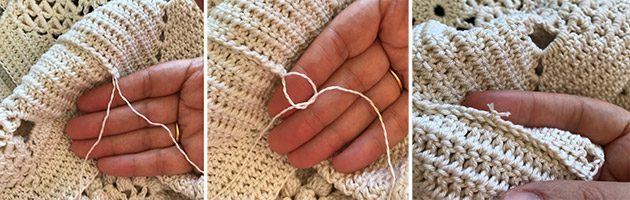 So this is everything you need to know before starting the Smitten border: closing the last round of your Smitten squares, joining all your Smitten squares and weaving in ends.
You are now ready for THE most meditating work on making a crochet blanket – Border making. So make sure all is ready before you get an email from me, telling you that the Smitten Border is available. Aa blog subscriber you will receive an email with a coupon code for a special introductory price for this elegant border.
I will be so happy know if you find it easy to follow my joining tutorials or if you have any suggestions to make it better. Have you used some other joining method on your squares? Share your project with #crochetobjet or #smittenblanket, I will check these hashtags every few days. I’ll jump back into my Smitten Border writing now, xxxMo
13 comments on Joining Smitten Squares – free crochet pattern
Sandra
Very beautifully explained and lovely squares!
Mo Malron (author)
Thank you Sandra
Charlene Brown
Thank you so much! This so much neater than what i have been doing. Also very easy to understand!
Mo Malron (author)
Thank you Charlene, you can use this joining for future projects 🙂
Michelle
I really enjoyed the joining process for Love Garden; seeing every stitch and corner match up and line up so beautifully was such a pleasure! I am so excited to begin this lovely blanket. Now to decide the color . . . I’m thinking maybe Granny Kit Cream . . . Annnndddd, because I so love working with Granny Kit cotton and having it’s silky softness in my hands, I may add another row and have 6 x 8 squares. It’s so nice to have a visit with you again in this special place! XO
Mo Malron (author)
Yes If I will make it again I will for sure make it 8×5 or 8×6. All my students made it bigger than mine, This size is a little too small for our bad. Thank you for all your kind comments dear Michelle <3
Patrizia
Hi Mo. as usually, your works are beautiful!!
It is possible to buy the instructions for the squares? and for the border?
thank you in advance 😉
Patrizia
Mo Malron (author)
Thank you Patrizia, The Smitten square is a free pattern, I shared link in the post. As mentioned in the post the Smitten border will be available in my Etsy shop in a few days.
DANA DYER
I just found your web-blog and have a question for you or one of your subscribers. I find that many times my projects curl at the corner. I’ve tried changing the direction of my turn and that didn’t fix the issue. I was told once that I should block my project, but how do you block a large afghan? I would appreciate any suggestions.
Mo Malron (author)
Hi Dana, There are many different ways to avoid corners and edges curling in crochet. You may find some of them in below links:
https://crochetobjet.com/2018/08/23/love-garden-edging-and-blocking-tutorial/
https://crochetobjet.com/2017/11/07/stripes-colours-crochet-blanket-pattern-and-kit/
Michal Shavit@gmail.com
Thank you so much!! Enjoied every moment!!
Hester Fraser
Where do I get the pattern for these Smitten Squares?? Please and even the new small squares you have jut ublished onYour tube
Mo Malron (author)
Here you can find the pattern for Smitten squares:
https://crochetobjet.com/2019/05/24/joining-smitten-squares-free-crochet-pattern/
I don’t have a written pattern yer for the Solid squares but I just shared it on YouTube so you can follow and make it with me.