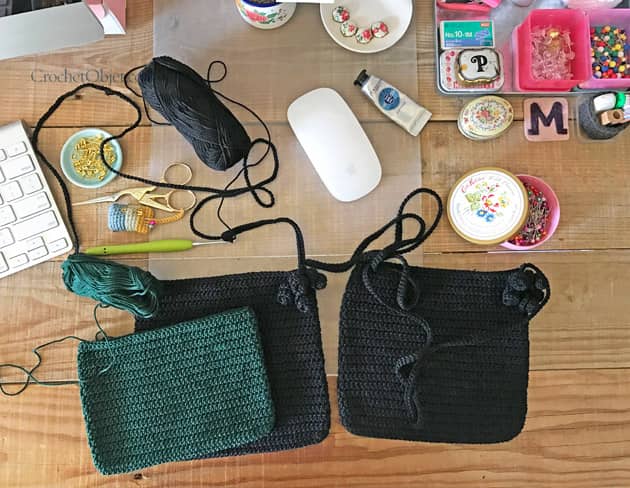
I have started making this Black Jet bag, while on the flight to my Berlinish’ Girls weekend. You can read all about it here. I had this idea in my mind for quite a while and I’m so very very excited to share this step-by-step pattern here today. I just thought of a small bag to carry my driving License and mobile while I’m driving my kids to their afternoon activities. BUT as a matter of fact, from the moment this Black Jet bag got off the hook, I’m using it heavily. This little bag is so nice not just for my everyday driver duties. It is perfect when wearing my casual jeans but also when I go out dressed up less casual. This little crocheted bag is “going out” much more than what I was planing for. In the picture above you can see couple of Black Jet bags crocheted in colour Jet and a third bag crocheted in colour Ebony – this one is crocheted while I was checking my pattern right before publishing this post.
So, before we start the ‘how to’ we need some essential information.
BAG SIZE
With a Granny Kit cotton and a 2.25 mm crochet hook, your bag will come out about:
Width = 17.5c”m (6.7″)
Hight = 16 c”m (6.3″), not including the strap.
The strap is about 58 c”m (22.8″) long.
The pattern I’ll share here today is the original bag size I’ve crocheted, feel free to change it to whatever size you wish to have.
WHAT DO YOU NEED
Yarn: 1.5 balls of GrannyKit cotton colour Jet (you’ll get 2 bags out of 3 cotton balls)
Crochet hook: 2.25 mm
Crafty scissors
Stitch marker
Tapestry needle
STITCHES & ABREVIATIONS (US crochet terms)
ch = chain stitch
st(s) = stitch(s)
rnd(s) = round(s)
yo = yarn over
lp(s) = loop(s)
sl st = slip stitch = insert hook, yo, pull the lp back through the st and through the lp on your hook.
sc = single crochet = insert hook, yo, pull the lp back through the st (2 lps on hook), yo and pull through both lps on hook.
hdc = half double crochet = yo, insert hook, yo, pull the lp back through the st (3 lps on hook), yo and pull through all 3 lps on hook.
dc = double crochet = yo, insert hook, yo, pull the lp back through the st (3 lps on hook), yo and pull through 2 lps on hook (2 lps left on hook), yo and pull through remaining 2 lps.
dc2tog = double crochet 2 sts together = yo, insert hook, yo, pull the lp back through the st (3 lps on hook), yo and pull through 2 lps (2 lps left on hook) ,yo, insert hook to the next st, yo, pull the lp back through the st, yo and pull through 2 lps (3 lps left on hook),yo and pull through remaining 3 lps – this is a decreasing.
To Start ch 40
rnd 1: hdc in the 3rd ch from hook – where I put my sewing pin in below picture.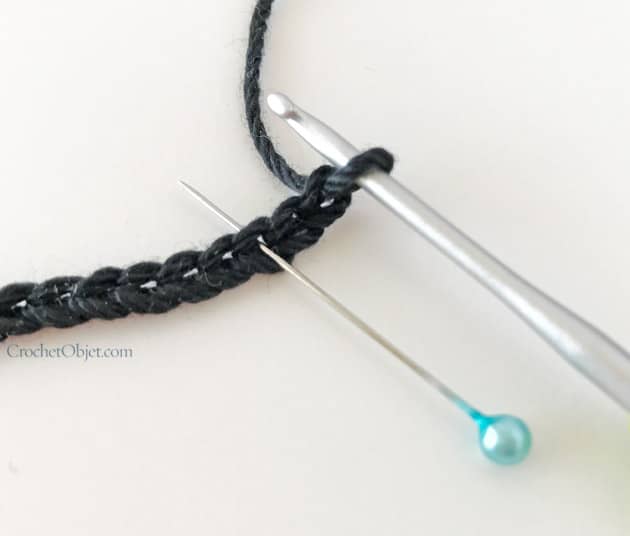 Make 1 hdc in each of the next 36 sts. Make 3 hdc’s into last st – tighten to close the hole. It should look like the bellow pic.
Continue working around: work on the other side of your foundation ch now, hdc in each of the next 36 sts, using the other lp of each ch st of your foundation ch. Make the first hdc where I show with my sewing pin in below picture. Try to work on the yarn tail so you don’t have to weave it in later.  When you reach the end, add 1 more hdc into the first st, to the point shown by my sewing pin in the picture below.
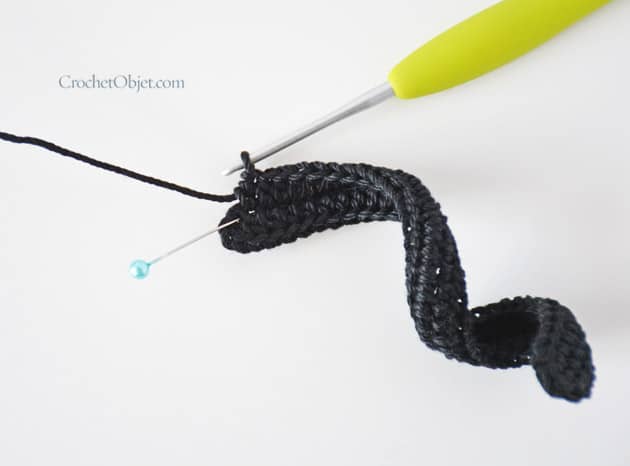 To close this rnd, sl st into the 2nd ch of your initial ch 2. Your work should look like the below picture now. You should have 36 hdc’s on each side + 3 hdc’s in each corner – 78 hdc’s in total on this rnd.
rnd 2: Mark the last hdc you crocheted in previous rnd and ch3 (counts as first dc). Make 1 dc into the same point, the base of ch3 – where I show with my sewing pin in the picture below.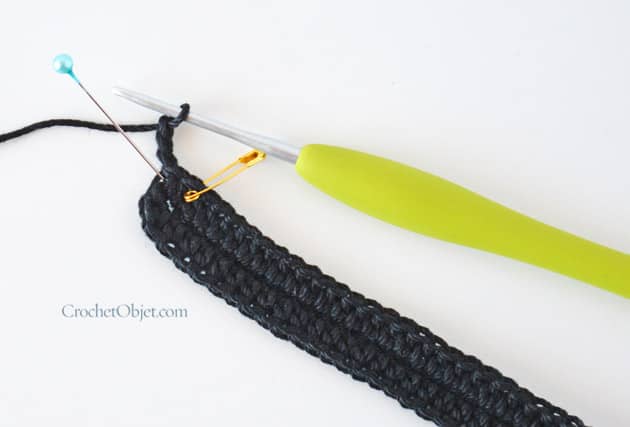 Make 2 dc’s in next st. Now make 1 dc in each of the next 36 sts. When you reach next corner, you have 3 corner sts right? I show them with my sewing pins in the picture below, make 2 dc’s in each of the 3 corner sts.
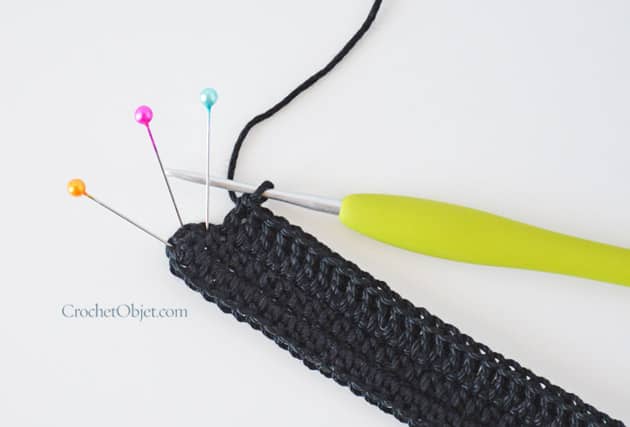 Continue working 1 dc in each of the next 36 sts. When you reach the first corner again, remove the st marker and make 2 dc’s in last remaining st on this rnd – this is one of the three corner sts.
To close, sl st into the 3rd ch of your initial ch 3. We have 36 dc’s on each side + 6 dc’s in each corner – 84 dc’s in total on this rnd. Your work should look like the below pic now. We have just finished crocheting the base of our black Jet bag – with 84 sts around. In next rnds we will work the ‘body’ of the bag.
rnds 3-17 (15 rnds): ch3 (counts as first dc), dc in each st around. To close sl st into the 3rd ch of your initial ch 3. (84 sts). It’ll look like the below picture at the end of rnd 3. It will look like the below picture at the end of rnd 7.
 It will look like the below picture at the end of rnd 12.
 When your cotton ball is finished just make a knot with a new one and continue working. Weave in the tails later.
 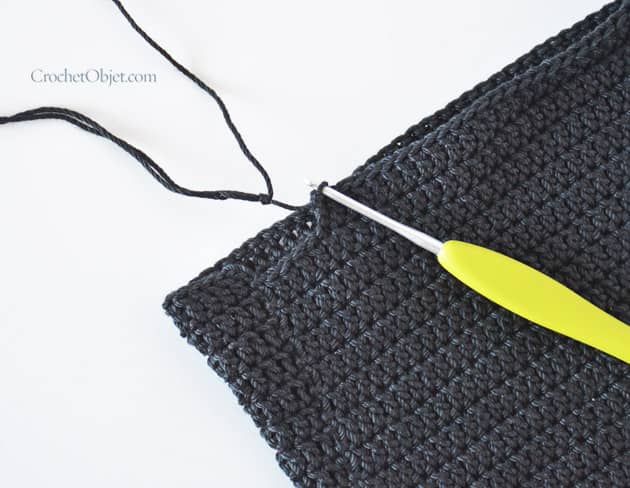 It will look like the below picture at the end of rnd 17.
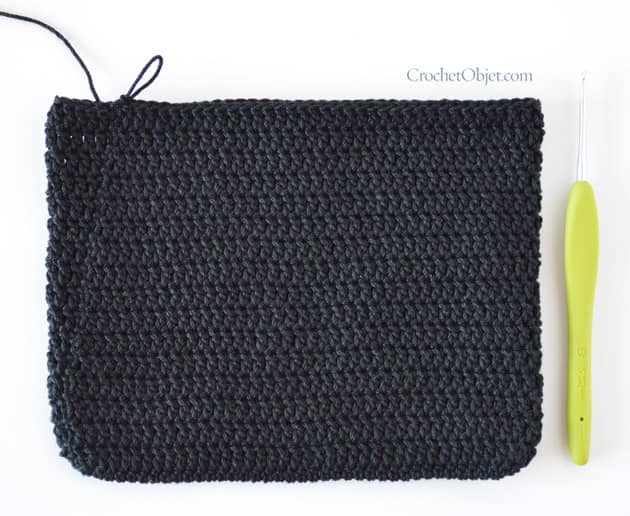 Spiral Tassels
We will start working the spiral tassels now. We will create the tassels while decreasing the number of sts in each of the next rnds.
rnd 18: In this rnd we will make the first spiral tassel and we will decrease 2 sts. Ch 3 (counts as first dc), dc in each of the next 45 sts. We will make the first little tassel now.
ch 10. Work into these ch sts as follow: make 2 dc’s into the 4th ch from hook, where shown with the sewing pin on the picture below.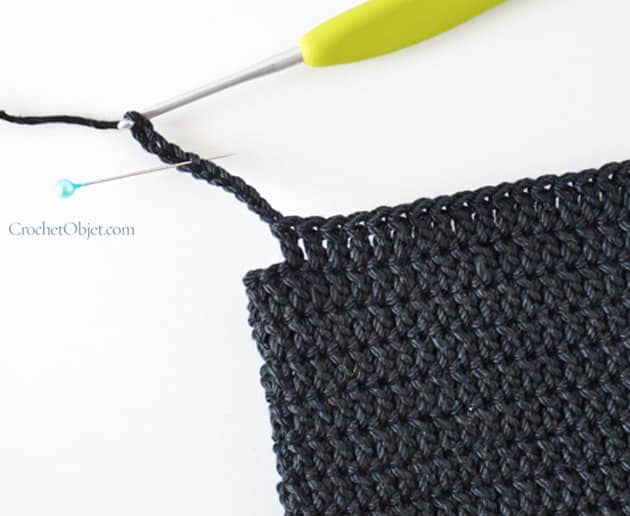 Make 3 dc’s into each of the next 5 sts, make 2 dc’s in last ch st, ch 3 and sl st into the same last st. We just made our first spiral tassel. We will continue rnd 18, crocheting 1 dc in each st around, starting at the st I show with my sewing pin on the below picture. Pull the tassel down with your finger and continue to work from the point I show with the sewing pin.
  Dc in each of the next 8 sts, dc2tog, dc in each of the next 26 sts, now make a dc2tog, from the last two sts. To close, sl st into the 3rd ch of your initial ch 3. (82 sts + 1 spiral tassel)
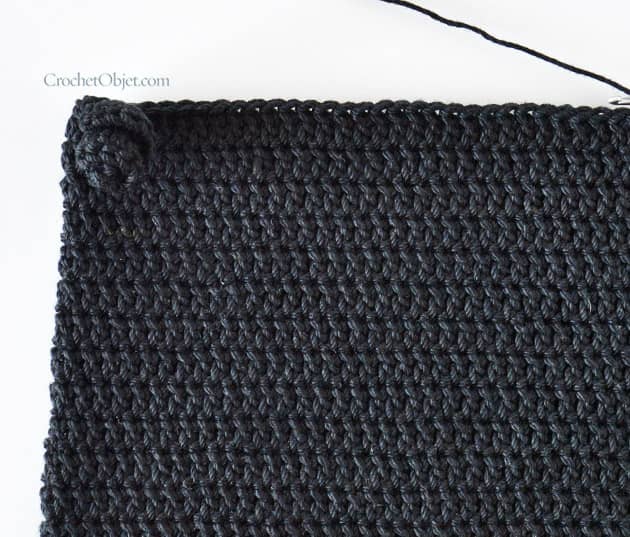 rnd 19: In this rnd we will make the next 2 spiral tassels and we will decrease 2 more sts. Ch 3 (counts as first dc), dc in each of the next 44. We will make the next spiral tassel now.
ch 11, and work as follow: make 2 dc’s into the 4th ch from hook.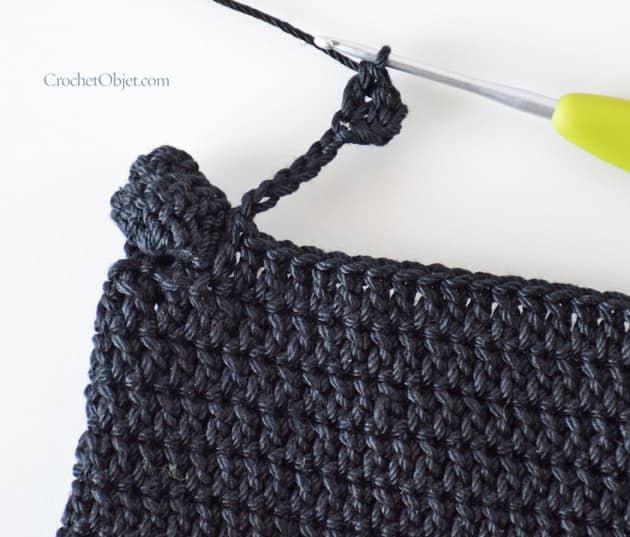 Make 3 dc’s into each of the next 6 sts, make 2 dc’s in last st, ch 3 and sl st into the same last st. This is the second spiral tassel made. Continue working dc’s around now, make sure you don’t skip any st. Dc in next 3 sts. I show exactly where to make them, in next 3 pictures. Make the first dc on the next st, where I show with my sewing pin.
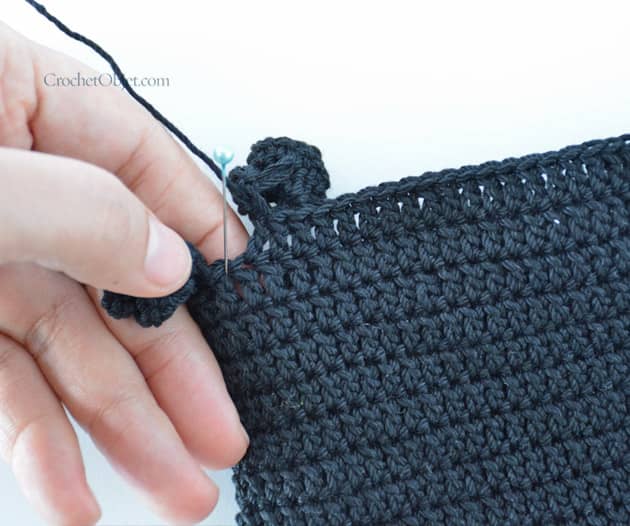 Make the 2nd dc into the next st, on top of your first tassel, pull it aside with your finger and dc where I show with my sewing pin in below picture.
 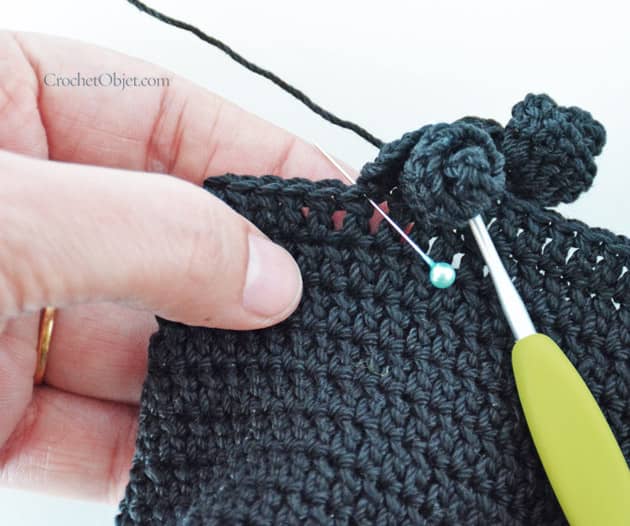 Make the 3rd dc into the next st, where I show with my sewing pin below. We have to make sure we make a dc into each and every st and not to miss any of them.
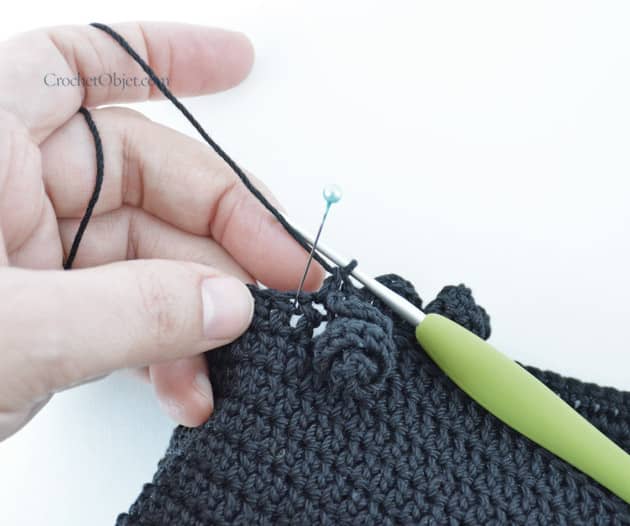 We will make the third tassel now: ch 9, and work as follow: make 2 hdc’s into the 3th ch from hook, 3 hdc’s into each of the next 5 sts, make 2 hdc’s in last sts, ch 2 and sl st into the same last st. Continue making the dc’s around now. Pull the tassel down and aside with your finger and work the following from this st I show at the pic below.
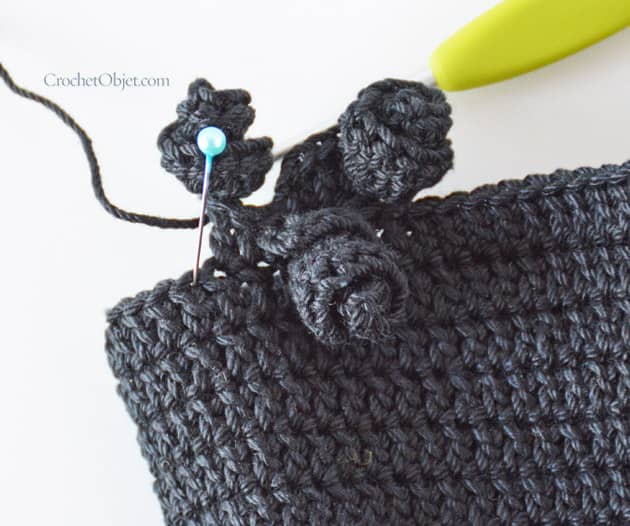 Dc in each of the next 7 sts, dc2tog, dc in each of the next 22 sts, dc2tog. Dc in last st. To close, sl st into the 3rd ch of your initial ch 3. (80 sts + 2 spiral tassel)
Your work should look like the below picture now.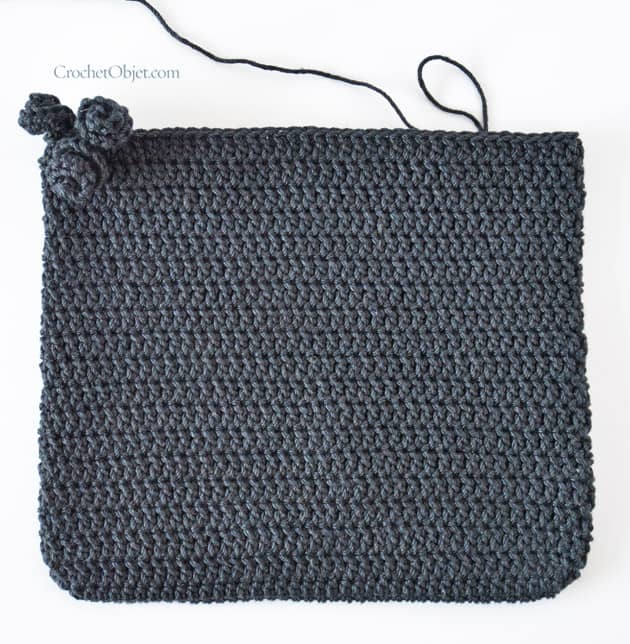 rnd 20: In this rnd we will make the last two spiral tassels and we will decrease 2 more sts. Ch 3 (counts as first dc), dc in each of the next 2 sts, dc2tog, dc in each of the next 40, pull the tassel below you aside and make a dc on the next st. We will make the 4th spiral tassel now.
ch 10, and work as follow: make 2 dc’s into the 4th ch from hook, 3 dc’s into each of the next 5 sts, make 2 dc’s in last sts, ch 3 and sl st into the same last st – 4th tassel made. Dc in next st, where I show in next below picture. 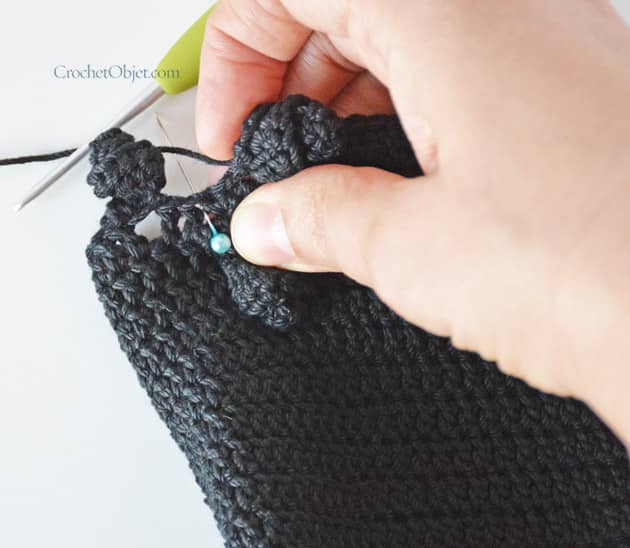 Make the last spiral tassel now. Ch 10, and work as follow: make 2 dc’s into the 4th ch from hook, 3 dc’s into each of the next 5 sts, make 2 dc’s in last st, ch 3 and sl st into the same last st – last tassel made.
Dc in next st, dc on top of next tassel below you, dc in next st, dc2tog, dc in each of the next 28 sts. To close, sl st into the 3rd ch of your initial ch 3. (78 sts + 2 spiral tassel)
Your bunch of tassels is made. Your work should look like the below picture now.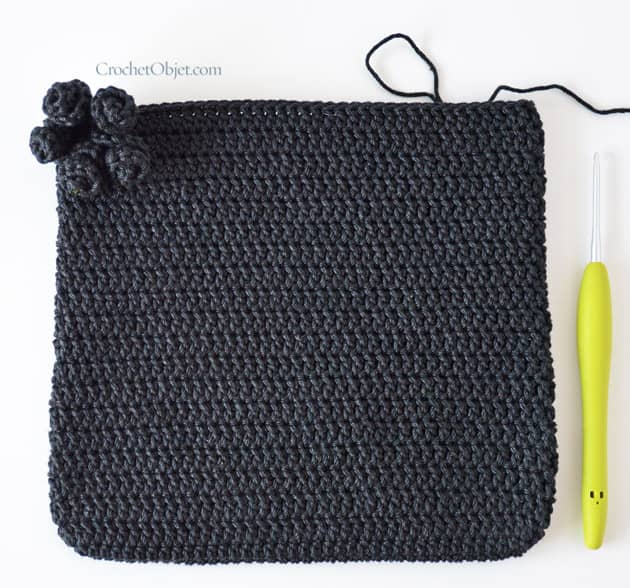 rnd 21: This is the last rnd of the bag. We will crochet sc’s in each and every st around. ch 1 (counts as first sc), sc in each st, make sure you don’t miss the sts on top of the tassels. To close, sl st into the first ch made. (78 sts). Your work should look like the below picture.
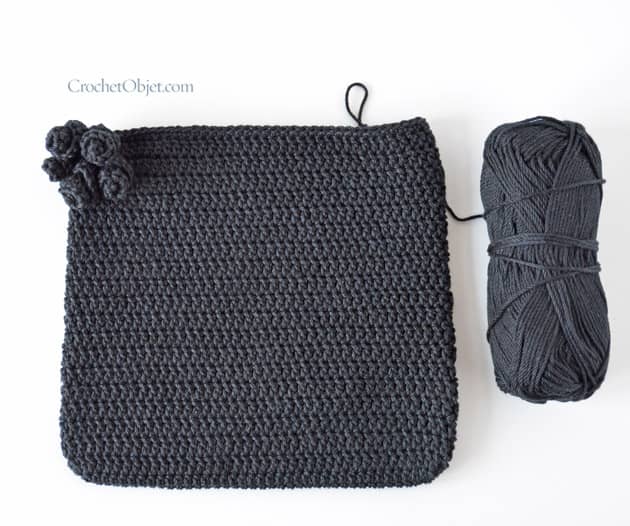 Strap
Strap
Now we will create the strap which is the last and final part of this little project. The strap here is made of two rows worked as follow:
row 1: Sl st into each of the next 6 sts, sc into the next st. Your hook should be located one st before the middle st. Now make a ch of 300 sts – this long ch creates the strap length, you can change the number of ch you crochet and create any length you wish to have. After your ch is as long as you like to have it, sl st into the parallel st at the other side of the bag to connect your strap.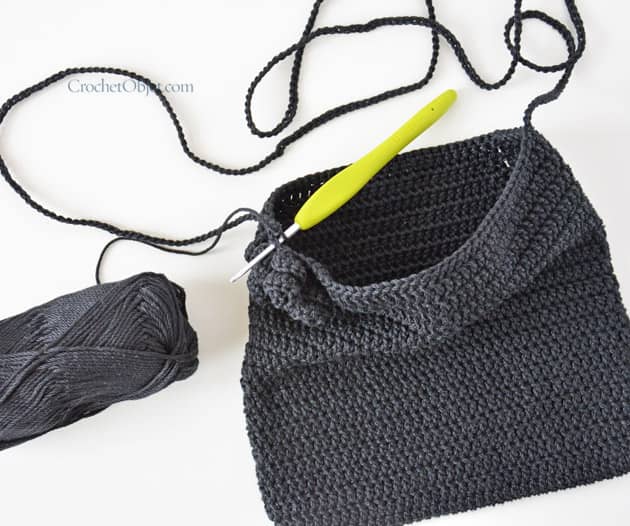 row 2: Sc into the next st of the bag itself. Sc into each of the strap sts, make sure you sc into one lp only of each and every ch in your strap.
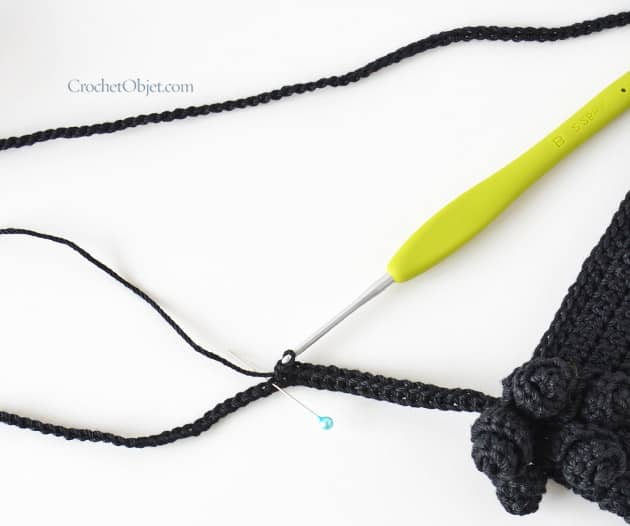 When you reach the end of your strap ch, sc into the next st on the bag, next to the st where you started making the strap ch. Shown by my sewing pin on bellow picture.
  Sl st into the next 2 sts. Fasten off and weave in the tails.
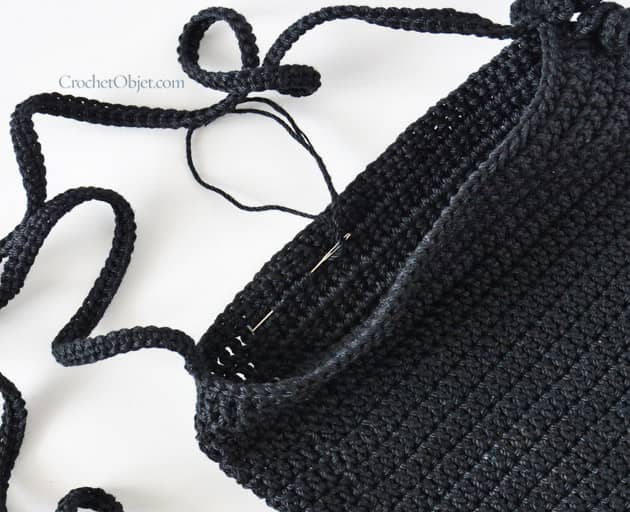 Your Black Jet beg is here!!! Ta Dah !!! isn’t that an easy breezy crochet project? Most of it is a very simple dc’s work with a little pretty addition that if you learn ‘how to’, you can easily fly with it to so many beautiful places and ideas. I really really hope you’ll find it nice and give it a go.
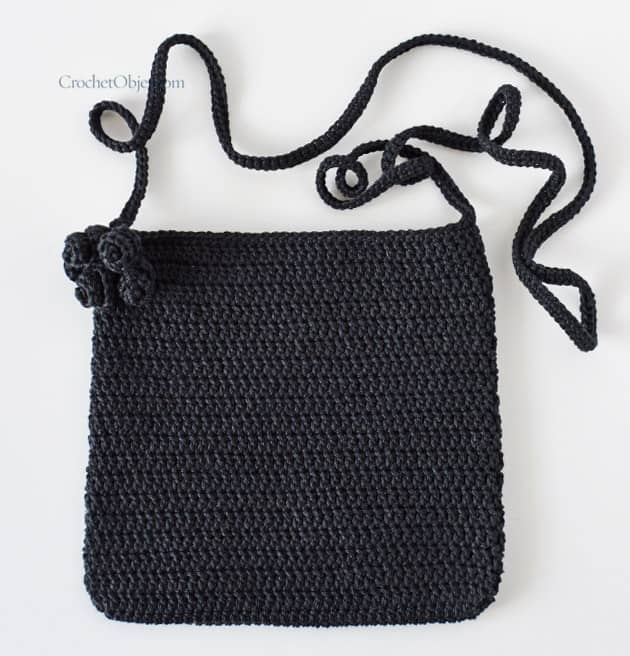 Blocking: I haven’t done any blocking this time, I just used it right after it got down of the hook. But if you like to block it, here is what I suggest: What I usually do is just spray a little water on, I “help” the edges look sharp by arranging them/make them straight with my fingers. In this case I would add some more attention to the bunch of tassels, I would spray some water on it and give a little shape to the tassels, like make them a bunch. After it is all fixed as I want it, I just lay it flat to dry over night. Use it only after it is totally dry.
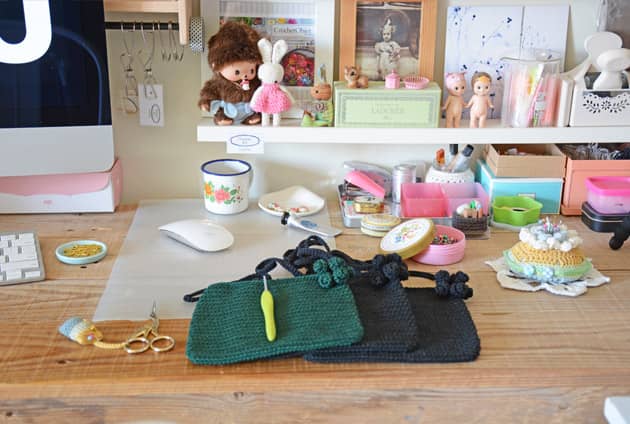 Here is a ‘just words’ pattern, for you, same pattern with no pictures:
To Start ch 40
rnd 1: hdc in the 3rd ch from hook
Make 1 hdc in each of the next 36 sts. Make 3 hdc’s into last st – tighten to close the hole. Continue working around: hdc in each of the next 36 sts. When you reach the end, add 1 more hdc into the first st. To close, sl st into the 2nd ch of your initial ch 2. (78 hdc’s)
rnd 2: Ch3 (counts as first dc). Make 1 dc into the same point. Make 2 dc’s in next st. dc in each of the next 36 sts. Make 2 dc’s in each of the 3 corner sts. Work 1 dc in each of the next 36 sts, 2 dc’s in last remaining st. To close, sl st into the 3rd ch of your initial ch 3. (84 dc’s)
rnds 3-17 (15 rnds): Ch3 (counts as first dc), dc in each st around. To close sl st into the 3rd ch of your initial ch 3. (84 sts).
rnd 18: Ch 3 (counts as first dc), dc in each of the next 45 sts. We will make the first little tassel now.
ch 10. Work into these ch sts as follow: make 2 dc’s into the 4th ch from hook. Make 3 dc’s into each of the next 5 sts, make 2 dc’s in last ch st, ch 3 and sl st into the same last st. Make 1 dc in each st around. Pull the tassel down with your finger and continue. Dc in each of the next 8 sts, dc2tog, dc in each of the next 26 sts, now make a dc2tog, from the last two sts. To close, sl st into the 3rd ch of your initial ch 3. (82 sts + 1 spiral tassel)
rnd 19: Ch 3 (counts as first dc), dc in each of the next 44. We will make the next spiral tassel now.
ch 11, and work as follow: make 2 dc’s into the 4th ch from hook. Make 3 dc’s into each of the next 6 sts, make 2 dc’s in last st, ch 3 and sl st into the same last st. This is the second spiral tassel made. Continue working dc’s around now, make sure you don’t skip any st. Dc in next 3 sts. Make the 2nd dc into the next st, on top of your first tassel. Make the 3rd dc into the next st. We will make the third tassel now: ch 9, and work as follow: make 2 hdc’s into the 3th ch from hook, 3 hdc’s into each of the next 5 sts, make 2 hdc’s in last sts, ch 2 and sl st into the same last st. Dc in each of the next 7 sts, dc2tog, dc in each of the next 22 sts, dc2tog. Dc in last st. To close, sl st into the 3rd ch of your initial ch 3. (80 sts + 2 spiral tassel)
rnd 20: Ch 3 (counts as first dc), dc in each of the next 2 sts, dc2tog, dc in each of the next 40, pull the tassel below you aside and make a dc on the next st. We will make the 4th spiral tassel now.
ch 10, and work as follow: make 2 dc’s into the 4th ch from hook, 3 dc’s into each of the next 5 sts, make 2 dc’s in last sts, ch 3 and sl st into the same last st – 4th tassel made. Dc in next st. Make the last spiral tassel now. Ch 10, and work as follow: make 2 dc’s into the 4th ch from hook, 3 dc’s into each of the next 5 sts, make 2 dc’s in last st, ch 3 and sl st into the same last st – last tassel made.
Dc in next st, dc on top of next tassel below you, dc in next st, dc2tog, dc in each of the next 28 sts. To close, sl st into the 3rd ch of your initial ch 3. (78 sts + 2 spiral tassel) Your bunch of tassels is made.
rnd 21: Ch 1 (counts as first sc), sc in each st, make sure you don’t miss the sts on top of the tassels. To close, sl st into the first ch made. (78 sts).
Strap
row 1: Sl st into each of the next 6 sts, sc into the next st. Your hook should be located one st before the right middle side st. Now make a ch of 300 sts. After your ch is as long as you like to have it, sl st into the parallel st at the other side of the bag to connect your strap.
row 2: Sc into the next st of the bag itself. Sc into each of the strap sts, make sure you sc into one lp only of each and every ch in your strap. When you reach the end of the your strap ch, sc into the next st on the bag, next to the st where you started making the strap ch. Sl st into the next 2 sts. Fasten off and weave in the tails. This is my Black Jet bag step-by-step tutorial. If you like to make it with any other colour just make sure you get 2 Granny Kit cotton balls here. Hope you’ll give it a go, as this is a fun and very fast project that will supply some happiness to your heart.
Please share your work on IG using #crochetobjet & #blackjetbag. Thank you, xoxMo
14 comments on Black Jet Bag – How To
Sandra
What a lovely bag, so chic for the evening in black and in such a lovely green too! I love the addition of the tassels which look like roses!
Mo Malron (author)
Thank you Sandra, this bag is now my buddy 🙂
Sigrid
I saw your bag before and liked it rightaway! Thank’s for the clear instructions and pictures, must keep this in mind and put it on my long, long list of To Make 🙂
Have a nice weekend,
Sigrid
Mo Malron (author)
Thank you Sigrid, don’t wait so long it is a very little project. Give it a go.
Cynde
Thank you. Mo, for this pattern. You are a creative and generous designer. I will share this with my friend and we’ll crochet the bags together. I do appreciative the creative spark you ignite, through design and color.
Sincerely
Mo Malron (author)
Thank you for this nice comment Cynde, Sharing my creation energy is the only way I can thank you for come and visit me here. I am so happy you plan to crochet this bag.
Jo
I love this little bag, Mo. I’ve crocheted very little throughout my life; now that I’ve discovered CrochetObjet, suddenly I have four projects I’m working on. Guess it will be five projects now! This bag can’t wait. It’s très chic! Thank you so much for the detailed pattern with photos.
Mo Malron (author)
Thank you so soooo so much Jo, you made me very happy here with your comment. There’s so much peace and quiet in crochet that good for you for getting yourself back in.
Koh'lani
This is a very useful bag! And it’s free! Love the bag, love the styling descriptions, you are a goddess!
Mo Malron (author)
Thank you Koh’lani
Karen A
As always, excellent!
Thank you ma’am.
Mo Malron (author)
Thank you Karen, as always, good to hear that.
algmiae
Merci beaucoup pour le tuto et pour ce petit sac adorable !
Susan
I love your blog and your workshops look so fun……I live in Arizona, so I am unable to attend…..would love to though!! I admire your work……you are so good at what you do….I was wondering if you are putting your Smitten pattern up on your Etsy Shop anytime soon…..I love that pattern and I know there is another site that has it….but it looks like yours is a little different as far as size and I like it better……thanks for reading this and have a great day!! Susan