My Angie bunny patterns collection is growing to be quite a nice presentative collection. I have few of the clothing patterns on my shop and few as a free pattern here on my blog. Together they all became quite a nice varied and colourful collection. There are few more clothing ideas in my busy head that I plan to write down, somewhere in the future and I hope it’ll be somewhere really soon. Today I’m ‘gona’ write down the baby overall pattern here for you.  I originally crocheted the Angie’s baby bunny overall as my youngest sun had complained I only make Angie girls. He wanted to have a baby boy for his own. He wanted a little baby bunny to hug. This guy is a little miniatures collector. It was quite a long time ago, and he was not feeling very well so we spent the day together, laying on the sofa and chatting a little bunnies chat, untill he fell asleep.
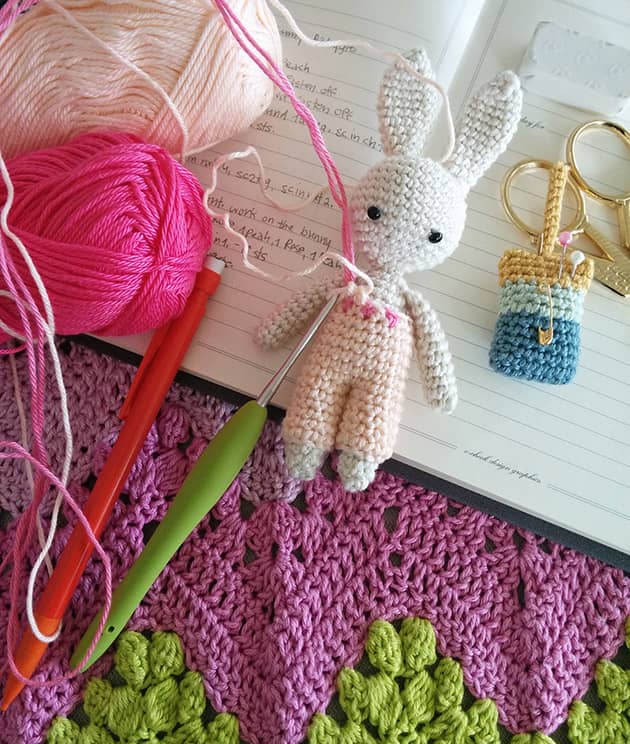 When I first crocheted the baby overall, I wanted to have this cute effect that these ‘newborn’ overalls have. I wanted to create a little detail on it. Well, it’s not that easy to create a detail on such a small work so I tried few different options and finally came out with the 3 dots on the front. It is actually quite an easy speedy kind of work, still a miniature work but very easy to make. I made the first one and while crocheting the second one, I wrote down the pattern on my pattern sketch book so it’s documented somewhere.
  I’ve been asked many times for the pattern for this 3 dots baby overall. I planed to share it here as a FREE pattern for quite a while and finally found the time to write a step-by-step pattern for you in my home alone morning hours. Gosh I love being here at my desk for pattern writing.
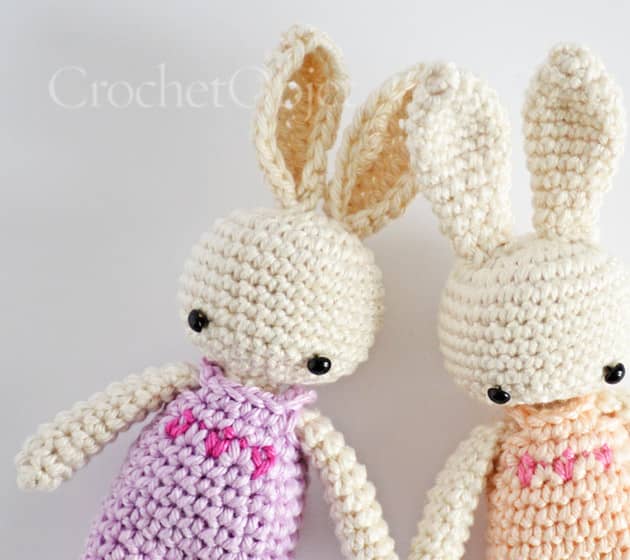
 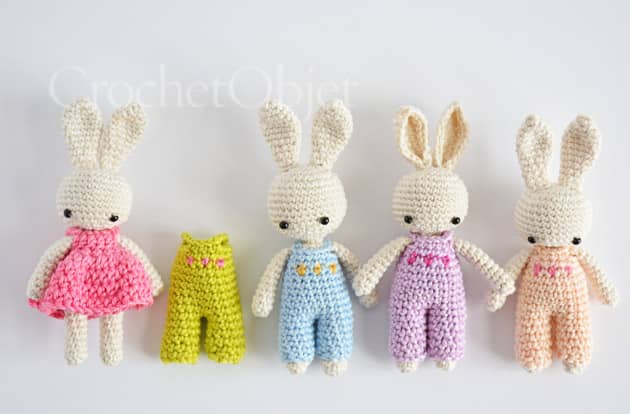 If you haven’t tried my ‘Mini pretty in pink‘ dress pattern, please go ahead and give it a try. It’s a speedy and very lovely kind of work. I think it really is requested to have the baby overall here now, so we have a baby girl and a baby boy in our Angie collection – bare Necessities. Now that the Angie kit is on the shop you can make quite a nice Angie collection of your own. We will use colours from the kit here today.
 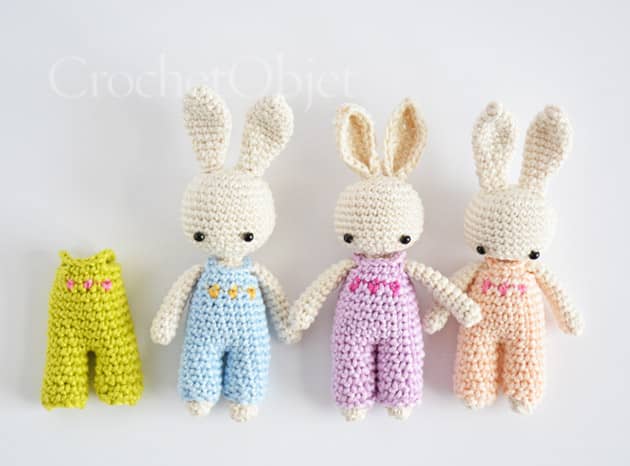 Before we start with the pattern, here is some important information you should know.
WHAT DO YOU NEED
A crocheted baby bunny
Yarn: GrannyKit cotton in any 2 colours.
Crochet hook: 2.75 mm
A pair of crafty scissors
Tapestry needle
On todays pattern I’m using colours included on the Angie kit so if you already have one, just take out the Lilac and a little piece of the Fuchsia yarn. 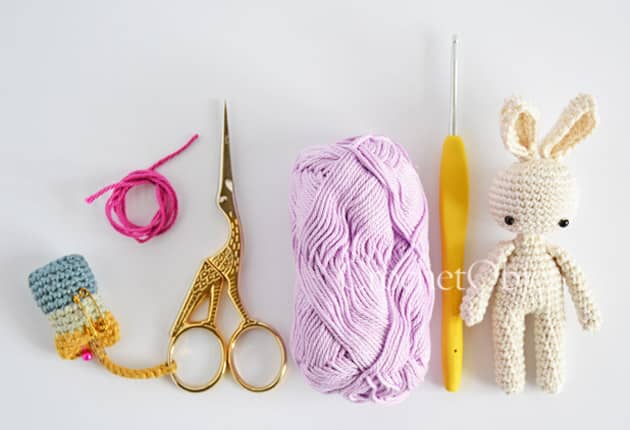 ABREVIATIONS AND STITCHES (US crochet terms)
ch = chain stitch
st(s) = stitch(s)
rnd(s) = round(s)
yo = yarn over
lp(s) = loop(s)
sk = skip
*…* = repeat instructions between ** x times
sc = single crochet = insert hook, yo, pull the lp back through the st (2 lps on hook), yo and pull through both lps on hook.
sc2tog = single crochet 2 next stitches together: insert hook to front lp only of next st and than to front lp only of the next st. yo, pull through both front lps, yo and pull through both remaining lps on hook.
TO START Ch 10 and sl st to the first ch to form a ring. (I’m using colour Lilac for this tutorial)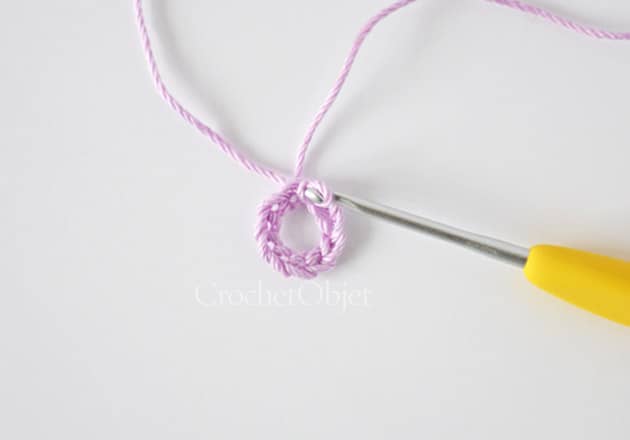 rnd 1: ch 1 (counts as first sc), sc in each sts around (10 sts). DO NOT work on the yarn tails. We will weave it in later.
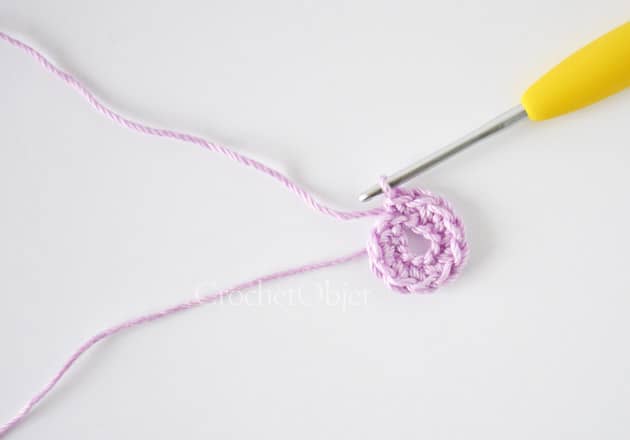 rnds 2-6: (5 rnds) sc in each sts around, work in spiral and mark your first st each rnd (10 sts).
Break the yarn and weave in the tail as I teach on Angie & baby first leg patterns – First pants leg made.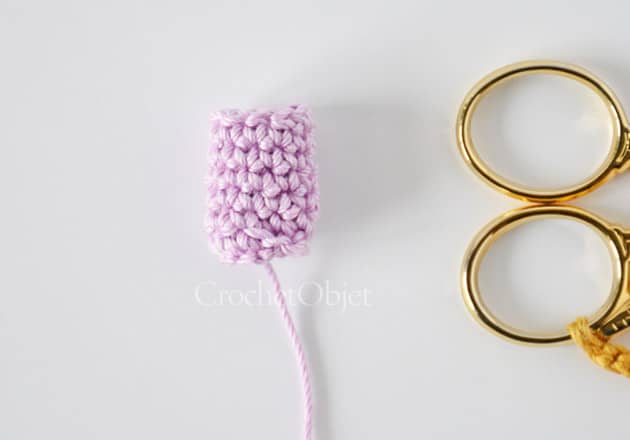 Make the second leg now, same as the first one. When you finish rnd 6, DO NOT cut the yarn. We will continue working with it.
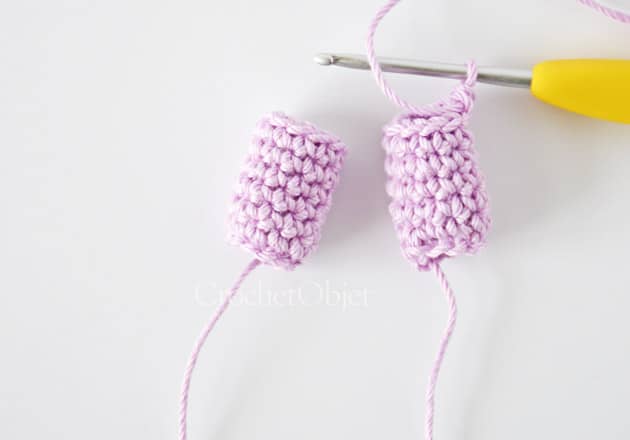 Connecting the legs and make pants:
rnd 7. Continue working with the yarn on the 2nd leg as follow: ch1, insert your hook into one of the sts around the first leg. Now sc in each st around the first leg (10 sts).
Sc in ch1, using 1 lp only. Insert your hook where I show with my sewing pin in below pic.
Now sc around the 2nd leg (10 sts).
Sc in ch1 from the other side, insert your hook as I show in below pic.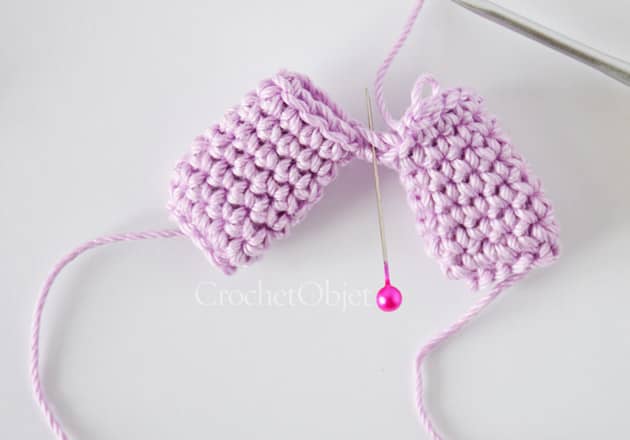 When you finish rnd 6 You should have 22 sts around – this is the base of all following rnds.
rnds 8-9. (2 rnds) sc in each st around (22 sts). Work spiral and mark your first sts on each rnd. Your work should look like the below at the end of rnd 9.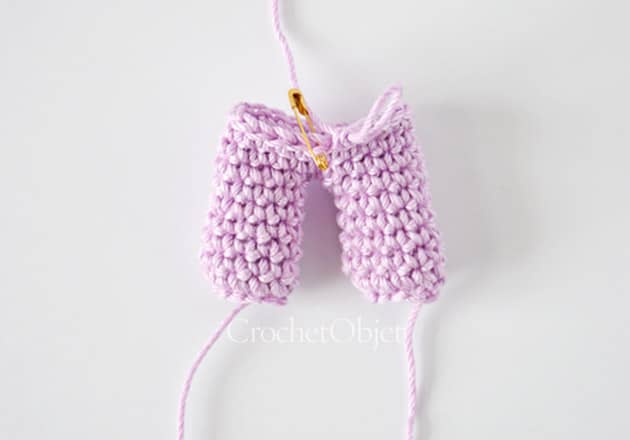 rnd 10. sc in next 2 sts, sc2tog, sc in next 14 sts, sc2tog, sc in last 2 sts (20 sts).
rnds 11-13. (3 rnds) sc in each st around (20 sts). At the end of rnd 13 your work should look like the below picture.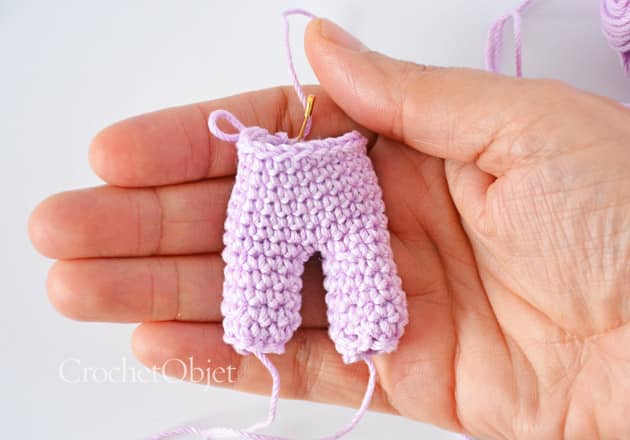 We will continue to work on the bunny from here, put the overall on your baby bunny, put it so your hook will be located on the back and work as follow:
 rnd 14. In this rnd we will create the 3 dots on the front – I’m using the Fuchsia for the dots.
Sc in next 2 sts, sc2tog, sc in next 4 sts – make the last part of the 4th sc with the dots colour, you should have the dot colour on your hook now.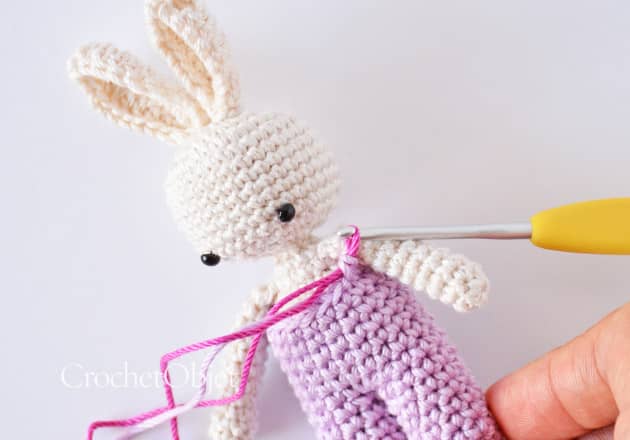 *With the dots colour on your hook, make a sc into the next st but make the last part of this sc with the overall colour, so you change colour again.
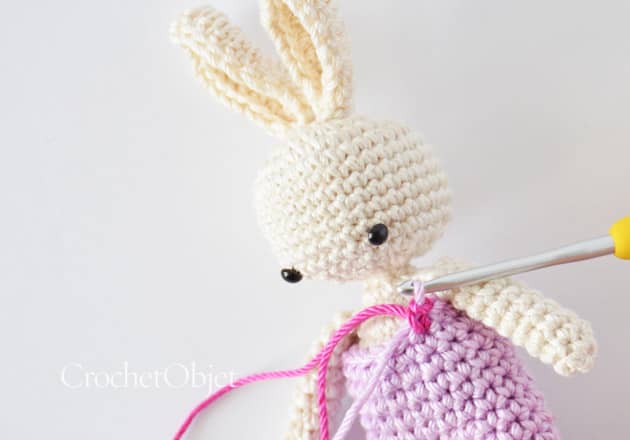 With the overall colour on you hook sc into the next sts, finish it with the dots colour* rep between ** once again.
Now with the dot colour make a sc in the next sts and finish it with the overall colour on your hook.
We have 3 dots on the front of the tiny overall now and we have the overall colour on our hook, right?
Break the dot yarn now, hide it inside the overall or behind the sts.  Continue working rnd 14 as follow: sc in 4 next sts, sc2tog, sc in last st (18 sts).
rnd 15. sc in each st around (18 sts).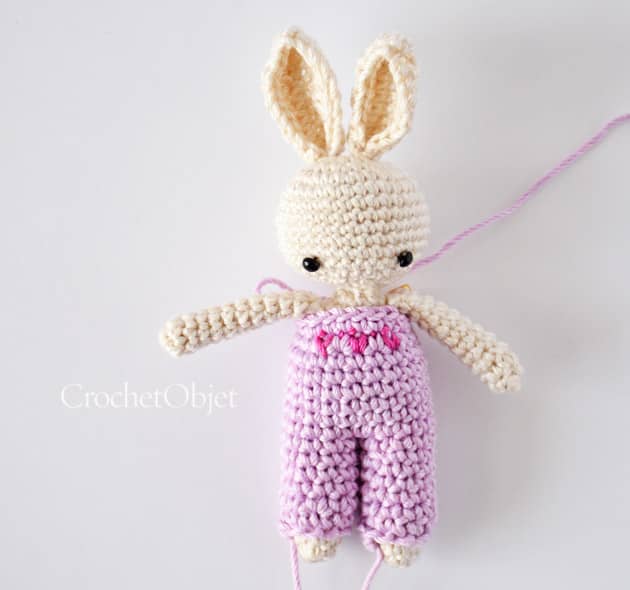 rnd 16. This is our last rnd, where we create the shoulder straps of the overall:
Sc in each of the next 4 sts, ch 4, sk 4 sts. First strap made.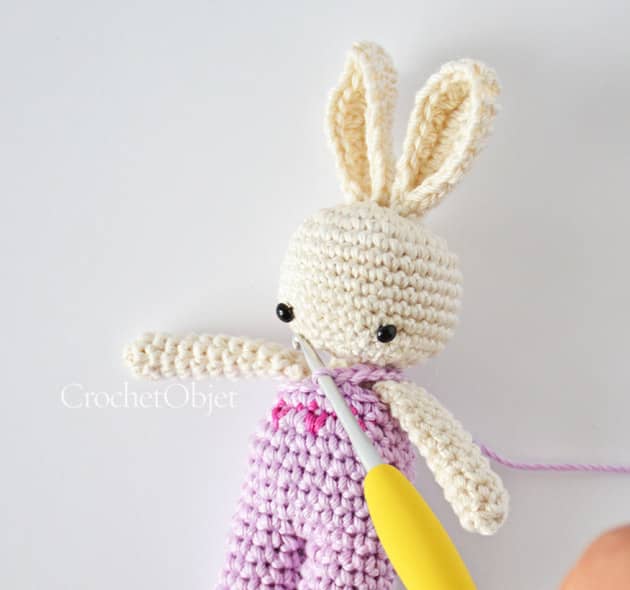 Sc in next 4 sts, ch 4, sk 4 sts, slst in last 2 sts (18 sts). Break the yarn and weave in tail.
 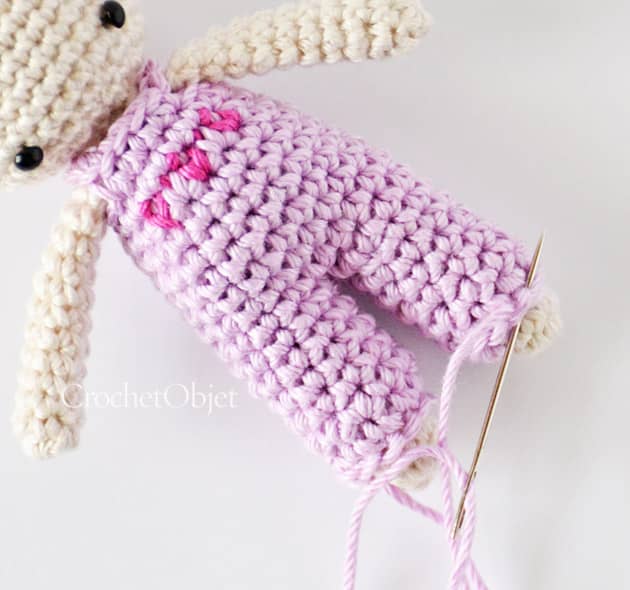 Hide the tails on the bottom pants, make it in a way that keeps the natural movement of the sts to create a clean edge. Your baby overall is completed now. This cute tiny overall – a ‘make my heart sing’ kind of thing.
Here is the abbreviated version of the pattern, just words no pictures here :
TO START Ch 10 and sl st to the first ch to form a ring.
rnd 1: ch 1 (counts as first sc), sc in each sts around (10 sts).
rnds 2-6: (5 rnds) sc in each sts around, work in spiral and mark your first st each rnd (10 sts).
Break the yarn and weave in the tail as I teach on Angie & baby patterns – First leg made.
Make the second leg now, same as the first one. When you finish rnd 6, DO NOT cut the yarn. We will continue working with it.
Connecting the legs and make pants:
rnd 7. Continue working with the yarn on the 2nd leg as follow: ch1, insert your hook into one of the sts around the first leg. Now sc in each st around the first leg (10 sts).
Sc in ch1, using 1 lp only, sc around the 2nd leg (10 sts).
Sc in ch1 from the other side.
When you finish rnd 6 You should have 22 sts around – this is the base of all following rnds.
rnds 8-9. (2 rnds) sc in each st around (22 sts). Work spiral and mark your first sts on each rnd.
rnd 10. sc in next 2 sts, sc2tog, sc in next 14 sts, sc2tog, sc in last 2 sts (20 sts).
rnds 11-13. (3 rnds) sc in each st around (20 sts)
Put the overall on your baby bunny so your hook will be located on the back and work as follow:
rnd 14. In this rnd we will create the 3 dots on the front – I’m using the Fuchsia for the dots.
Sc in next 2 sts, sc2tog, sc in next 4 sts – make the last part of the 4th sc with the dots colour, you should have the dot colour on your hook now.
*With the dots colour on your hook, make a sc into the next st but make the last part of this sc with the overall colour, so you change colour again.
With the overall colour on you hook sc into the next sts, finish it with the dots colour* rep between ** once again.
Now with the dot colour make a sc in the next sts and finish it with the overall colour on your hook.
We have 3 dots on the front of the tiny overall now.
Break the dot yarn now, hide it inside the overall or behind the sts.
Continue working rnd 14 as follow: sc in 4 next sts, sc2tog, sc in last st (18 sts).
rnd 15. sc in each st around (18 sts).
rnd 16. This is where we create the shoulder straps of the overall:
Sc in each of the next 4 sts, ch 4, sk 4 sts. First strap made.
Sc in next 4 sts, ch 4, sk 4 sts, slst in last 2 sts (18 sts). Break the yarn and weave in tail.
Hide the tails on the bottom pants, make it in a way that keeps the natural movement of the sts, to create a clean edge.
Your baby overall is completed.
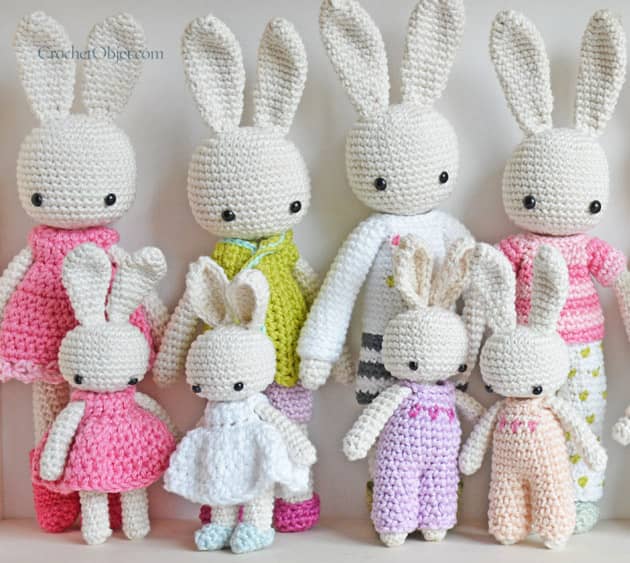
 Making few of them was a ‘goes without saying’ here, and I do have a strong feeling that it’ll be just the same for some of you. These little baby bunnies are not just so huggable but also the sweetest decoration on any shelf emong a miniature collection. I imagine it inside a doll house, oHhhhh my goodness, too too cute. If you did make the overall pattern and you are on IG please share it with a #angiebunny so we can all enjoy it.
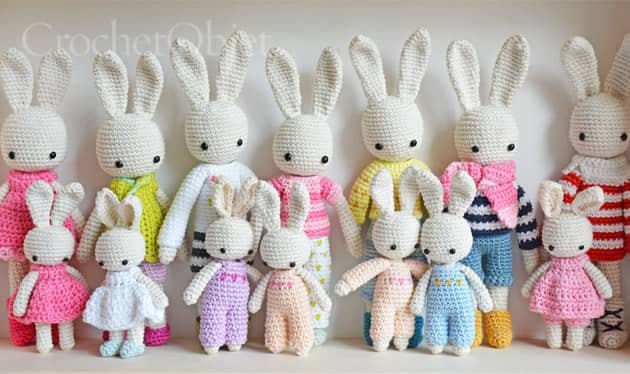 It is indeed a nice bunny family I have here by now, quite proud of this joyful bunny family I created – so many hours of joy. Such a crochet bliss.
  Psssssss, are you still here? Good, Come closer….I have a little bunny papery dream again. I was thinking of creating a set of PDF files for you to download for free, and that you can print. I thought to create a set of post cards/art work to frame and hang on the wall – in a size that will fit the IKEA picture frames.
 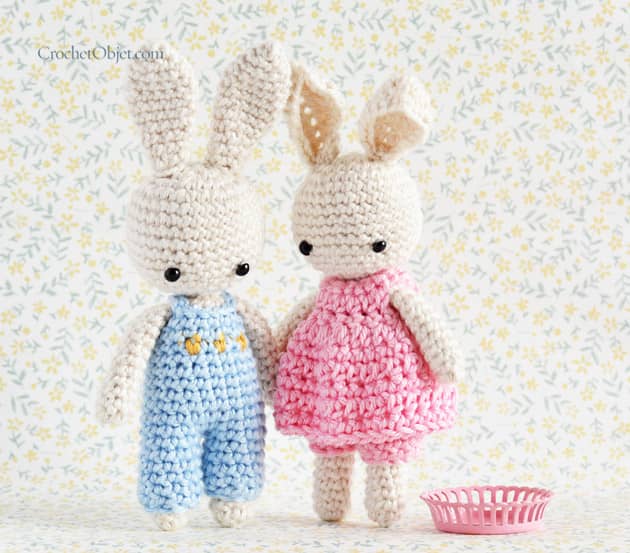 I’m just thinking it can be a gorgeous bunny pictures set. What do you think? should I go ahead and make it? A set of bunny pictures on a kids room wall? how does it sounds mmmmm…..
Well my lovelies, this is it for today. It’s quite late here and I still have some packages to pack and then off to bad. Tomorrow is another day. xoxMo
9 comments on Baby Bunny Overall
Pnina yakir
Thanks very much.
Mo Malron (author)
Toda raba Pnina, Shavuha tov!
John holmes
I love to read your posts
Your colours are such an inspiration
Florence
very good idea these PDF files for you to download for free, and that you can print. I thought to create a set of post cards/art work to frame and hang on the wall – in a size that will fit the IKEA picture frames. I love your work !!! I have just ordered the whole bunny kit. Thank you !
Mo Malron (author)
Thank you Florence, I hope to have them ready soon. Just packed your order.
Lizette Marsh
Hi there do you perhaps have a pattern for the tiny bunny too??? Not sure whether I missed it on the posts. Want to make some for stork tea and crip mobile.
Mo Malron (author)
Here:
https://www.etsy.com/listing/288359659/crochet-pattern-amigurumi-baby-bunny?ref=shop_home_active_15
Lucy McKee
I love your bunnies and the clothes thsatvgo with them. I read on the pattern for the overall set, that you might offer your patterns on a PDF and offer to download for free. I would love to have your patterns. Can you let me know what you decided please? And I love your idea of taking photos of your bunnies and putting them on cards. I think that is a cute idea!
Mo Malron (author)
Thank you,
You can find the patterns here:
https://www.etsy.com/shop/CrochetObjet?ref=seller-platform-mcnav