Helloooooo, Please let me just first start with a big THANK YOU!! Thank you for loving my Love Garden yarn pack. Thank you for giving this special project a go. Thank you for supporting me and my small home business. I am so thankful for being able to inspire, and for having you here with me, in my little CrochetObjet corner in the world. Almost every evening we are all busy here, packing your orders, and the morning, after E takes them all to the post.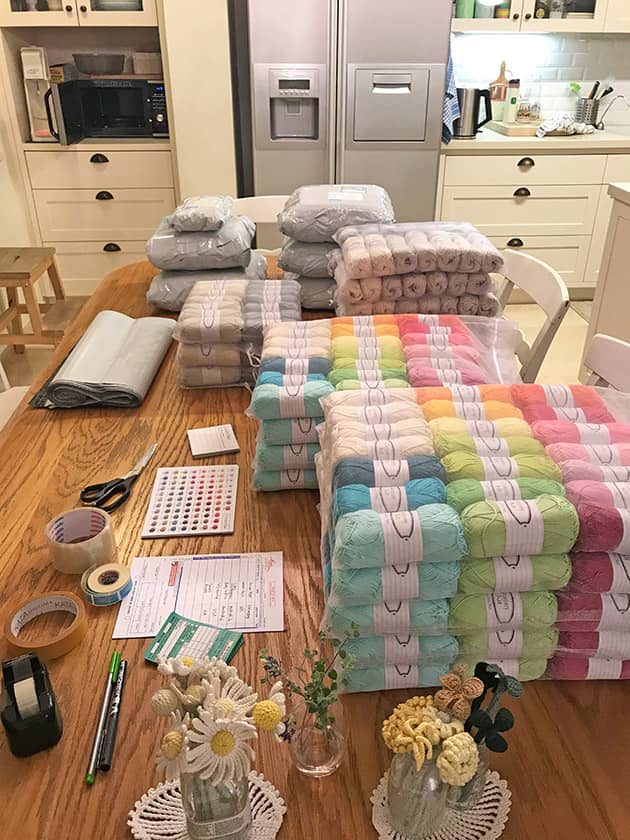 I’m trying to send your packages as quickly as I can, 3 days MAX after ordering, so you can all start crocheting your Love Gardens Crochet Blanket soon. I’m so looking forwards to seeing your Love Garden WIP. My heart is full of joy. My mom is happily watching from above, I’m so sure about it.
 Today I’m here for the Love Garden Crochet Blanket Joining. Remember I told you, in my previous post, that at a certain point of the progress I decided I want to create a layout where there’s no same flower colour in one row or column? Both my mom and I were very positive about this idea even though it was quite a challenging task. At this point she was still communicating and I could clearly understand what she said even if she used some ‘unconnected’ words in her speech. I spent hours crocheting at her bedside, and we had such a lot of ‘fun time’ together.

 Every evening when I came back home I spread my Love Garden Crochet Blanket squares on the carpet and looked at the lay out. I have to say Minion #3 (8 years old) was a big help for me here. My head wasn’t completely in place, and in some cases I couldn’t see clearly that there were two flowers of same colour in same row/column. He jumped and pointed them for me: “look mommy these two are in the same line with the same colour flower “. Every morning when all the Love Garden Crochet Blanket squares were still on the carpet, using the bright morning light, I took a photo of the new lay-out and printed it. Every day I took it to show my mom. Every day she told me what she thought. Everyday she told me all the most beautiful words on earth about my work. It was a very happy and comforting routine. Well it was a mixture of happiness and sadness because I knew I will soon stop hearing these words coming out of her mouth in her special warm voice.
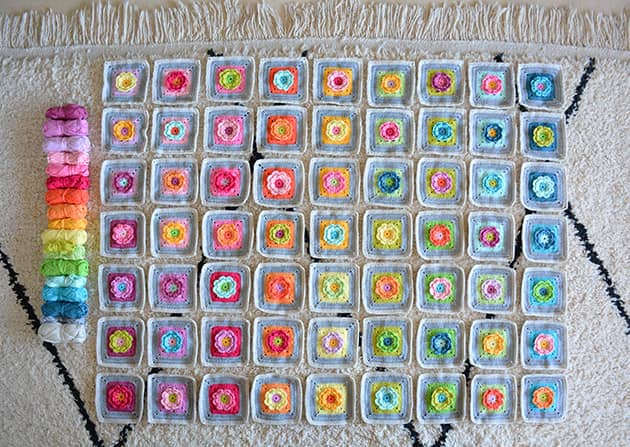 The lay-out story is not just about the fact that there shouldn’t be two of same colour flowers in one row / column but also about the order in a box of colours or paints. The ones that we usually get for our kids to keep them busy (or for ourselves if you understand what I’m talking about). I got my first set of colours ever from my mom, when I was a young kid. I remember that day like it was yesterday. It wasn’t a simple set of colours but a very special one with a lot more than just the basic colours. I was a very young kid and I remember that I was totally in love with this pack. What attracted me the most was the way the colours were arranged in the box, it was that very rich rainbow colour flow that mesmerized me. No matter what I painted I remember I tried very hard to keep the original order in that box, and not to mess it up, so that I did not lose this magical rainbow colour flow. If you look closely now, you will see that the Love Garden Crochet Blanket colour lay-out reflects that set of colours arrangement. My first conversation ever about colours was with my mom. I was about 3-4 years old and I painted something. She looked at it and explained me why she really loved my painting, and the most beautiful part of it is how I put together the colours, Magenta with Citron and Lime Green. This was the first time ever I realized colours have a lot more names and not just Red, Blue or Green. I miss her terribly.
When I finally made it and we were both happy with the lay-out and all squares were just in the right colour flow, with not even one same flower colour on any row/column, we were both ready for the joining. Yes the colour pack got massed at some point and the flower colours can tell this colourful mess within my beloved set of colours.
The last 3 days I have been working on a step-by-step tutorial to show you how I joined my Love Garden Crochet Blanket squares. Yes, 3 full days, no less. Writing, crocheting, photographing and making it all bright and beautiful. I made it so that even if you are a beginner you can follow it. It’s a VERY heavy pictured tutorial, but once you get the idea you will not need the tutorial next to you anymore. 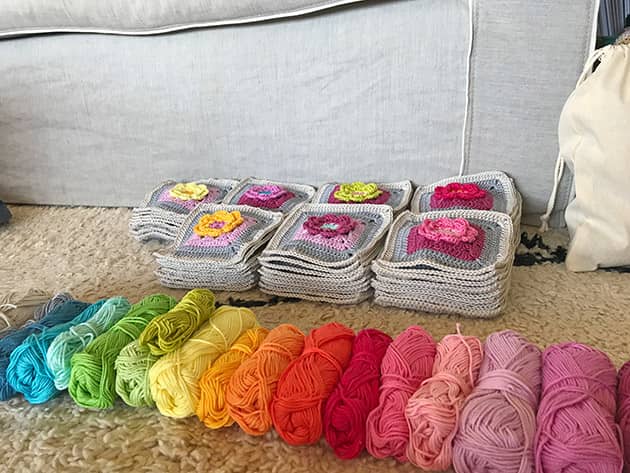 So, whenever you are ready with all your Love Garden Crochet Blanket squares, you can jump in and follow the joining steps. It will always be here for you. At the end of the tutorial, you will find the squares lay-out just as it is in my original blanket. So lets get started.
 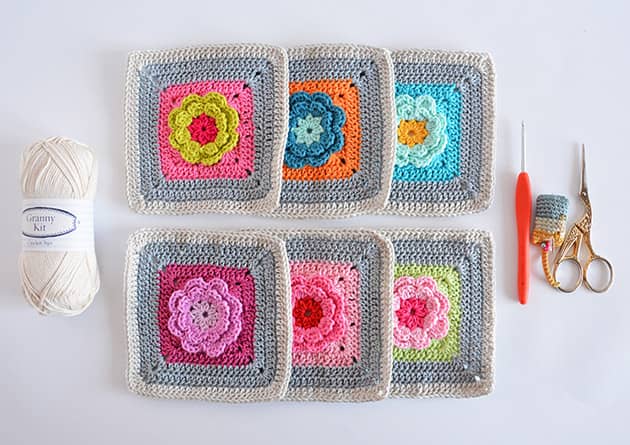 WHAT DO YOU NEED
The Love Garden Crochet Blanket Yarn Pack – You will need SAND colour for this part.
Love Garden Squares
The PDF file with Squares colour list. Download here – LoveGardenCoList
Crochet hook – 3 mm
Crafty scissors & A tapestry needle.
ABREVIATIONS AND STITCHES (US crochet terms)
ch = chain stitch
st(s) = stitch(s)
rnd(s) = round(s)
lp(s) = loop(s)
ch sp = chain space
sk = skip
sl st = slip stitch = insert hook, yo, pull the lp back through the st and through the lp on your hook.
dc = double crochet = yo, insert hook, yo, pull the lp back through the st (3 lps on hook), yo and pull through 2 lps on hook (2 lps left on hook), yo and pull through remaining 2 lps.
JOINING LOVE GARDEN Crochet Blanket SQUARE
This is the Join-as-you-go method and I guess some of you already know it. In order to create the joining round for my Love Garden Crochet Blanket Squares I had to turn the “solid Square” made in the last rnds into a ‘3dc’s Clusters rhythm’. I will show you here how I made it, you can always choose to work things differently of course. I’m using some spare Love Garden Squares left out of the blanket, to show you all the steps I made. These 6 colourful squares will help me demonstrate the joining tutorial. We will be working from the TOP RIGHT square towards the LEFT side. We will join the TOP ROW FIRST and after that we will join the next 3 squares in the second row. We will join by rows, from right to left. 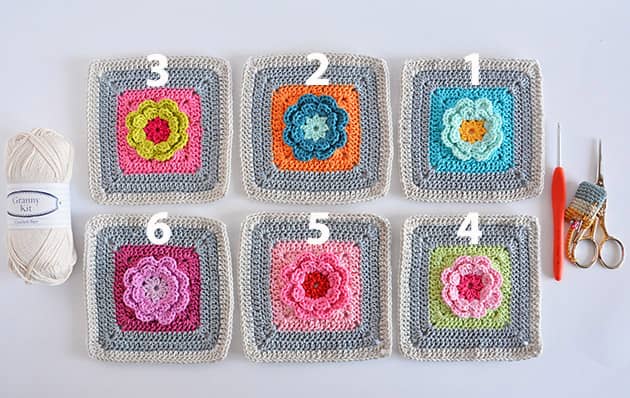 JOINING THE FIRST ROW
Take a SAND ball out of your Love Garden yarn pack.
The first step we need to make is crocheting a full round around the first square. Our first square will be the one on the TOP RIGHT corner, as shown in the above picture. Take your first square and work as follow:
Step 1. Join the Sand colour in one of the corner ch sps. Now Ch 5 (counts as one dc + ch 2 sp). Make 2 dc’s into the same corner sp – see next picture. Step 2. Skip 3 sts – the 3 I show in the next picture and make 3 dc’s into the next st. Move your corner sts a little so you don’t miss the first st.
 Step 3. Continue working *sk 3, make 3 dc in next st. In corners make: 2 dc + ch2 + 2 dc*
 Step 4. Repeat between ** till you reach the corner sp you started from. Now make a dc into the first sp – corner completed. To close the rnd join with a sl st into the 3rd ch of your initial ch5 – see next picture.
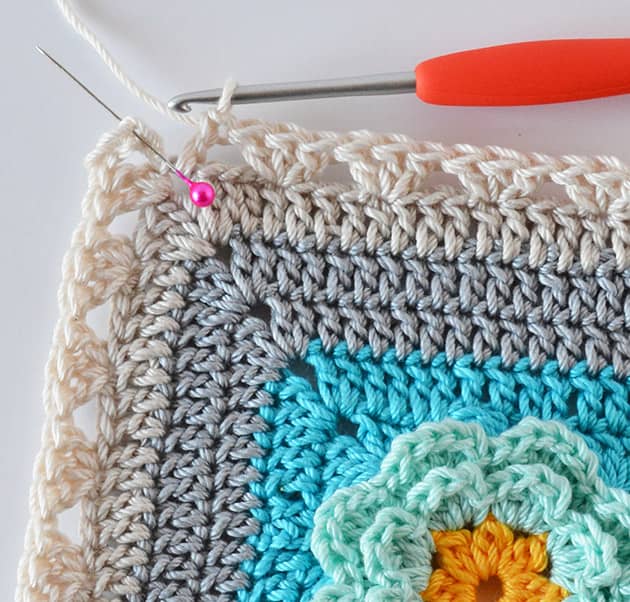 Step 5. What I did next is to thread a needle onto the yarn tail and weave in the tails, this way I keep it all clean of yarn tails as-I-go, which is my favorite way.
 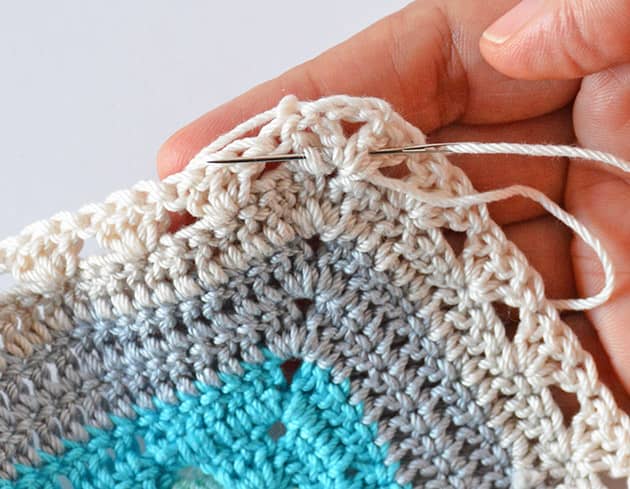 Your first Love Garden Crochet Blanket is framed with clusters and it should look like the next picture. You should have 6 3dc clusters in each side of the square + 4 corner clusters of: 2dc+ch2+2dc.
 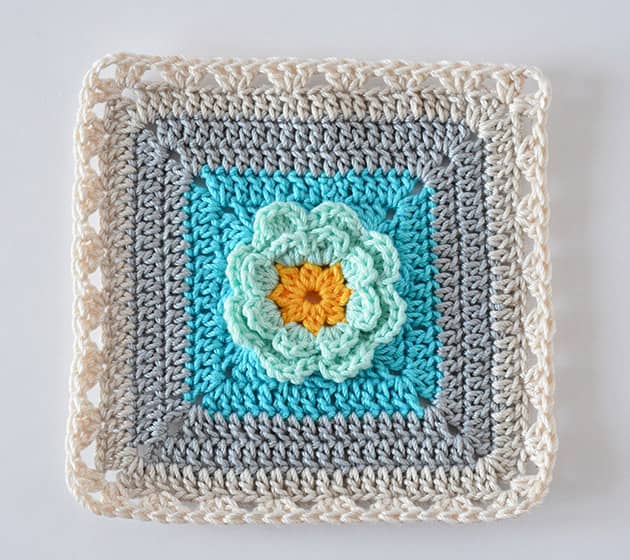 We are now ready to join the next square. We will crochet the next rnd on the next square while joining.
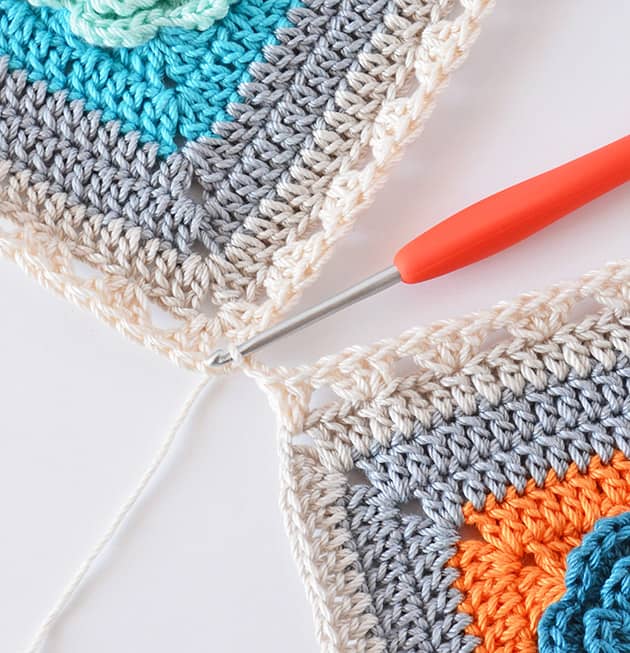
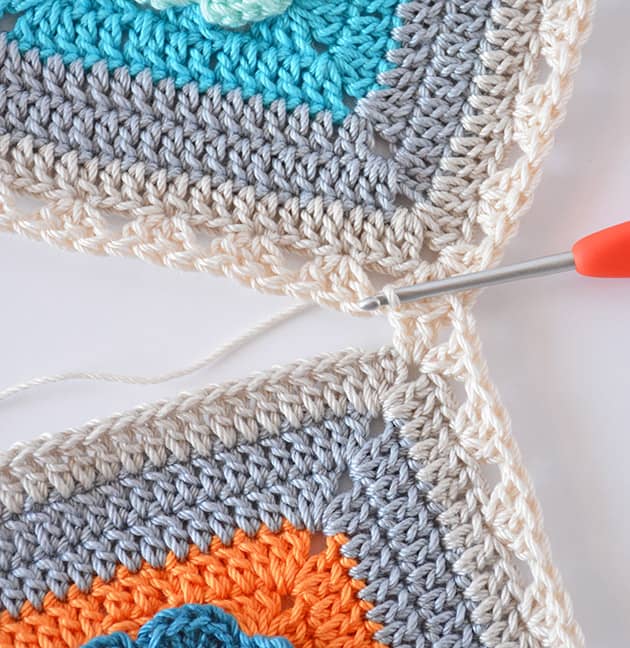
Step 6. Take the next square in the line and repeat steps 1 – 3 but when you reach the next corner make ONLY: 2dc+ch1 as seen in next picture. Now instead of making the next ch st, we will make the first joining sl st as follow:  Step 7. Put the first square next to you. Insert your hook into one of the ch sps on the first square and make a sl st. Insert you hook from the front towards the back of the square – as I show in the next two pictures. That’s how you insert your hook every time you make a joining sl st.
 Step 8. Go back to the square you just started to frame (with the TEAL flower) and make 2 dc’s into the corner sp, to complete the corner – see next picture.
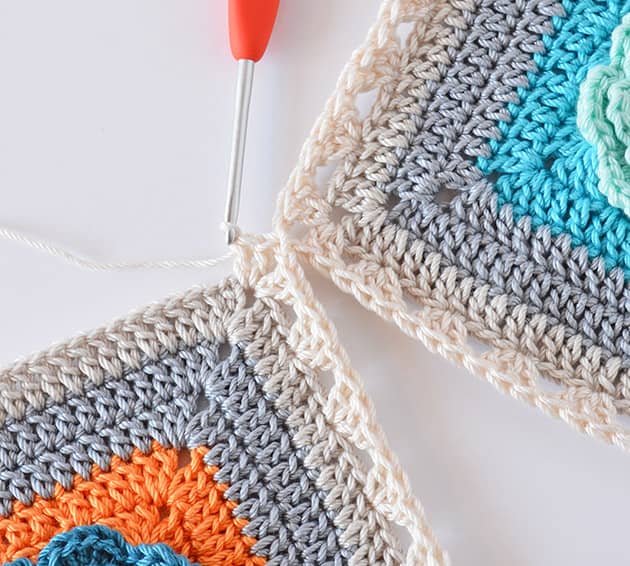 Step 9. Insert your hook into the next sp between 2 clusters of the previous square (with the Sea Foam flower) and make a sl st. See next two pictures.
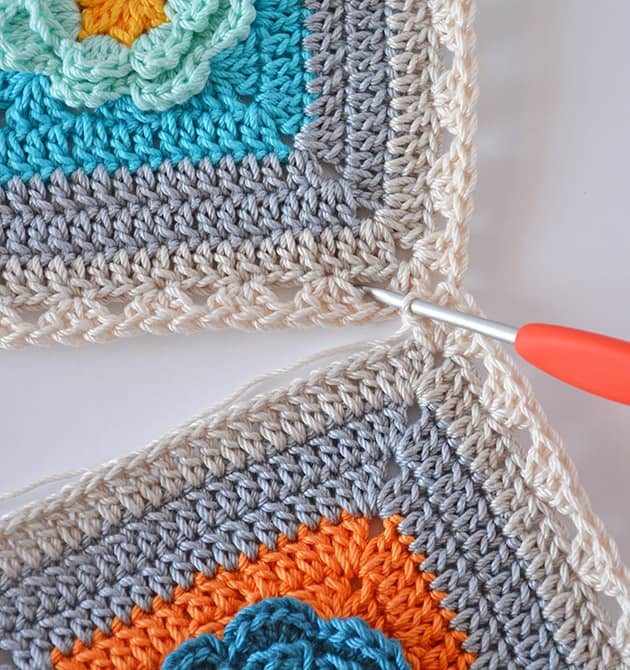
 Step 10. Back to the square you just started to frame, sk 3 sts and make 3 dc’s in the next st.
 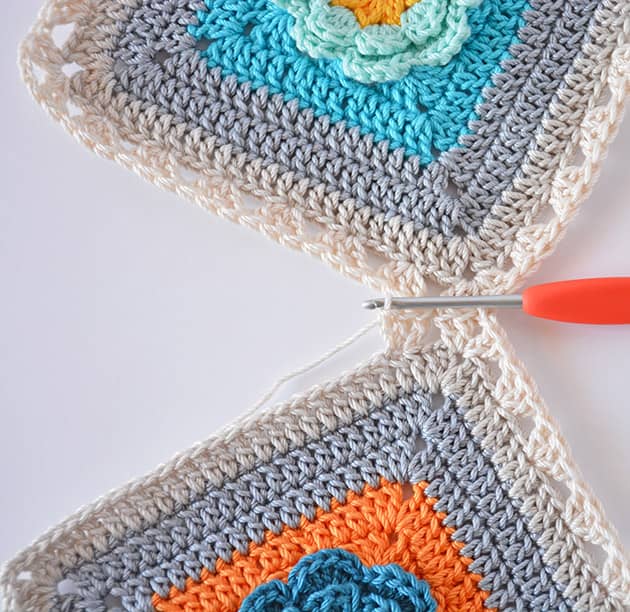 Step 11. Repeat steps 9 & 10, till all 6 side clusters are attached. When you reach the next corner make 2 dc’s into the corner sp.
 Step 12. Make a sl st into the corner sp of the previous square (with the Sea Foam flower) and go back to the square you frame now (with the TEAL flower), make ch1 + 2 dc’s into the corner sp – corner completed.
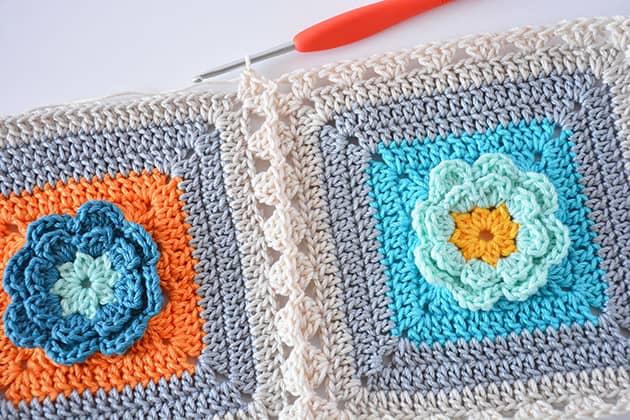 Step 13. Sk the next 3 sts and continue framing the square as we did in the first square: *sk 3 sts, 3dc’s in next, in corners make 2dc’s+ch2+2dc’s*
Step 14. When you reach the first corner you started from, make one more dc into the corner sp and sl st to the 3rd ch from your initial ch5 to join.
Step 15. Thread a needle into the yarn tail and weave in the ends.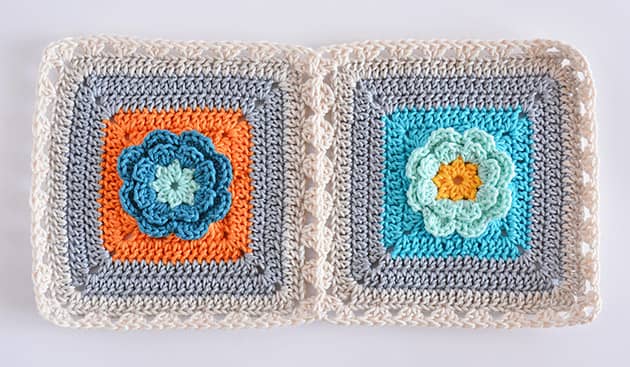 Repeat steps 6 – 15 to join the next square in the line. Your first row is joined now. In the Love Garden Crochet blanket you will repeat these steps till all 9 Love Garden squares of the first row are joined.
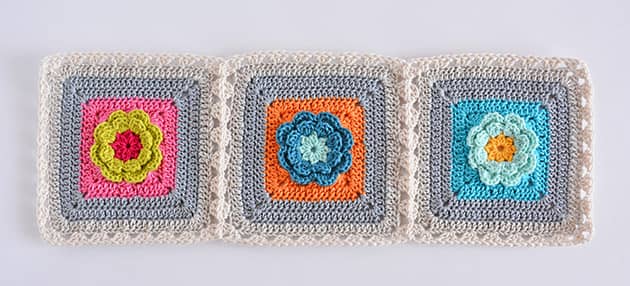 We will now join the second row, beginning from the first square in the right side. In this tutorial it will be the one with the Baby Pink flower.
 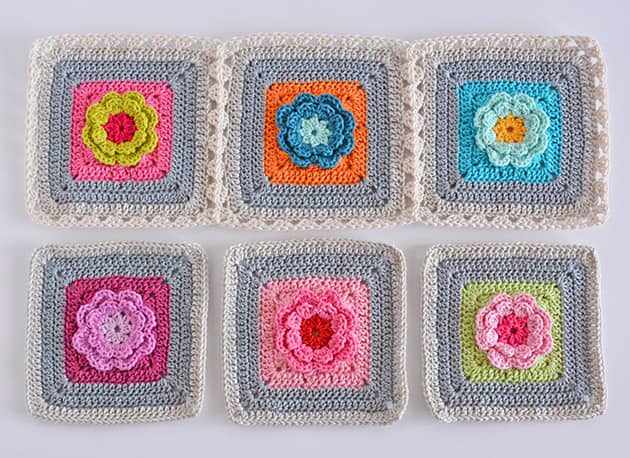 JOINING THE NEXT ROW
We will be joining the squares of the next row to the squares of the previous row, one by one.
To join the first square in this row you just have to repeat steps 6-15 from the first row joining. You join only one side of the square so nothing is different here. The first joining sl st will be in the corner sp where the green arrow is pointing. After joining the first corner just repeat what we did in previous squares to join the whole side. The last joining sl st in this square will be in the corner sp where the red arrow in pointing. Got it? Hope I made it clear for you. 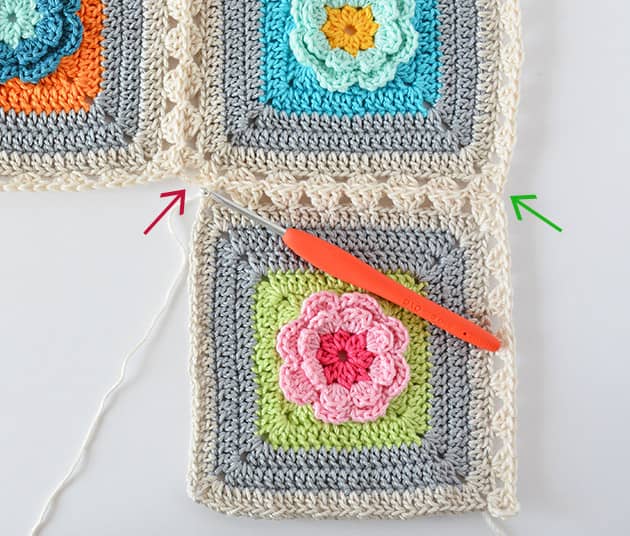 Now we have to complete framing the square repeating all the steps we did in previous squares up to Step 15. Your work should look like next picture now.
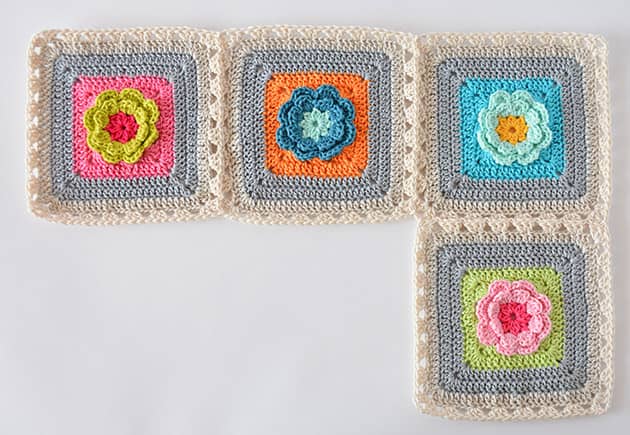 JOINING THE NEXT SQUARE
From now on we will be joining two sides of each square. Remember, you work from right to left adding squares one by one. We will be joining the first side from bottom up and than the other side in the direction showed by the arrows in the next picture.
Step A. Join Sand colour in one of the corner ch sps of the next square. Ch 5 and make 2 dc’s into the same corner sp.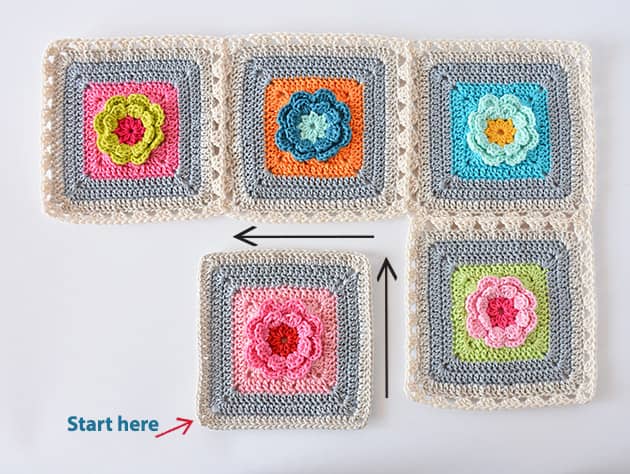 Step B. Sk 3 sts and make 3 dc’s into the next st. Continue working *sk 3, make 3 dc in next st* till you reach the next corner. In the next corner sp make: 2 dc’s + ch1. Your work should look like the next picture now.
Step C. Make the first join as follow: insert your hook into the left bottom corner sp in the square you are joining to – Where I show with the arrow in the next picture and make a sl st. 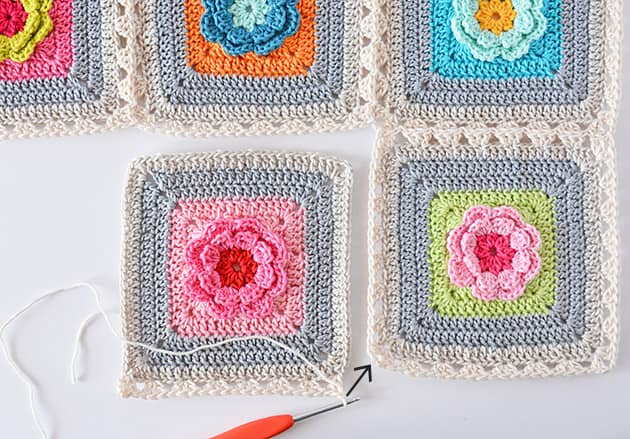 Step D. Go back to the square you just started to frame and make 2 dc’s into the corner sp – corner completed, see next picture.
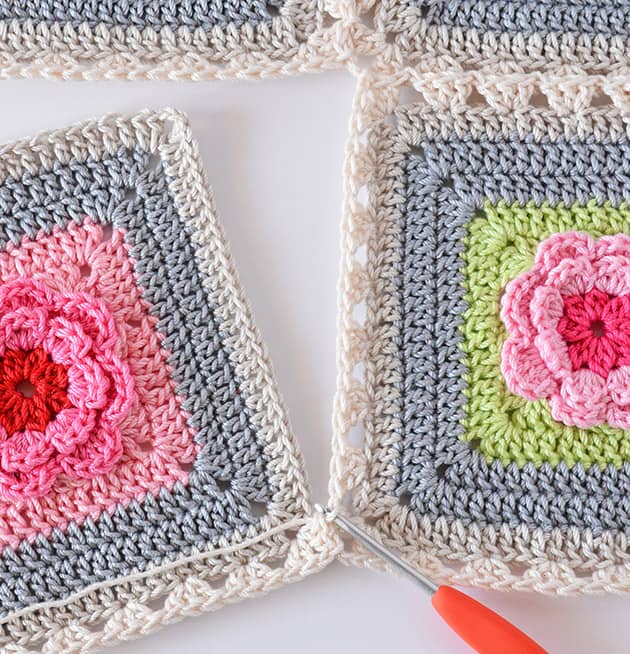 Step E. Repeat steps 9 & 10 from the first row joining, till all 6 side clusters are attached. When you reach the corner make 2 dc’s into the corner sp (of the square you frame).
Step F. We will be making the corner joining with 2 sl sts as follow: Insert your hook into the corner sp of the previous square on your right, where the green arrow is pointing and make the first joining sl st. Now insert you hook into the corner sp of the square above you, where the red arrow is pointing, and make your second sl st. Go bake to the square you frame, make 2 more dc’s in the corner sp – corner completed. 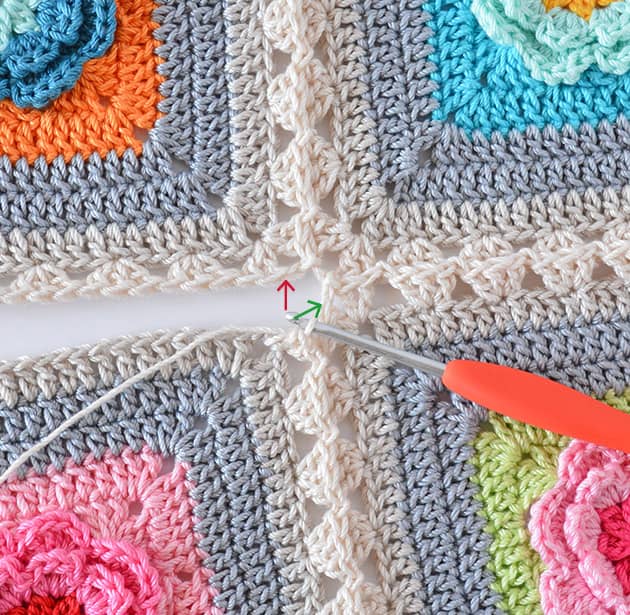 This is how it will look after the two joining sl sts and after we completed the corner with two more dc’s. and I LOVE IT!!! hope you love it too (tell me you love it, PLEASE). This is the corner I was looking for while designing my joining round. It makes a little design/ ornament and I’m just SO in love with it.
 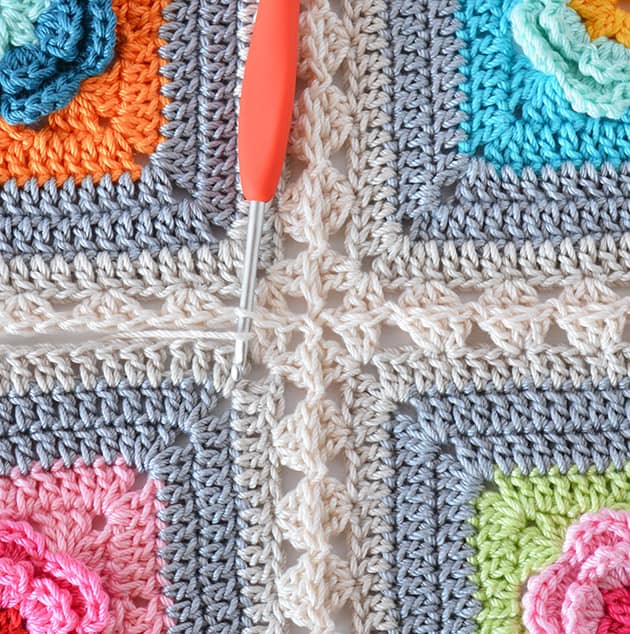 Step G. Join the next side of the square now, repeating steps 9 & 10, till you reach the next corner.
Step H. Make 2 dc’s into the corner sp and join with a sl st into the next corner sp in the square above you, where the red arrow is pointing in the next picture.  Step I. Ch1 and make 2 dc’s into the corner sp of the Square you frame now – corner completed.
Step J. Repeat steps 13-15 to complete the round.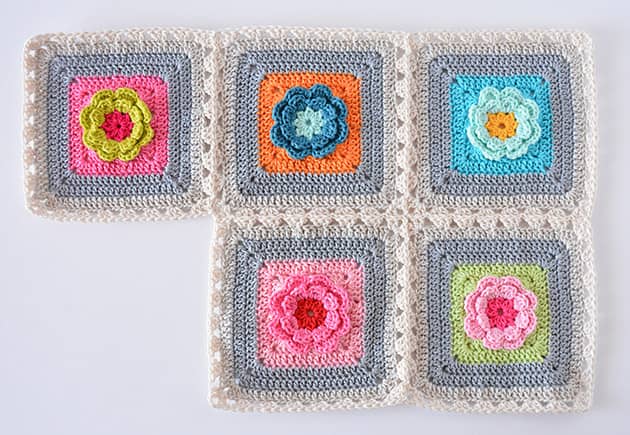 For joining the next square and for all other Squares in the line, repeat JOINING THE NEXT SQUARE Steps A – J.
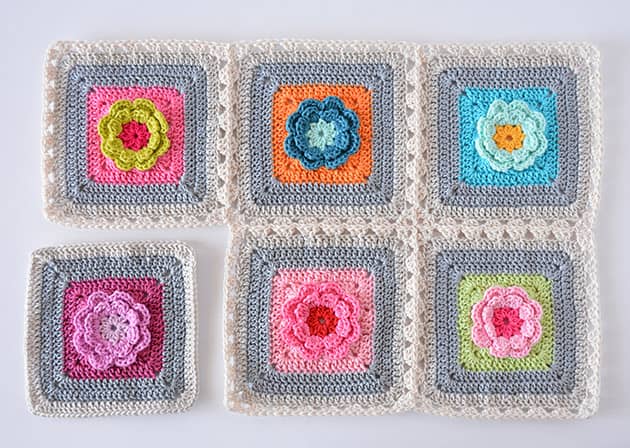
 And that’s it. Can you believe we made it all up to here? Thank you for staying with me for such a long tutorial. Hope it will help you joining your Love Garden squares whenever you need it.
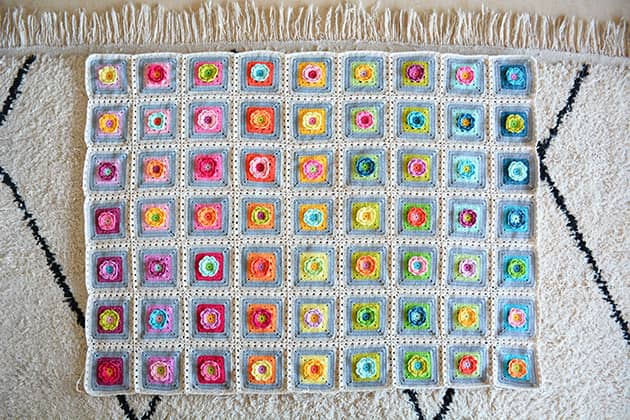
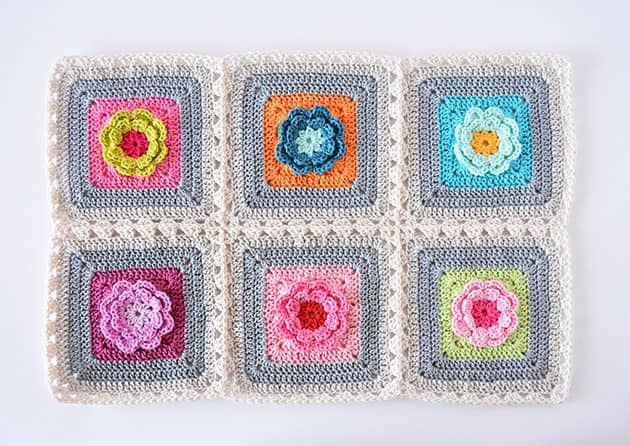
Now let me show you the final squares lay-out in the Love Garden Blanket. 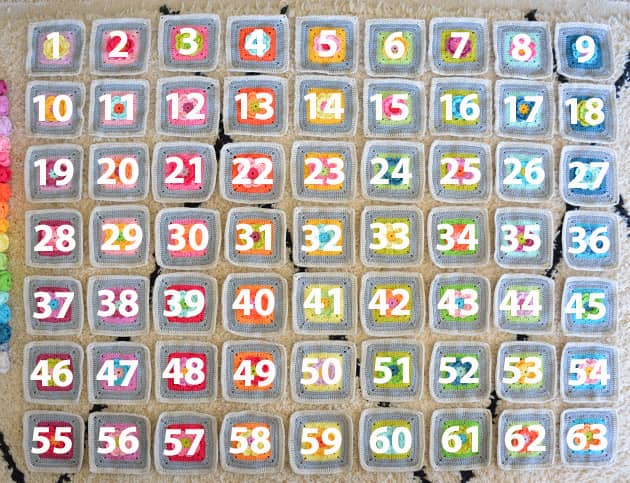 The above picture is showing you the squares order. If you work with my Love Garden yarn pack and you followed the PDF for the LoveGardenCoList than you should have 63 Love Garden Crochet blanket Squares and each one of them has a #. In the above picture I used these #’s to show you the lay-out of these 63 squares. As you can see, square #1 is located in the top right and it goes by rows from left to right. Row 1: 1-9. Row 2: 10-18. Row 3: 19-27 and so on…
  Now, this might be a little confusing because in my joining tutorial I just showed you how to join the squares going from right to left. You will have to forgive me about that because I’m a left handed and I joined my Love Garden squares from left top corner towards the right. My head wasn’t totally in place when I made it, so I hope you understand. YOU will have to start joining from square #9 in the right top corner towards square #1 (if you are a right handed). You will start joining the first top row, starting from square #9 towards square #1. Continuing to the second row joining square #18 to square # 9 first and than continuing towards square #10.
 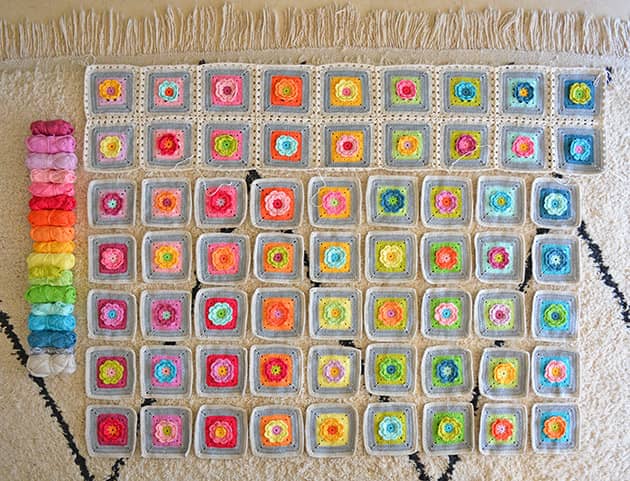 Continuing to the third row and so on.
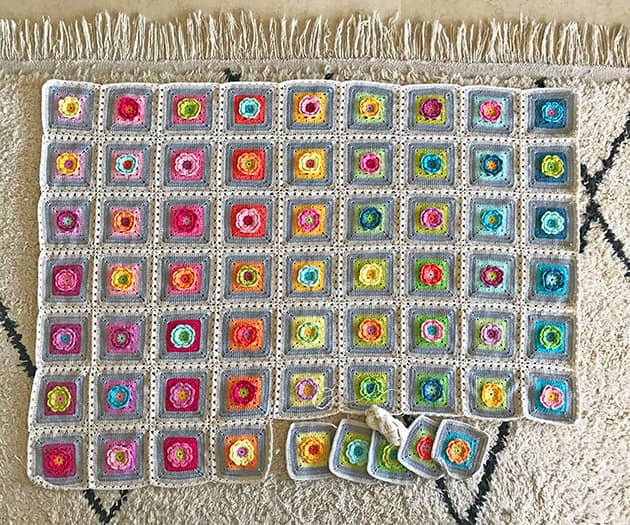 Till you have it all done. If I have to be honest I couldn’t imagine how much I would love this blanket. After all 63 squares were joined my heart missed a beat. This colour flow made my heart sing. I was kind of worried about the Platinum framing. But O M G when I finished joining them I was totally in love with it. I will tell you more about it in a separate post. My mom was very very happy too. Just a few more squares to go.
 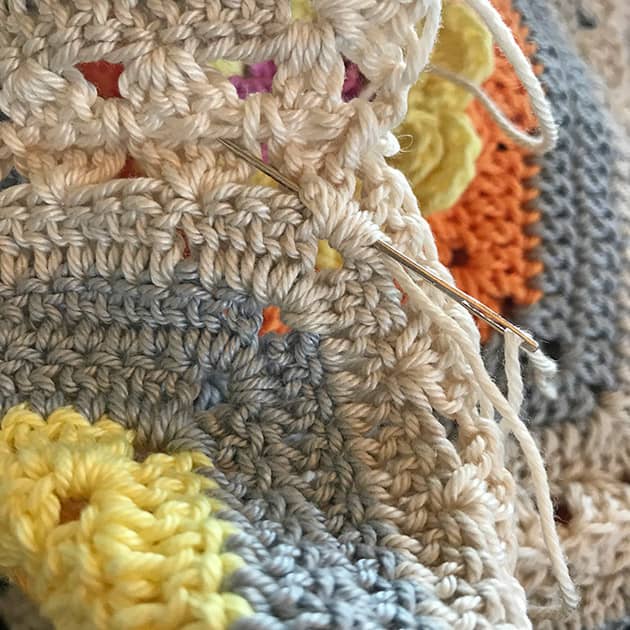 Please do take my advice and weave in ends after joining each square. It’ll make it so much easier.
 You will need about 3.2 gr’ of Granny Kit cotton for framing & Joining every square so you will need about 4 Sand balls for the joining. If you use the Love Garden pack you have 6 Sand balls so no worries. You will need more Sand colour for the framing and it was calculated.
 Now after all 63 square are joined, the next step on the Love Garden Crochet Blanket journey will be the most delighted framing. So we’ll meet here soon again, with more Love Garden tales. Thank you for reading this unbelievably long post. I appreciate it Sooooooo much.
If you like to start your own Love Garden journey here is some useful links you’ll need:
The love Garden Crochet Blanket Yarn Pack
The Flower Square pattern
The Love garden Crochet Blanket Square pattern
The Squares Colour list download here: LoveGardenCoList
The Love Garden Edging and Blocking – coming soon
Now I’m off to my Yoga class which helps me, in so many ways, to keep my body and spirit up these days. xxx and much love to you all Mo
9 comments on Love Garden Crochet Blanket Joining Tutorial
Sandra
What a beautifully explained tutorial of your Love Garden blanket! I can feel the love between you and your mother in every step. Yes, she is watching from where she is now and loving all you do and share with others!
Melanie
Thank you too Moran, for all the hard work, and many, many hours that you have dedicated in creating this beautiful blanket. I really enjoyed reading about how you chose your colours and their placement, and the fact that you’re whole family have been involved with it. Just lovely!! Needless to say, I wait with much excitement, and anticipation for my yarn parcel to arrive!! Thanks also for your very detailed joining instructions!🎉💕 I cannot wait to start. Cheers, Melanie.
Flo
Very pretty ! All these beautiful colors give balm to the heart. .. thank you for all your creations! See you soon for a next order. ..
Michelle
There is abounding beauty in each of these pictures, but none are as beautiful as the one of your dear momma’s hand holding the picture of your Love Garden layout. I can hardly keep the tears from spilling over . . . . These visits with you are so special to me and I am so at home in your little corner of CrochetObjet even though we are miles of ocean apart. Your process in this Love Garden is a delight to read; I love knowing the “inside story” 🙂 Thank you SO much for the care and love you put into this tutorial; it is so tangible. It will be a big yippee kind of day when that gray parcel of wonderful Granny Kit cotton arrives in my mailbox. XOXO
Meryl Brockway
Dear Mo,
Thankyou……. I too am left handed and this is the first time I’ve ever seen a blanket tutorial especially for us. This is beautiful ,I love all aspects especially the back story with your Mam (I’m Welsh). I’ve got into a right mess trying to do this following a right hand pattern .To say the least I’ve avoided a small square blanket like the plague since then. No more though ; now I’ve got yours to work from. So Thankyou very much for all your hard work, I really can’t thank you enough. I am going to make this when my stash allows. Stay strong Mo.
Lots of love
Meryl xx
Mary Egan Dufault
I only wish I could crochet this blanket. Such a beautiful tribute to your mom.
Mary Egan Dufault
A beautiful tribute to you mom
Dee Massey-Chambers
Thank you for the tutorial, it’s explained very well. And the blanket is so beautiful, definitely something I would love to be cuddled under x
foldeknive danmark
Hi mаtes, hoow is the whole thing, and whаt you dеsire to say abolut this post,
in my viеw іts in fact amazing foor me.