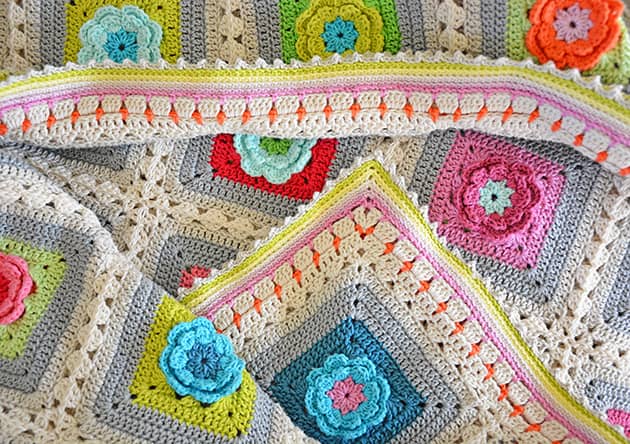
While you enjoy your Love Garden Crochet Blanket WIP, making colourful squares and joining them, I’ll be writing the Love Garden Edging for you. By the time you are ready with all your joined squares, it will wait for you here as a step-by-step tutorial. This is the last part of the Love Garden Crochet Blanket project that I made with my mom in her last weeks. I designed this edging to hold together the Love Garden Crochet Blanket story in all it’s special aspects and moments. It was very important to me to frame this blanket in an optimistic way. It was not very easy for me, at that time and I struggled to find the right edging. At first I just left my joined squares folded in my project bag for a while. When I finally got back to it, it was after my mom passed away and THE Love Garden crochet blanket edging just flew out of my hands in no time. Even after all the samples I made before, I still wasn’t sure about the colours. I just picked them up one after the other and designed it all on-the-go with a heart full of thankfulness for the mom-love I had all those years. 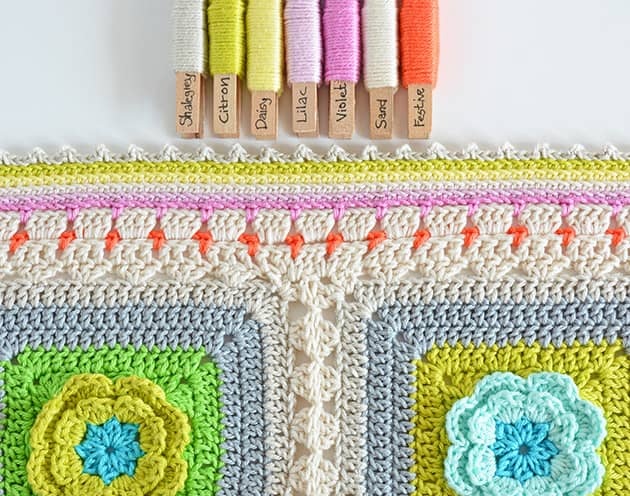 The final colours I used came out reflecting my mom’s Love-Life personality. I was so sure she went to a better place and with all the sadness I felt in my broken heart, I knew sun will always shine above us all, no matter what. This is what I had in my head in those hours of framing my blanket and this is how it all came out. My Love Garden crochet blanket edging came out light and optimistic, with a tonal radiation between bright colours. The Love Garden edging is made out of: positive thinking, nine rounds & seven different cotton colours. I just LOVE the combination of tiny little details, created by Linen Stitch, with fine stripes and solid dc’s. It makes it so delicate and fresh but most of all optimistic. It holds the whole story of my last journey with my mom in a positive way, facing the future.
 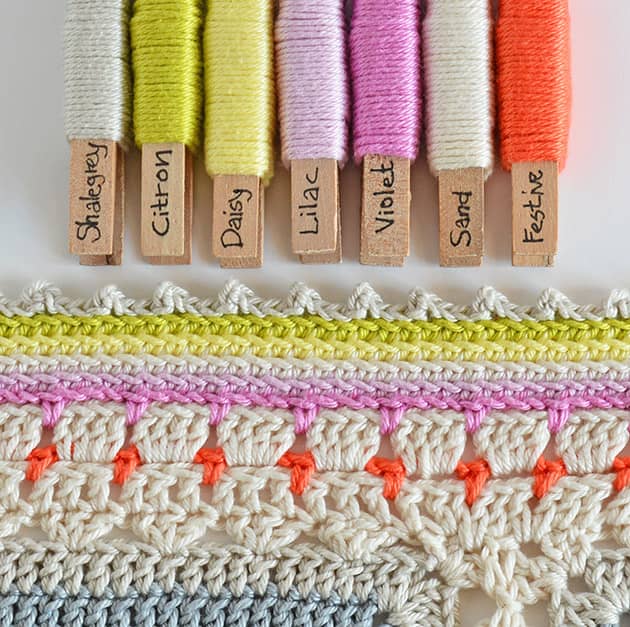 I have put here a step-by-step pattern so you can frame your Love Garden blanket just as I did. I know there are so many other beautiful possibilities that you may think of and I will definitely understand if you choose to frame your blanket differently. I believe this Love Garden Crochet blanket edging can be framed with many other projects you’re busy with so please feel free to use this pattern in whatever project you find fits in. For those of you who like to make the same edging just as in my original blanket, this is how I made it.
 In case you don’t need the whole detailed instructions, I’ll put a ‘just words’ pattern at the end of this post. I will be using the 6 Love Garden squares from my joining tutorial for this tutorial. Lets get started.
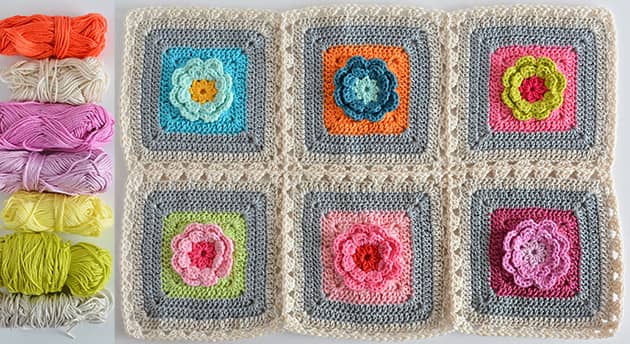 WHAT DO YOU NEED
The Love Garden Yarn Pack
Love Garden Squares joined piece.
Crochet hook – 3 mm
Crafty scissors & A tapestry needle.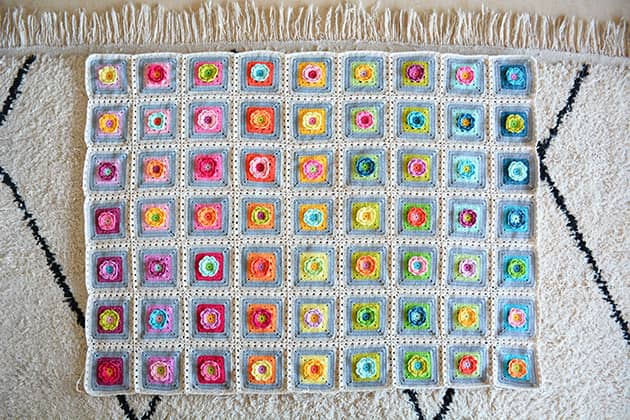 ABREVIATIONS AND STITCHES (US crochet terms)
ch = chain stitch
st(s) = stitch(s)
rnd(s) = round(s)
lp(s) = loop(s)
ch sp = chain space
sk = skip
BLO = Back loop only
sp(s) = space(s)
sl st = slip stitch = insert hook, yo, pull the lp back through the st and through the lp on your hook.
dc = double crochet = yo, insert hook, yo, pull the lp back through the st (3 lps on hook), yo and pull through 2 lps on hook (2 lps left on hook), yo and pull through remaining 2 lps. The Love Garden Crochet blanket Edging is made out of only nine rounds and seven colours (left to right): Festive, Sand, Violet, Lilac, Daisy, Citron & ShaleGrey. Take these colours out of your yarn pack to be prepared. If you have the yarn pack you can see that there are some extra balls of Sand, Citron and Shale Grey, that’s because we will be using them now to frame the blanket. For those who asked me, I didn’t block my blanket after joining all squares together. I only blocked it after framing.
TO START get ready with Sand colour.
rnd 1: You will need about 27 gr of Granny Kit cotton for this rnd. Attach Sand colour in any corner space in your work ch3 and make another dc into the same sp, as seen below.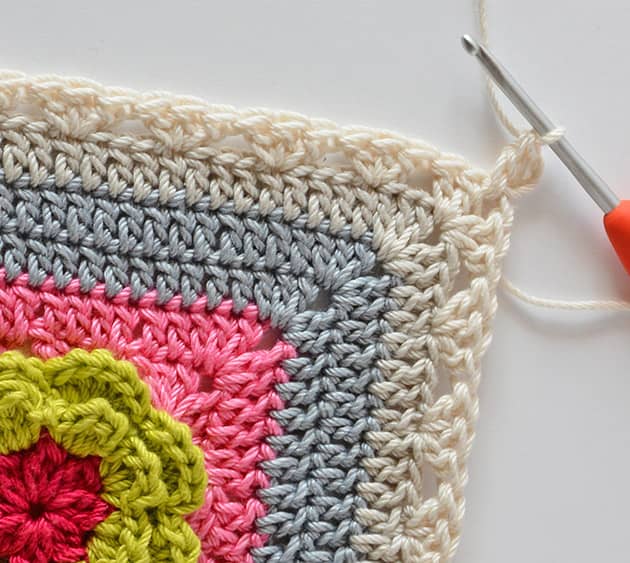 Work over the yarn tail and dc in each st around as follow: First, DO NOT dc between clusters, dc in each st. When you reach the point where 2 squares are meeting make: 2 dc’s into corner sp, 1 dc into the st between 2 corners, 2 dc’s into next corner sp – that’s what you do at every meeting point between 2 squares. It will look like the next picture. The sewing pin shows the dc I made at the ‘meeting point’ between 2 squares.
 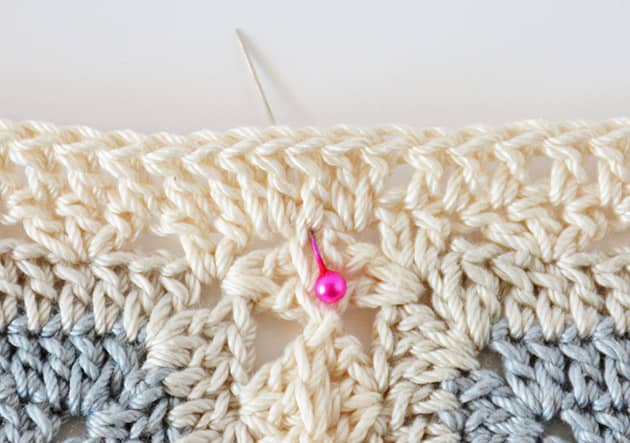 Continue making dc’s all the way. When you reach a corner make: 2 dc’s + ch2 + 2dc’s into the corner sp. Don’t miss the first st right after the corner, pull back the corner sts to see it clearly. Your corners should look like the next picture.
 When you reach the point you started from make: 2 dc’s + ch 2 into the first corner sp to complete it. To close this rnd sl st in the 3rd ch of the initial ch3, where I show in next picture.
 Break the yarn and weave in the tails. This is how it looked like when I finished this rnd.
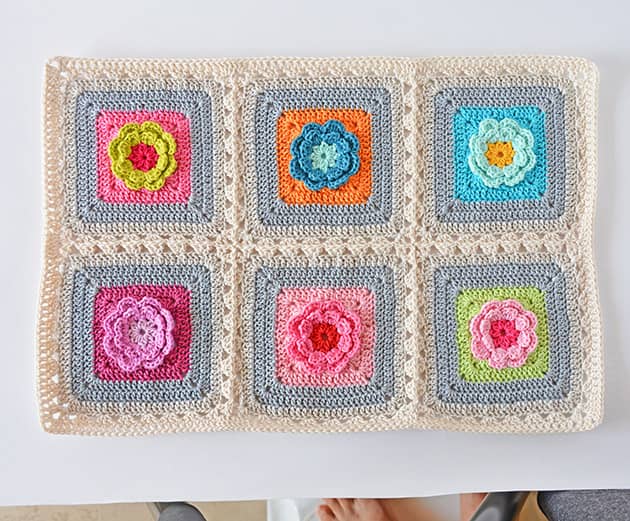 rnd 2: You will need about 12.2 gr of Granny Kit cotton for this rnd. We will be making a Linen st now. Attach Festive colour into any corner sp around. Make a sc in the same place attached.
  Now ch3, sk 4 dc’s and sc between 2 next dc’s, as seen in next picture, as seen in next picture. You can’t work over the yarn tail in this rnd, we will weave it in later.
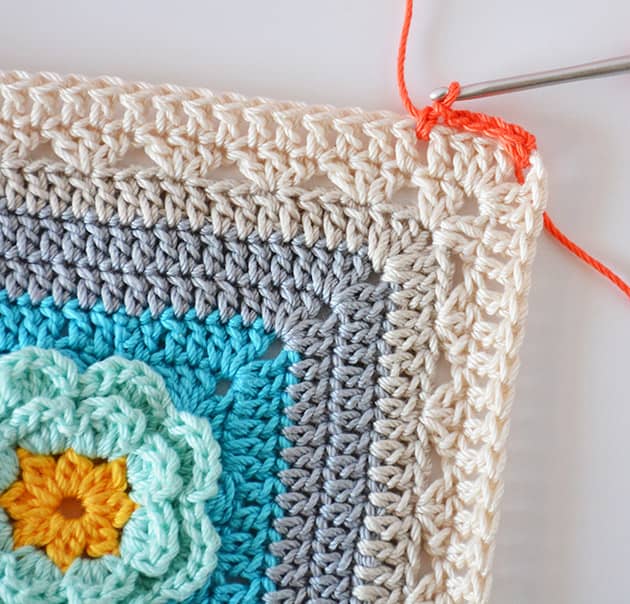 Continue working *[ch3, sk 3 dc’s, sc between next 2 sts] repeat between […] till you stand 4 dc’s before next corner sp, as in next picture.
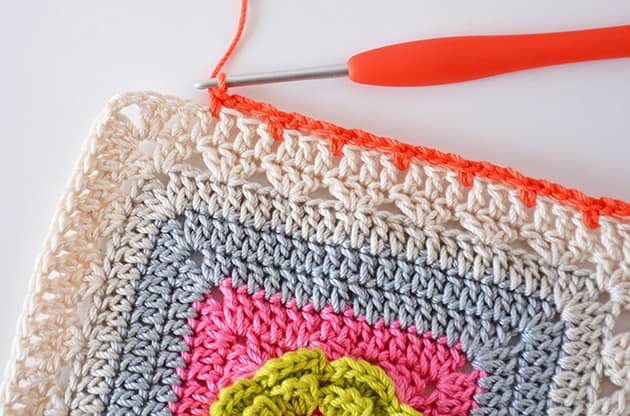 Ch3, sk 4 next sts and make: sc + ch3 + sc all into the next corner sp. Can you see how this Linen stitch is framing both previouse rnds? I just love LOVE it.
 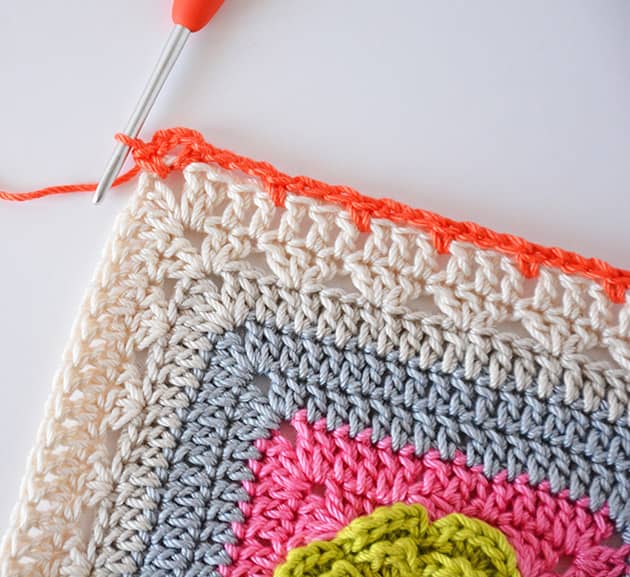 Now ch3, sk 4 sts and sc between next 2 sts* repeat between ** till you reach the starting point again.
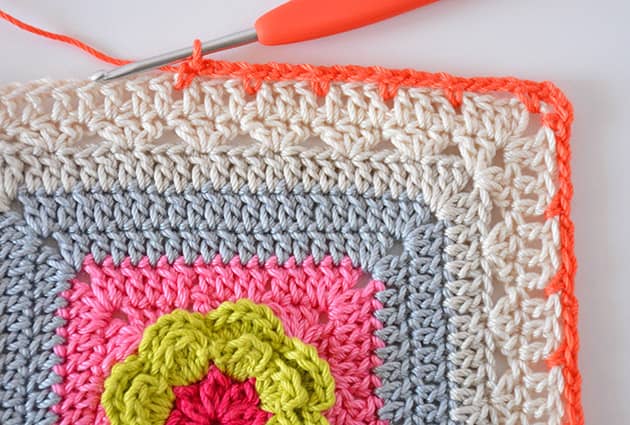 When you meet the sp you started from, sc + ch2 into the same sp to complete the corner. To close the rnd sl st into the first sc made in this rnd, where I show in next picture. Cut the yarn. You can weave in the tails now or leave them for later.
 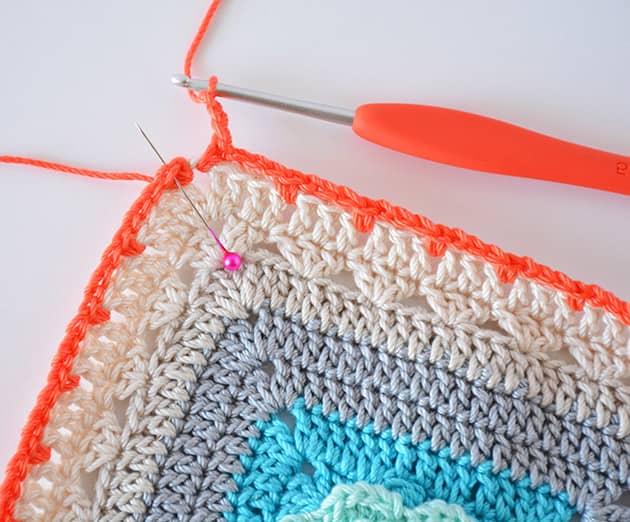 My work look like the next picture in the end of this rnd.
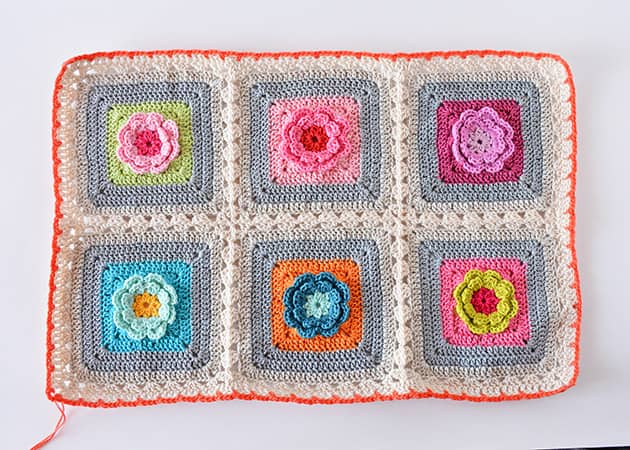 rnd 3: You will need about 39 gr of Granny Kit cotton for this rnd. Attach Sand colour into any corner sp around. Ch3 + dc into the sp where attached. *sk next sc, make 4 dc’s in next ch sp, till you reach next corner sp.
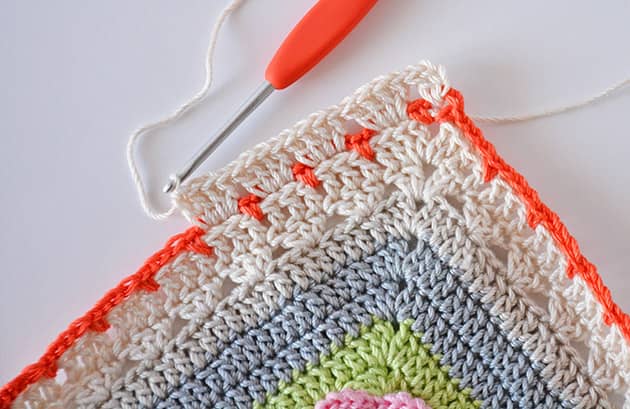 When you reach next corner make: 2 dc’s + ch2 + s dc’s into the corner sp* When you meet the yarn tails from previous rnd, work over them.
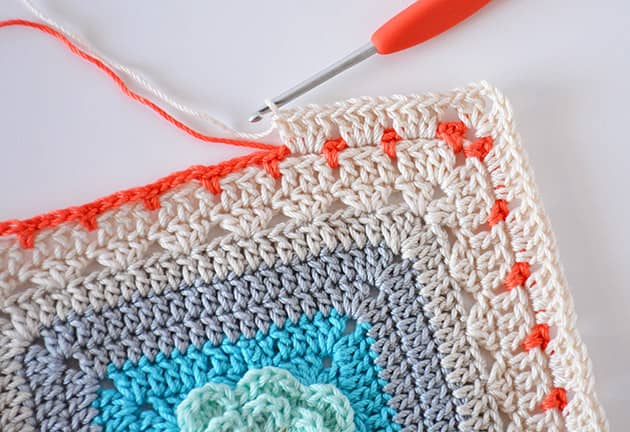 Repeat between ** till you meet the starting point again. Make 2 dc’s + ch2 into the first ch sp – corner completed. To close sl st into the 3rd ch of your initial ch3. Break the yarn.
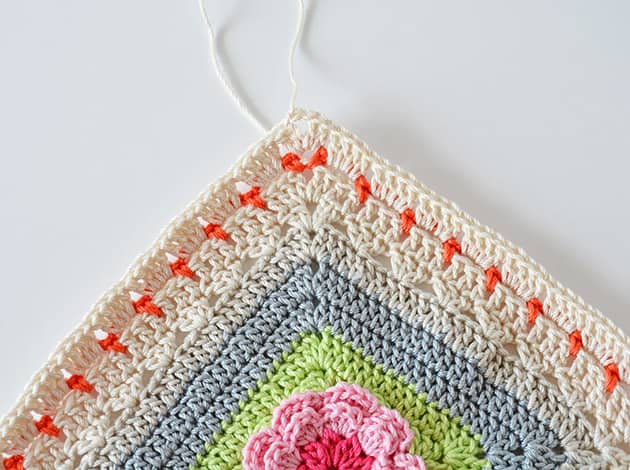 My work looked like this when I finished rnd 3. OMGosh do I love details? crazy about them.
 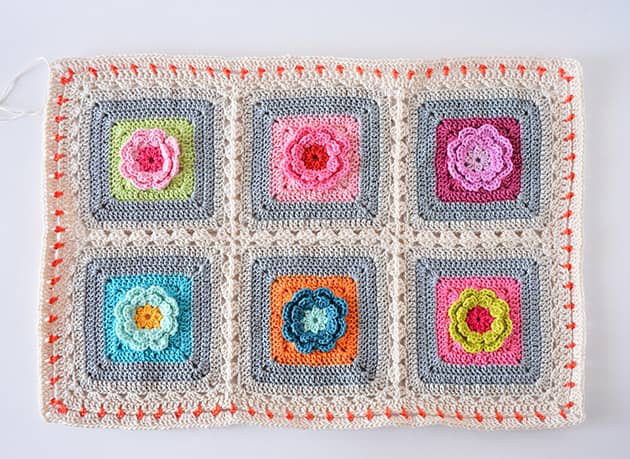 rnd 4: You will need about 12.2 gr of Granny Kit cotton for this rnd. We will be making the Linen st again. Attach Violet colour into any corner sp around. Sc in same place attached – seen in next picture.
 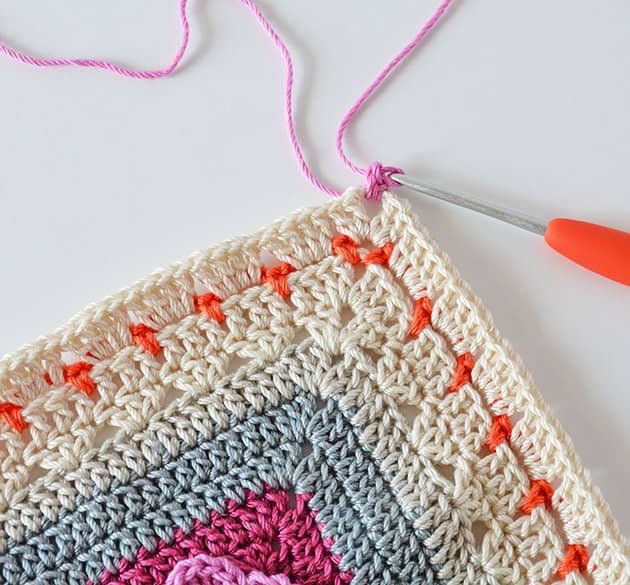 Now ch3, sk 2 dc’s and sc between next 2 dc’s, as seen in next picture.
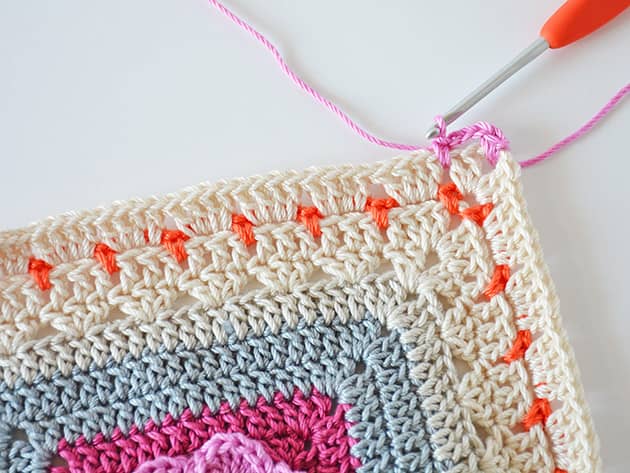 Continue working *[ch3, sk next 4 dc’s, sc between next 2 sts] repeat between […] till you stand 2 dc’s before next corner sp. Ch3, sk 2 next sts and make: sc + ch2 + sc all into the next corner sp.
 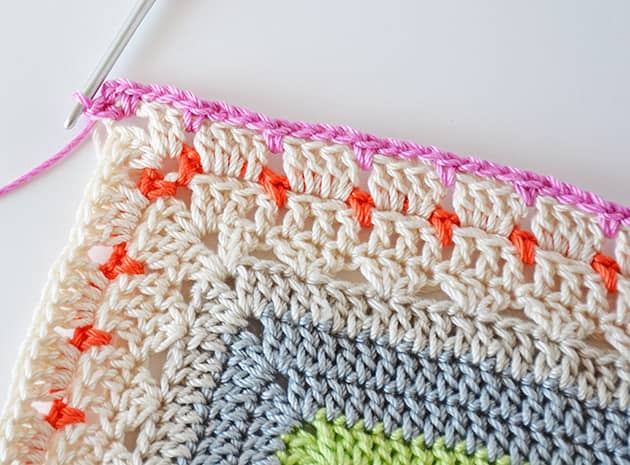 Ch3, sk 2 sts and sc between next 2 sts* repeat between ** till you reach the sp you started from. When you meet the sp you started from, sc + ch2 into the same sp to complete the cornet. To close the rnd sl st into the first sc made in this rnd.
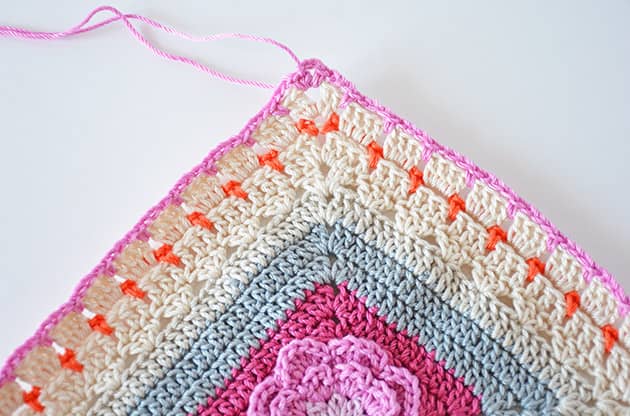 And here id my work at the end of rnd 4. Now I didn’t weave in ends at this point, I picked it up on the next rnd.
 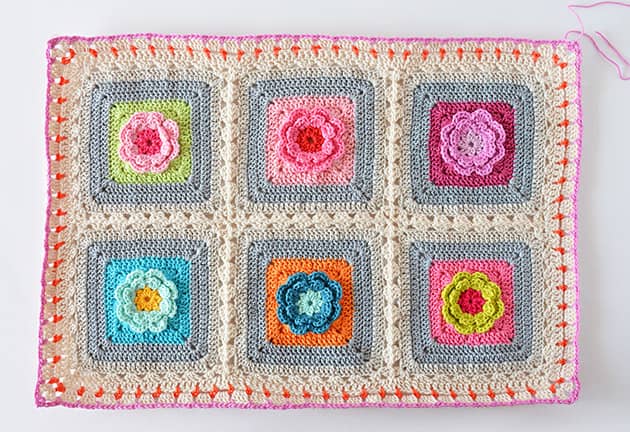 We have just completed the first part of the Love Garden crochet blanket Edging. On the next part we will be making a flat rnds of sc in each st around. We will be working the next rnds sts in back lp only, BLO, so from now on you crochet in BLO in each st. Keep your tension even and make sure you don’t crochet the next rnd too tight PLEASE.
rnd 5: You will need about 15.2 gr of Granny Kit cotton for this rnd. Attach Lilac colour in any corner sp, insert your hook under the corner ch sp. Sc in same place where attached. Make a sc in BLO of next st, now sc in each of the next ch3 sts, insert your hook into each individual ch st where I show below.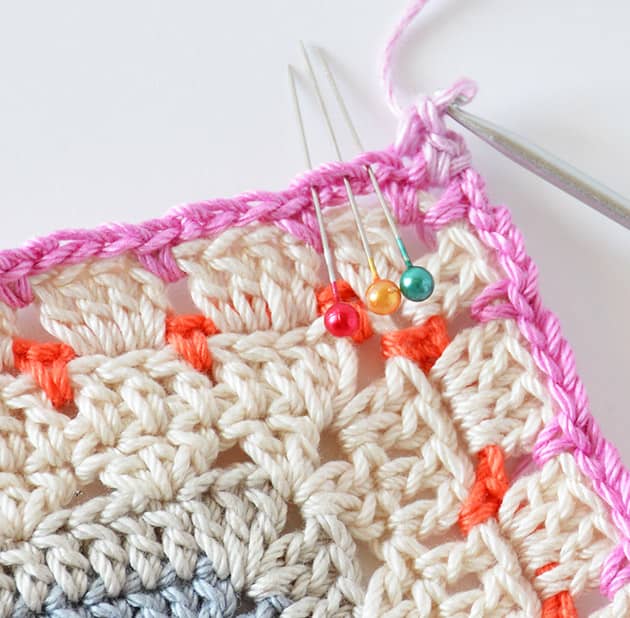 Continue sc in BLO of each st and in each ch st around. When you reach the corner make: 3 sc’s in corner ch sp (insert your hook under the ch sp). You can work over the yarn tail and when you meet the yarn tails from previous rnd, work over it as well. To make sure you’re not missing any stitch you can count in heart: 1,1,2,3,….. 1,1,2,3,….. 1,1,2,3,…… it will help you not skipping any st, especially the st right after the corner. Can you see this detailed beauty? do you love it just like I do? I AM IN LOVE!!!
 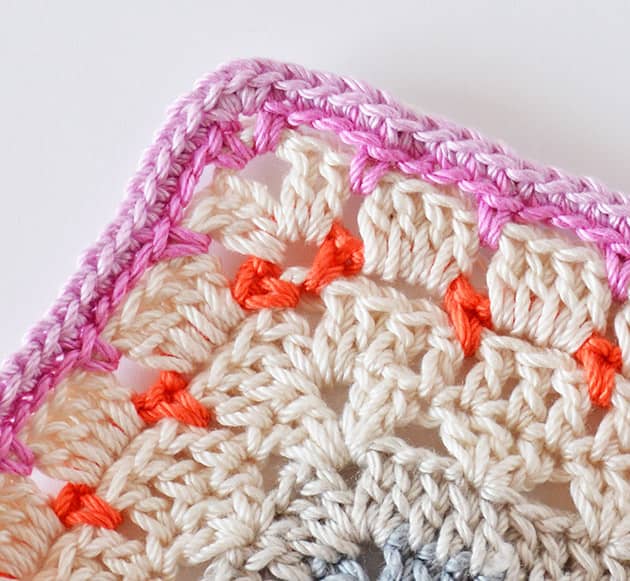 When you reach the starting point make 2 more sc’s into the same ch sp to complete corner.
Close this rnd with an invisible join as follow:
1. Cut the yarn leaving about 20 cm yarn tail and pull out the lp.
2. Thread a tapestry needle onto the yarn tail.
3. We are going to create an extra st so: skip the next sc and insert your tapestry needly into the next st as shown here: 4. Pull the yarn all the way through the st.
5. Insert your needle back in the last st made, insert your needle in the middle of the st and also through the back bar lp, as seen below. 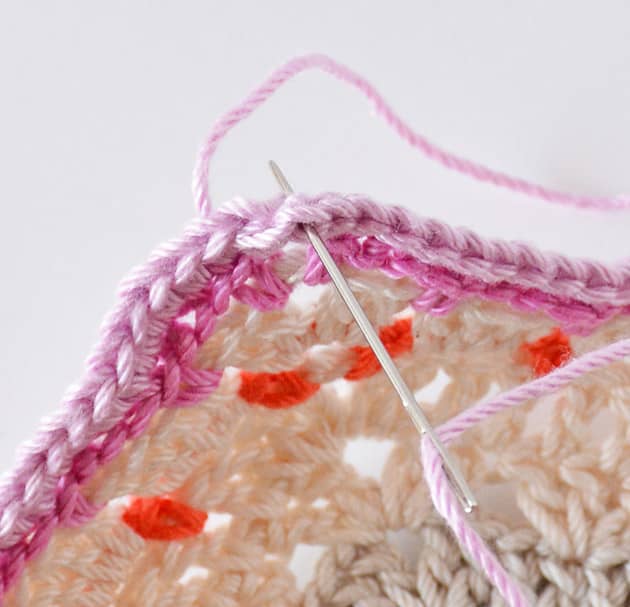 6. Pull the yarn all the way through the st and there you go. Look at this clean clean edge.
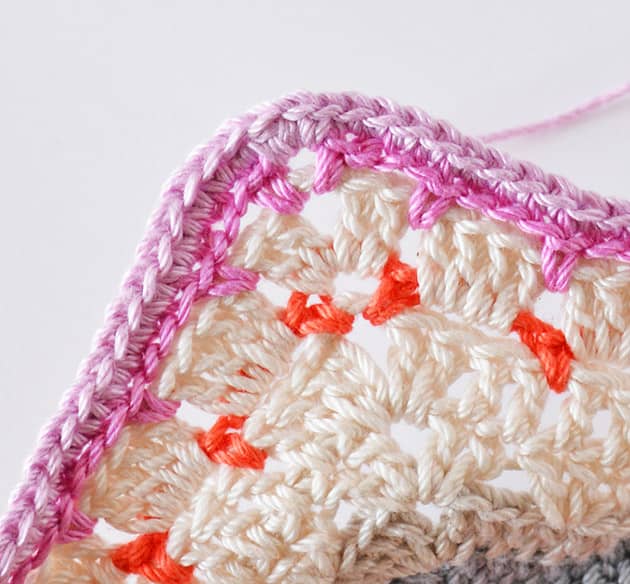 Now when your tapestry needle is on take a moment and weave in the tail to hide it.
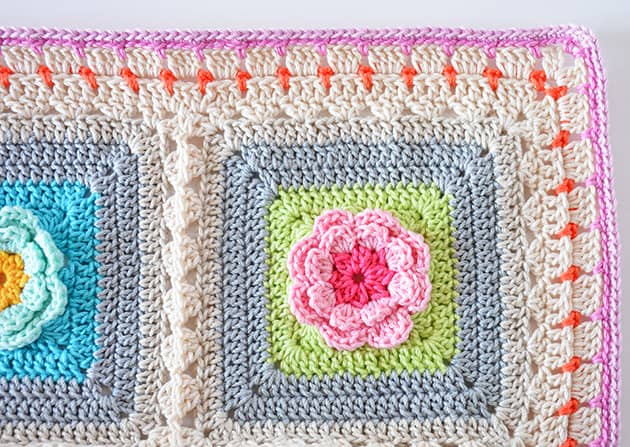 The next 3 rnds work pretty much the same so you can lay back and continue.
rnd 6: You will need about 17 gr of Granny Kit cotton for this rnd. Attach Sand colour into the middle st in one of the corners. Sc in same place where attached. Sc in BLO of each st around. Work over the yarn tail. When you reach the next corner make 3 sc’s in corner st (the second st in corner) in BLO.
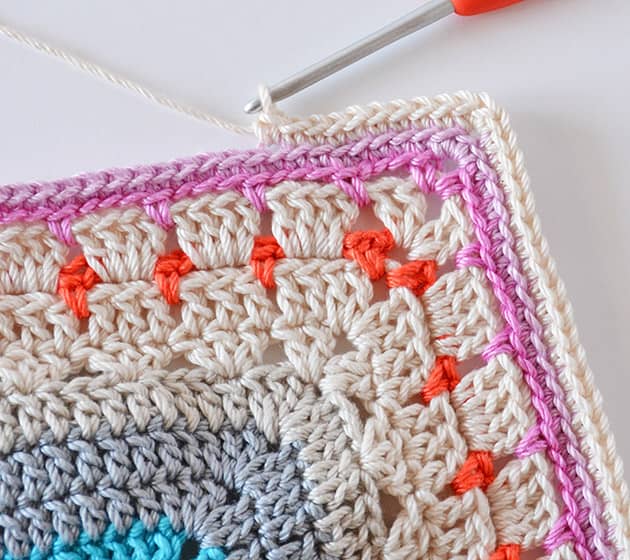 When you reach the starting point make two more sc’s in first st. Close rnd with invisible join as we did in previous rnd. Weave in the yarn tail.
 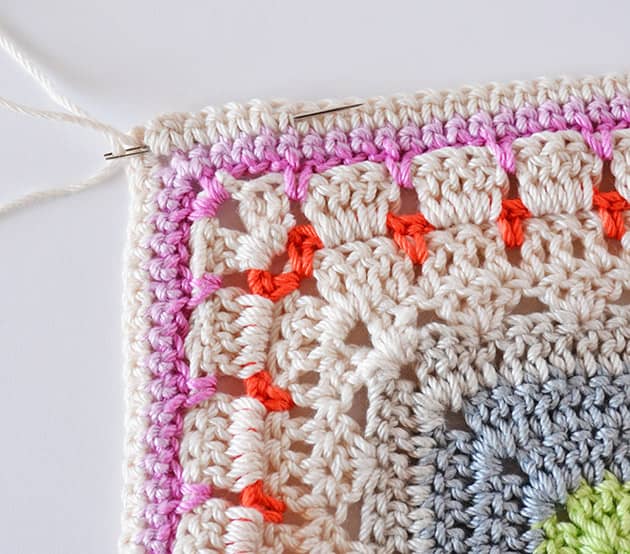 It looked like the next picture when I finished rnd 6.
  rnd 7: You will need about 17.4 gr of Granny Kit cotton for this rnd. Attach Daisy colour into the middle st in one of the corners. Repeat rnd 6.
rnd 8: You will need about 17.8 gr of Granny Kit cotton for this rnd. Attach Citron colour into the middle st in one of the corners. Repeat rnd 6. Your work will look like this now.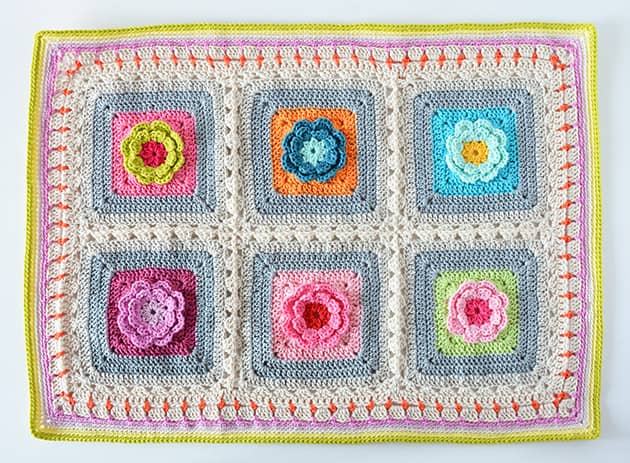 We will be making the last part of the framing now, which will close this special project. The last rnd makes a sweet little detail to end up the Love Garden story. I hope you’ll enjoy making it as much as I did.
  In this rnd you will work in BLO of each st. In corner sts you will work regularly into the cornet st.
rnd 9: You will need about 17 gr of Granny Kit cotton for this rnd. Attach ShaleGrey colour into any corner st, insert your hook into the st as normal and not to BLO, just as I show here.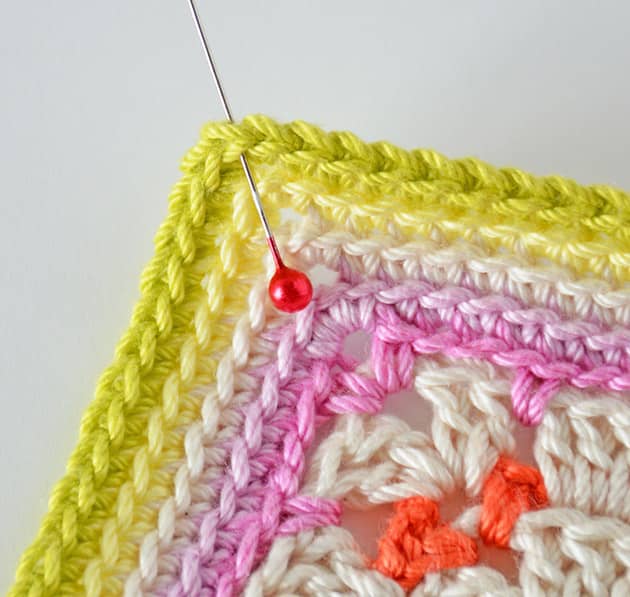 Now in same st where attached make: sl st + ch3 + sl st, as seen in next picture.
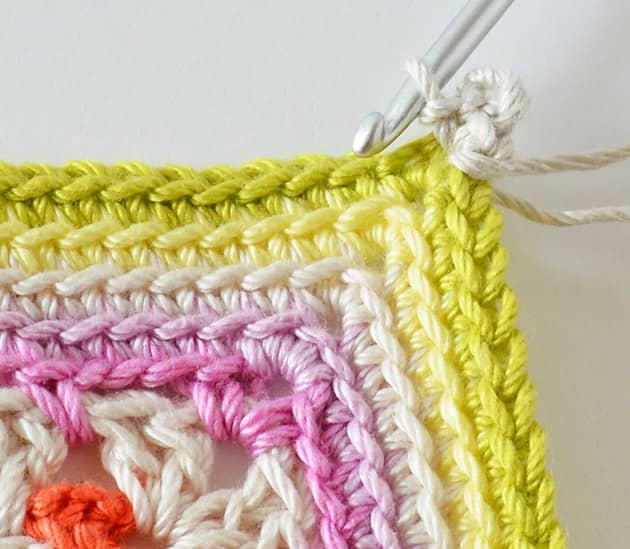 *[Continue working from here in BLO. Sl st in next 2 sts, in next st make: sl st + ch2 + sl st] repeat between […] till you reach next corner. in corners make: sl st + ch3 + sl st – insert your hook to the corner st as usual and not in BLO*. If before the corner st you don’t have 2 sts left, don’t worry, make just 1 sl st and than make the corner as instructed, just like I did.
 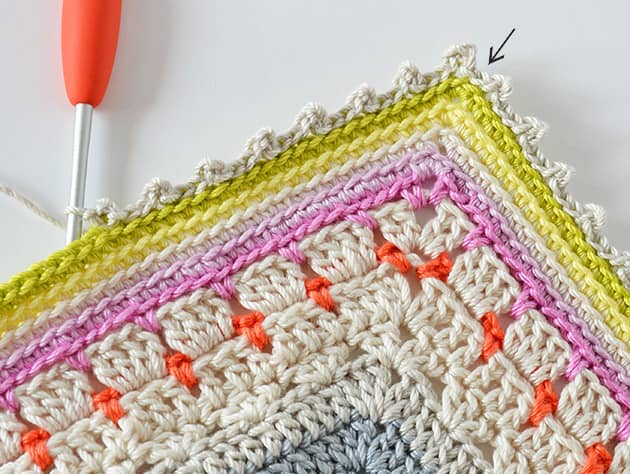 Repeat between ** till you meet the starting point again. When you are back at the first corner, cut the yarn and make an invisible join into the BLO of the first sl st made. Weave in all tails.
  Now look at it and tell me you are in LOVE. I am so in love with this tiny little detail. I’m in LOVE GARDEN. Fresh and Vital and so so SO cheerful. I LOVE my Love Garden Crochet Blanket Edging.
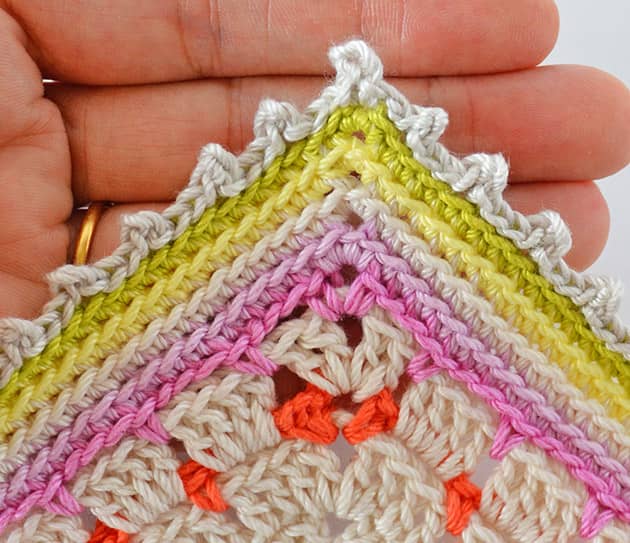 And that’s how it looks on the back. Still very tightly tidy (new ideas jump in my busy head right now).
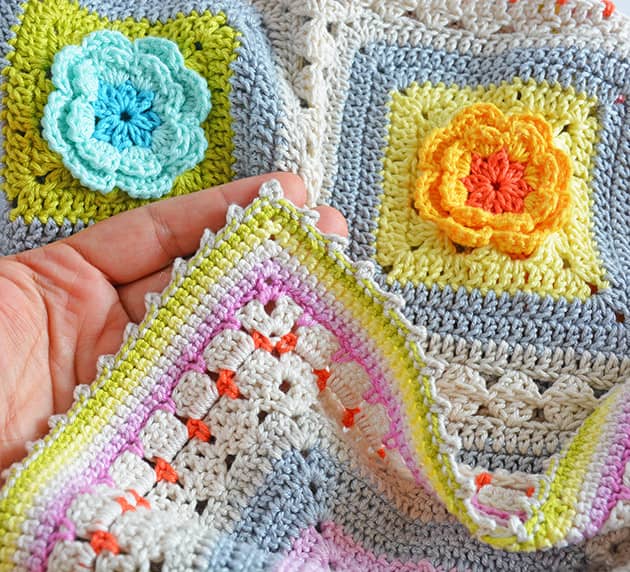 Here is a ‘Just words’ instruction which you can copy/paste. print.
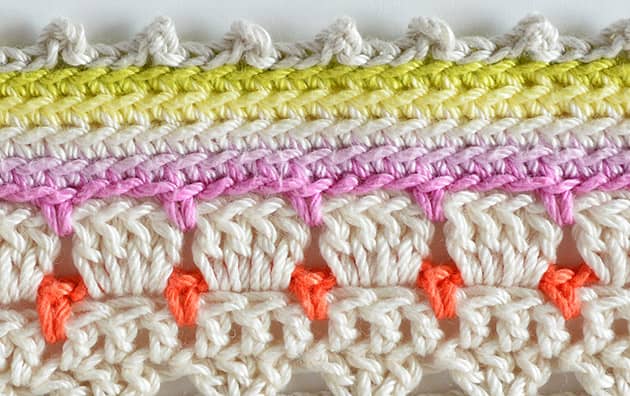 rnd 1: Attach Sand colour in any corner sp. Ch3 and make another dc into the same sp. Dc in each st around. When you reach the point where 2 squares are meeting make: 2 dc’s into corner sp + 1 dc into the st between 2 corners + 2 dc’s into next corner sp – that’s what you do in every meeting point. Continue making dc’s all the way and when you reach a corner make: 2 dc’s + ch2 + 2dc’s into the corner sp. When you reach the point you started from make: 2 dc’s + ch 2 into the first corner sp to complete it. Sl st in the 3rd ch of the initial ch3 to close. Break the yarn.
rnd 2: Attach Festive colour into any corner sp around. Make a sc in the same place attached. ch3, sk 4 dc’s and sc between next 2 dc’s. Ch3, sk 4 dc’s and sc between 2 next dc’s. Continue working *[ch3, sk 3 dc’s, sc between next 2 sts] repeat between […] till you stand 4 dc’s before next corner sp. Ch3, sk 4 next sts and make: sc + ch3 + sc all in next corner sp. ch3, sk 4 sts and sc between next 2 sts* repeat between ** till you reach the sp you started from. When you meet the sp you started from, sc + ch2 into the same sp to complete the cornet. Sl st in first sc made to close. Break the yarn.
rnd 3: Attach Sand colour into any corner sp around. Ch3 + dc into the sp where attached. *sk next sc, make 4 dc’s in next ch sp, till you reach next corner sp. When you reach next corner make: 2 dc’s + ch2 + s dc’s into the corner sp*. Repeat between ** till you meet the starting point again. Make 2 dc’s + ch2 into the first ch sp – corner completed. Sl st in 3rd ch of your initial ch3. Break the yarn.
rnd 4: Attach Violet colour into any corner sp around. Sc in same place attached. ch3, sk 2 dc’s and sc between next 2 dc’s. ch3, sk next 4 dc’s and sc between 2 next dc’s. Continue working *[ch3, sk 4 dc’s, sc between next 2 sts] repeat between […] till you stand 2 dc’s before next corner sp. Ch3, sk 2 next sts and make: sc + ch2 + sc all into the next corner sp. ch3, sk 2 sts and sc between next 2 sts* repeat between ** till you reach the sp you started from. When you meet the sp you started from, sc + ch into the same sp to complete the cornet. Sl st in irst sc made to close. Break the yarn.
Work the next rnds sts in back lp only, BLO. Keep your tension evenly and make sure you don’t crochet the next rnd too tight.
rnd 5: Attach Lilac colour in any corner sp. Sc in same place where attached. Make a sc in BLO of next st, now sc in each of the next ch3 sts, insert your hook into each individual ch st. Continue sc in BLO of each st and in each ch st around. When you reach the corner make: 3 sc’s in corner ch sp (insert your hook under the ch sp). When you reach the starting point make 2 more sc’s into the same ch sp to complete corner. Close this rnd with an invisible join. Break the yarn
rnd 6: Attach Sand colour into the middle st in one of the corners. Sc in same place where attached. Sc in BLO of each st around. When you reach the next corner make 3 sc’s in corner st (the second st in corner) in BLO. When you reach the starting point make two more sc’s in first st. Close rnd with invisible join. Break the yarn
rnd 7: Attach Daisy colour into the middle st in one of the corners. Repeat rnd 6.
rnd 8: Attach Citron colour into the middle st in one of the corners. Repeat rnd 6.
rnd 9: Attach ShaleGrey colour into any corner st, insert your hook into the st as normal and not to BLO. Make: sl st + ch3 + sl st, in same st where attached. *[Continue working from here in BLO. Sl st in next 2 sts, in next st make: sl st + ch2 + sl st] repeat between […] till you reach next corner. in corners make: sl st + ch3 + sl st – insert your hook to the corner st as usual and not in BLO*. If before the corner st you don’t have 2 sts left, don’t worry, make just 1 sl st and than make the corner as instructed. Repeat between ** till you meet the starting point again. When you are back at the first corner, cut the yarn and make an invisible join into the BLO of the first sl st made.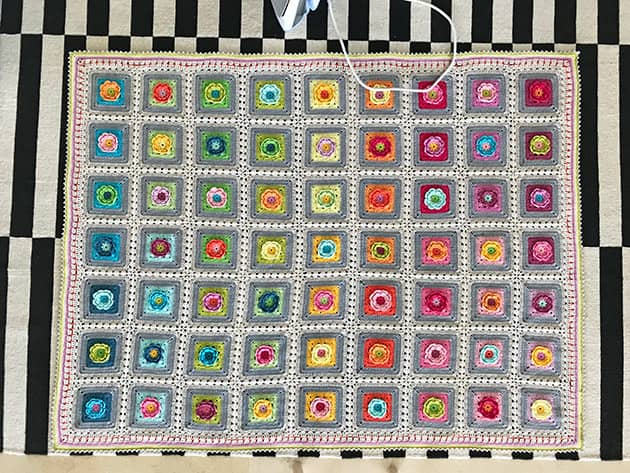 BLOCKING
As in my Stripes & Colours blanket I spread my Love Garden on a carpet, and steamed over the border and all over the blanket with an iron set on steam mode, on the medium – high heat level. DO NOT let your iron touch the blanket, keep it about 5 c”m away from it. Steam over each corner and stretch it a little. Make sure you don’t flatten the flowers, let them stay Fresh and Vital (just like my mum used to say). When your blanket and border are all flat and neat, lay flat to dry overnight. The steam blocking will give your blanket a lovely drape and will make it feel softer.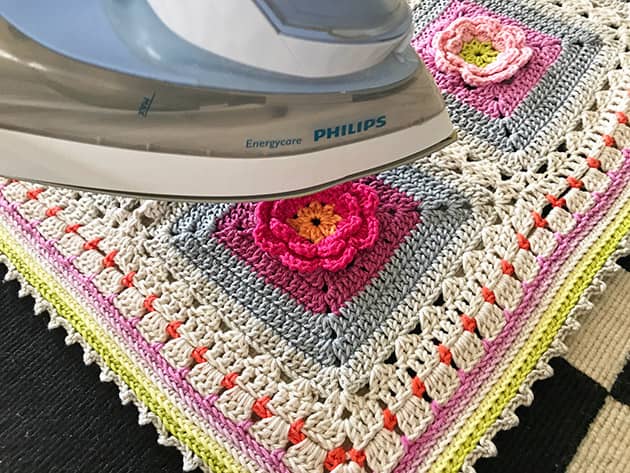

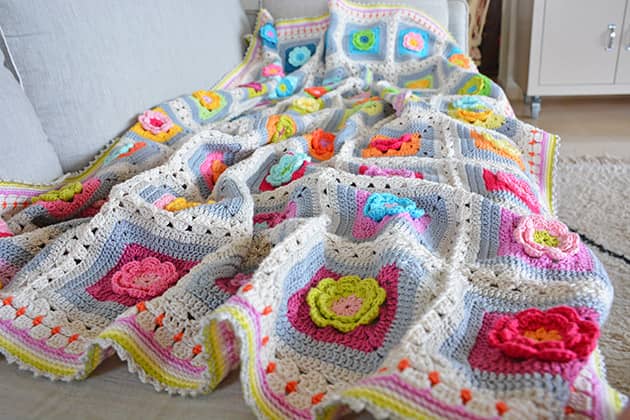 So this is it. This is the end of a VERY special ‘deep in my heart’ project. If you have followed this journey from the very start up to this moment you know what huge amount of memories and daughter – mother love it carries. This is the garden that will host my love for my mom in a shape of a blanket, it will cover our family for years to come with its ‘love-life’ happy colours and feeling. My mom covered us with her warm motherly personality all the years and it feels like the Love Garden blanket has been here for ages.
 Thank you so much for following me on this journey, I really appreciate your reading, your comments and you warm words. If you ever feel inspired to create you own Love Garden creation here are some essential links you’ll need:
The love Garden Yarn Pack
The Flower Square pattern
The Love garden Square pattern
Squares Colour list download here: LoveGardenCoList
The Love Garden Joining Tutorial
P.S just a quick note to let you know my Etsy shop will only offer patterns for 3 weeks during September, due to a family vacation. We will be traveling all the way to Vietnam for the Jewish holiday season. You can’t imagine me here without my mom during the up coming holidays ha? so I’m running away from this unbearable sadness. We will be away for more than 3 weeks and for this duration my shop will be offering patterns only. Please place your cotton / kits orders before Sep 4th if you want it to be sent just before we leave. xxxMo
44 comments on Love Garden Crochet Blanket Edging and Blocking Tutorial
Carmen
Thank you! I am still building my flower squares, enjoying every minute. I love the border edging – this pattern makes me so excited to keep going! This project has brought me so much joy. Have a wonderful day.🌸❤️
Mo Malron (author)
Thank you Carmen, so happy you enjoy it. xxxMo
Lucy, Kent ~ England
I’ve only just discovered your pattern, 2 days ago I learnt that I was to lose my beloved widowed brother in a few short months to an aggressive cancer.
5 years ago I made him a granny square blanket which he loves, now I’ll crochet your `love garden’ squares (he was a professional gardener for many years and still loves gardens) when I sit with him as he sleeps or has his medication.
It will be a memory blanket filled with all kinds of memories.
I hope that being away from home helps you to find enjoyment in your holiday.
Lucy
Mo Malron (author)
It will be filled with all kind of memories Lucy and with the love of brother and sister and you’ll enjoy every minute. I send all my love all the way to you and to your beloved brother. xxxMo
Michelle
This is a beautiful ending to go with a beautiful daughter-mother lifetime story. Through this post, which finishes the Love Garden Blanket, I can sense the love you had for your mom which continues even now and the love she had for you. I think of you with each flower square I complete, and imagine your time together will never be forgotten because you have those beautiful and colorful flowers to remind you of it. I’m currently up to flower square #17. Have a wonderful time on vacation with your precious family. Your building with them those precious memories she built with you. This first year will be a new year of firsts without her and will be difficult, but God’s grace is sufficient to see you through. Sending you much love and many hugs. XO
Mo Malron (author)
Sending you much love all the way back Michelle, I will post some photos from Vietnam for you, xxxMo
Sandra
A beautiful edging to this meaningful Love Garden blanket.
Liza
Hello Mo, i visited Etsy.com for the yarn pack but it’s sold out. You ‘ll give it again?
Mo Malron (author)
Liza, I have just listed 5 more kits in the shop, go get yourself 1 before they are also sold out. Thank you
Anna Zielińska
Moran, I love your colorful projects. I look with joy at everyone and wait for the next. It is a pity that I live so far away from you because I would like to see these colorful wonders with my own eyes. Best wishes Ania
Anna Zielińska
Moran, I love your colorful projects. I look with joy at everyone and wait for the next. It is a pity that I live so far away from you because I would like to see these colorful wonders with my own eyes. Best wishes Ania
Lily
Thank you for sharing your lovely journey. I’m sure this memorable blanket will embrace you with loads of Mommy love and hugs. Enjoy your time away and hope the healing will be with you.
Carrie Fisher
That’s is absolutely beautiful, I wonder how long this beauty takes you to do them? Love the colours such a vibrant blanket 😍 x
Michaela Tarlton
Such a beautiful blanket made with love and fond memories – looking forward to making it .
@monicacakemad
What a beautiful edging
Daniela Kodaira
Your work is so inspiring! I work sewing objects, but I love every project if yours. You have encouraged me to try some more defying crochet projects. Love from Brazil.
Jennifer
I just absolutely love the colors you use in all your projects. I’m thinking to use this pattern to create a pillow for my daughter’s room.
Nannette
I am so looking forward to making my own love garden blanket. I lost my mum 2 years ago and she loved my garden, she would love this blanket, it will be made with her in my heart and mind. Thank you for sharing your journey.
Bernice
I love the rainbow effect this can create. Great inspiration.
Diana Dix
Hi Mo , replying to your giveaway🌺 .. thank you so much for a fantastic pattern of your Love Garden and the beautiful story behind it ❣️🌼I look forward to each square so much💗🌸
Have happy and much deserved holiday.. lots of hugs sent across the ocean blue 😘🤗
Carmen
The edging does not disappoint. The blanket is stunning from start to finish!
Loly Bethencourt
Oh! Thank you, I love The Garden blanket and this border ending is very beautiful . I send you much love🌸
Pilar
What a beautiful blanket!!!!!
Carla
W
Carla
Wonderful
Sue H
This is so gorgeous. I love it
Kim
Everything about this blanket is beautiful!! I must add this to my to do list!! 😄
Yvonne Unrein
Such a pretty blanket!
Kelli Elijah
I have made one square and started another, this is going to be a beautiful blanket! You are so talented, I love your work!
marina genovesi
E’ davvero bellissimo e pieno d’amore questo giardino!
Julie Hockett
Thank you for sharing your pattern! I love the story behind it. So special❣️
Verónica Soto Schmidt
Me encanta todo lo que haces!! Amo esos colores ,son muy vivos y realmente llaman la atención y se ve que son de muy buena calidad!!! Además realzan tu trabajo y la verdad dos muy prolija! Tus trabajos realmente son de muy buena calidad!! Te escribo de Buenos Aires ,Argentina. Muchos besos para ti! Y felicitaciones!!
Timpi
Oh my cuteness! This is next on my list. I L💗VE it! Thank you for sharing. I am so happy I found your blog!
Teresa Alvaro
I love it <3
Kelpad
Perfect for my girlfriends new granddaughter (first pink one after 5 boys!) I better get hooking
Danijela
Lovely pattern,great colors!!So generous of you to share it.
Analía
Que hermosura!!!! Felicitaciones, tus trabajos son divinos!!!!
Analía
Bella!!!!!!
Joan Barnish
I’m working on this now would love the contest version. I think I subscribe to blog already?
Erica
What a beautiful blanket! Thank you for sharing.
Orna Klausner
I bought the kit while reading the blog accompanying the journey of Moran and her mother. I could not help buying it, I just fell in love even though my knowledge of knitting is very basic.
This week I finished the blanket that came out exactly the same. An exciting blanket, the most beloved one in the world. A pleasant experience that took several months and caused a surprise to all members of the family, a lot of enthusiasm and emotional reactions. I do not think there’s anything else like that in the world. This blanket is otherworldly.
Mo Malron (author)
Orna Thank you millions for making this blanket, Your Love Garden came out just as beautiful and special as you are <3
אורנה יקרה ומיוחדת, אלפי תודות על העשייה עצמה ועל התגובה המרגשת.
Anne Min
Love, love this blanket pattern and the kit!!! Whenever I look at my blanket I cannot stop smiling!! Definitely going to go for a second one. Thank you Mo!
Mo Malron (author)
Thank you!!! this blanket makes may heart sing every-time I look at it.